Intel 第四代至强处理器 Sapphire Rapids (SPR) 支持
- 支持包括 enqcmd(s)、AMX 系列指令等。
- 支持 DSA (Data Streaming Accelerator)、IAA (Intel Analytic Accelerator)、QAT (QuickAssist Technology,OOT 支持)、DLB (Dynamic Load Balancer,OOT 支持)加速器。
- 支持 SIOV (Scalable IO virtualization)。
其中 Intel® DSA 是集成到英特尔® 处理器(从第四代英特尔® 至强® 处理器开始)的高性能数据复制和转换加速器,它的目标是优化高性能存储、网络、持久内存和各种数据处理应用程序中常见的流数据移动和转换操作。
本文笔者将对 Intel® DSA 的配置和测试作简要介绍和分析。
DSA 配置
笔者的测试环境如下:
- CPU:Intel(R) Xeon(R) Platinum 8475B
- RAM:DDR5 32GB x 16
- Kernel:Vanilla Kernel 6.4.16
- OS:Alibaba Cloud Linux 3
- Sockets:2
硬件与内核要求
硬件要求
首先你的 CPU 需要有 DSA 加速器,需要是 Intel 第四、五代至强 SPR 处理器系列。关于 Intel 第四、五代至强处理器的相关比较信息,请查看下面两个链接以及 Intel@ Built-In Accelerators:
查看当前设备的 DSA 硬件,确认处理器以及集成 DSA 硬件:
ls -df /sys/bus/dsa/devices/dsa*

启用 DSA 需要两个条件:
- 在 BIOS 中启用 Virtualization technology for directed I/O (VT-d) 。
- Linux kernel version version 要大于等于 5.10。(另一种说法是 5.18,如果需要启用 SWQ)
排查 VT-d 是否启用的办法:
dmesg -t | grep ACPI | grep DMAR
如果启用了的话,可以看到类似输出,

内核要求
建议使用 >= 5.18 版本的内核。
在内核编译选项中启用 IOMMU 和 DSA 驱动:
CONFIG_INTEL_IOMMU=y
CONFIG_INTEL_IOMMU_SVM=y
CONFIG_INTEL_IOMMU_DEFAULT_ON=y
CONFIG_INTEL_IOMMU_SCALABLE_MODE_DEFAULT_ON=y

CONFIG_INTEL_IDXD=m
CONFIG_INTEL_IDXD_SVM=y
CONFIG_INTEL_IDXD_PERFMON=y
对于 Vanilla Kernel,一般默认情况下,上面这些选项都已经打开了。CONFIG_INTEL_IOMMU_SCALABLE_MODE_DEFAULT_ON 默认没有设置,也可以不用开启,按照下文添加启动参数也可以解决。
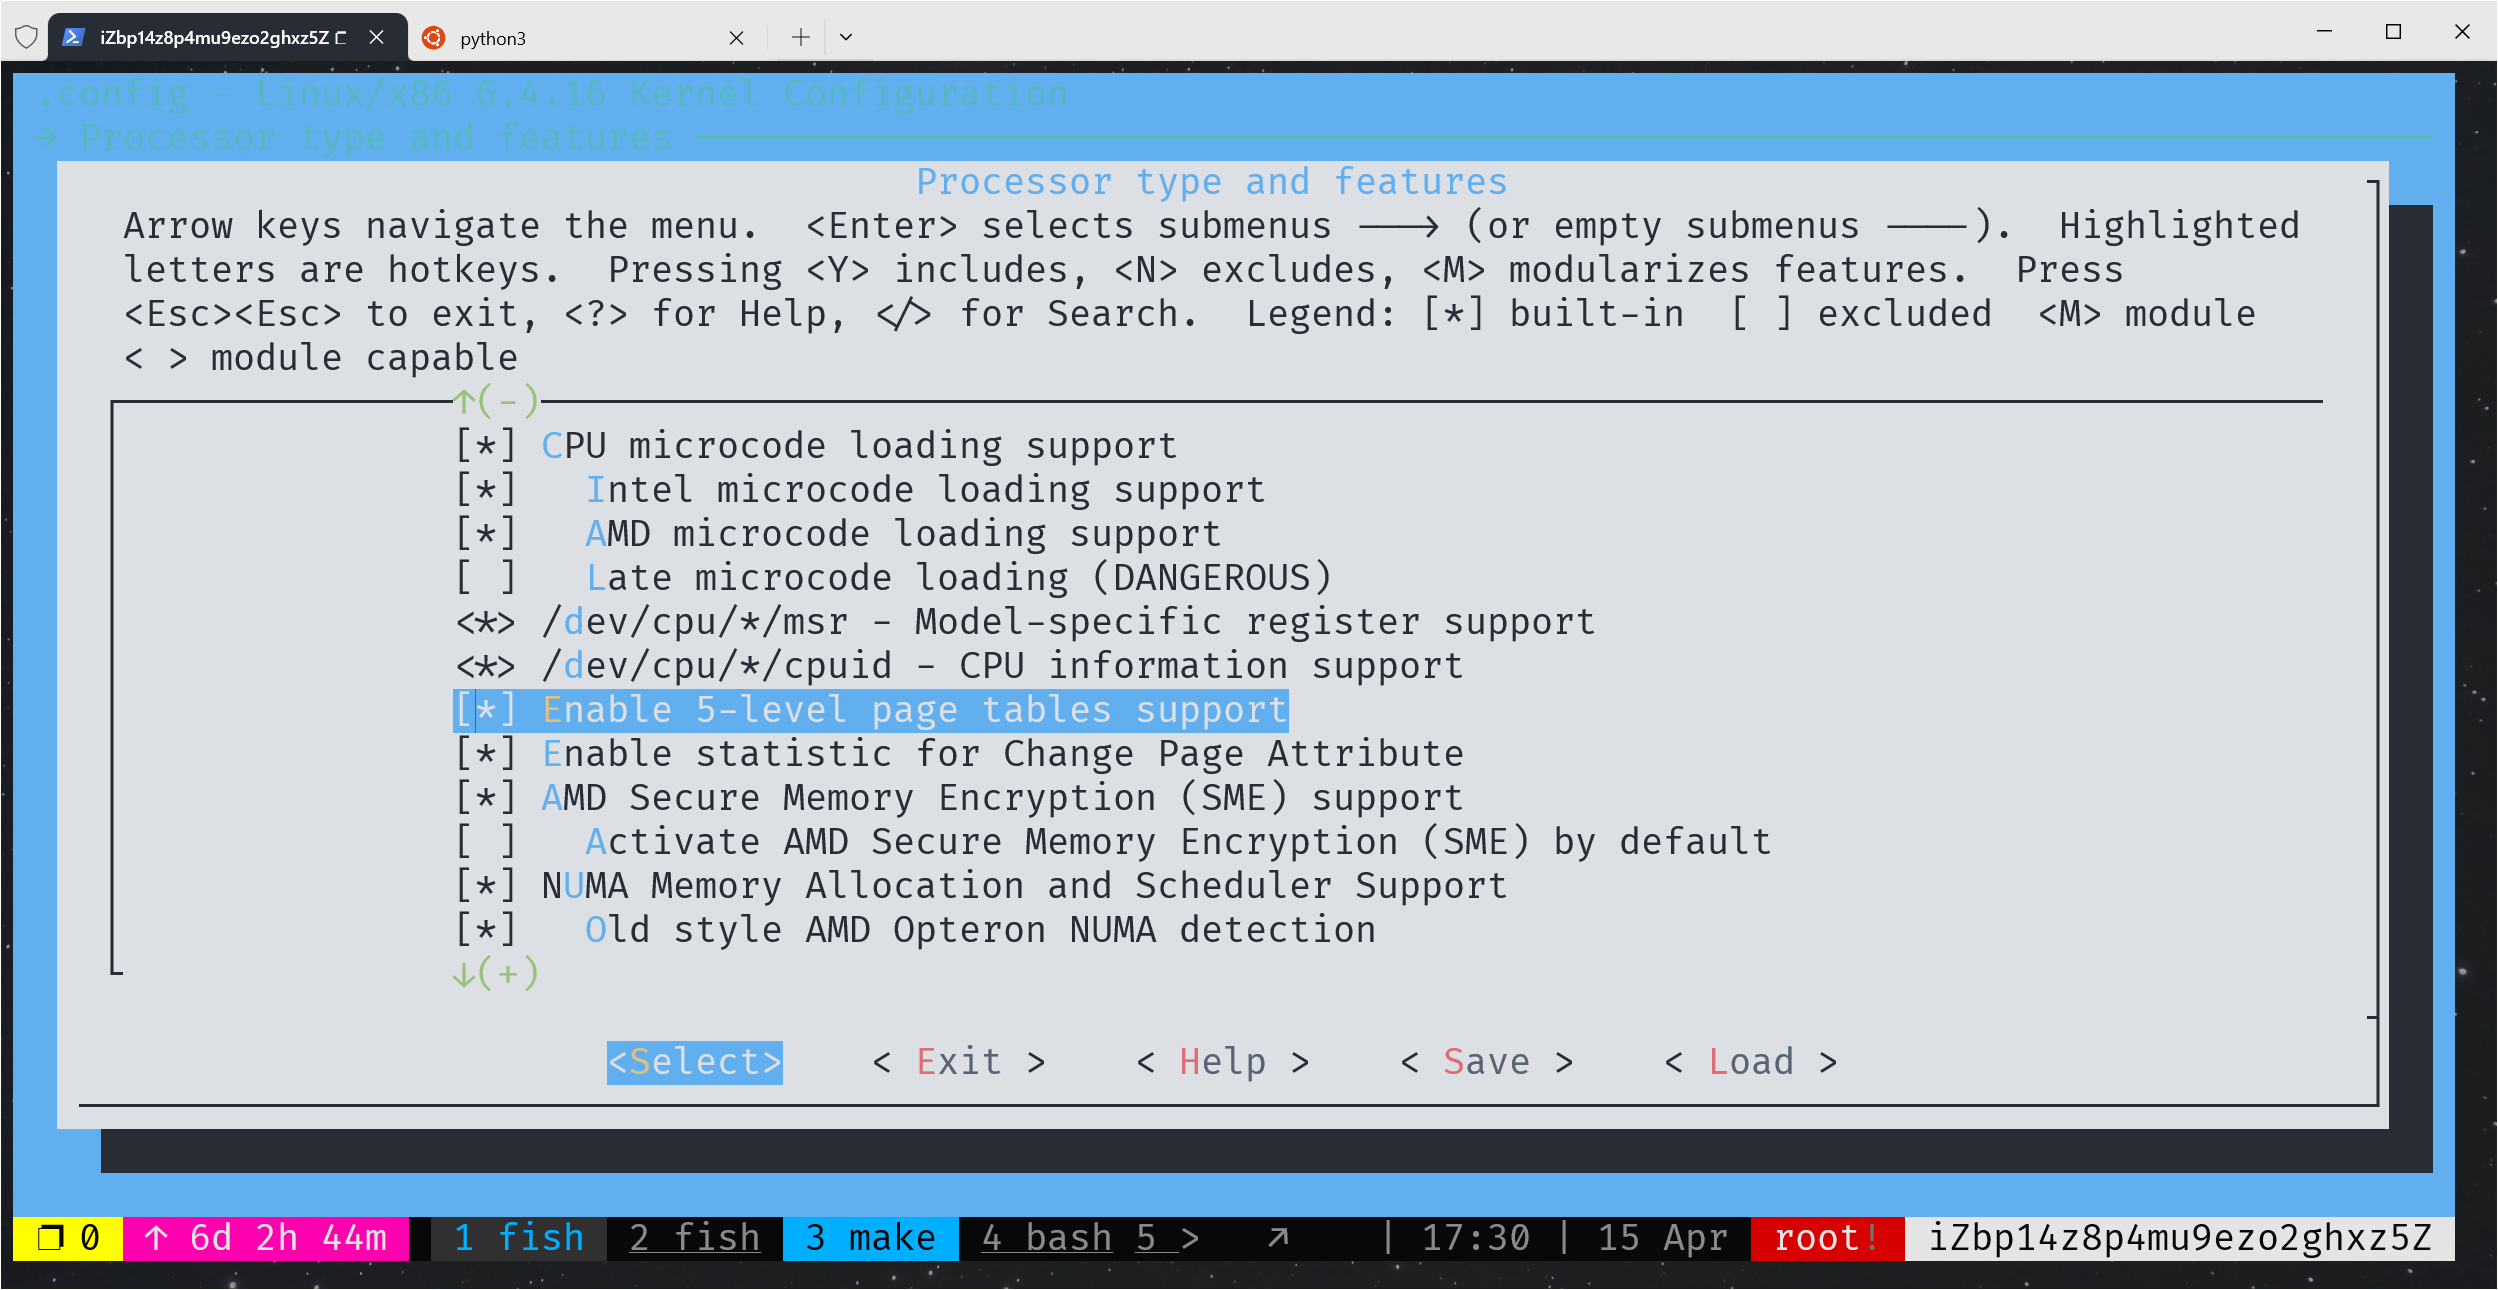
❗❗❗ 打开 5 级页表支持,Processor type and features -> Enable 5-level page tables support,一定要打开。(别问我怎么知道的,官方手册也没有提到过,被这个问题卡了好久)
编辑 /etc/default/grub,添加 intel_iommu=on,sm_on。然后更新生成新的启动配置,
sudo grub2-mkconfig -o /boot/efi/EFI/alinux/grub.cfg

用户态配置
需要安装以下组件:
- Accel-config / libaccel-config,DSA 的用户态配置工具
- libnuma,NUMA support for Linux
- Intel® DSA Performance Micros,DSA 性能测试工具,后文将使用它来进行测试
安装 accel-config,开启 test,
git clone https://github.com/intel/idxd-config.git
cd idxd-config
./autogen.sh
./configure CFLAGS='-g -O2' --prefix=/usr --sysconfdir=/etc --libdir=/usr/lib64 --enable-test=yes
make
sudo make install
编译安装后可以通过 accel-config test 来测试。
libnuma 可以通过 yum 安装,如果安装 dsa-perf-micros 找不到库报错,可以尝试编译安装。
安装 dsa_perf_micros,打开调试日志信息,
git clone https://github.com/intel/dsa_perf_micros/
cd dsa_perf_micros
./autogen.sh
./configure CFLAGS='-g -O2 -DENABLE_LOGGING' --prefix=/usr --sysconfdir=/etc --libdir=/usr/lib
启用 DSA
启用 DSA 可以采用命令行手动配置,也可以使用 sh 脚本 / py 脚本,本质上还是配置一个 JSON 格式的 conf。
在 dsa-perf-micros/configs 和 idxd-config/contrib/configs均可以找到配置示例文件。
加载配置文件并启用 DSA:
accel-config load-config -c <config> -e
将当前配置保存到文件,
accel-config save-config -s <config>
查看当前 DSA 配置,
accel-config list
关闭某个 DSA,
accel-config disable-device dsa<DSA_NUM>
根据我的实践,比较好用方便的办法是使用 dsa-perf-micros 提供的 scripts/setup_dsa.sh 配置脚本,可以方便地设置 num wqs,wq id,wq mode,wq size 等,并且在 DSA 已经开启的情况下,能够自动关闭和开启 DSA。
例如配置 Dedicated WQ of max size (128) with 4 engines,
./scripts/setup_dsa.sh -d dsa0 -w 1 -m d -e 4

不过有个缺点,这个 scripts 不支持自定义 max_batch_size。如果需要更自定义的配置,建议直接修改配置文件,并手动启用。例如下面是一份启用 dsa0,1 个 engine,1 个 workqueue,max_batch_size 修改为 64,的完整配置:
[
  {
    "dev":"dsa0",
    "read_buffer_limit":0,
    "max_groups":4,
    "max_work_queues":8,
    "max_engines":4,
    "work_queue_size":128,
    "numa_node":0,
    "op_cap":"00000000,00000000,00000000,00000000,00000000,00000000,00000001,003f03ff",
    "gen_cap":"0x40915f0107",
    "version":"0x100",
    "state":"enabled",
    "max_read_buffers":96,
    "max_batch_size":1024,
    "max_transfer_size":2147483648,
    "configurable":1,
    "pasid_enabled":1,
    "cdev_major":237,
    "clients":0,
    "groups":[
      {
        "dev":"group0.0",
        "read_buffers_reserved":0,
        "use_read_buffer_limit":0,
        "read_buffers_allowed":96,
        "grouped_workqueues":[
          {
            "dev":"wq0.0",
            "mode":"dedicated",
            "size":128,
            "group_id":0,
            "priority":10,
            "block_on_fault":0,
            "max_batch_size":64,
            "max_transfer_size":2097152,
            "cdev_minor":0,
            "type":"user",
            "name":"app0",
            "threshold":0,
            "ats_disable":-2,
            "state":"enabled",
            "clients":0
          }
        ],
        "grouped_engines":[
          {
            "dev":"engine0.0",
            "group_id":0
          }
        ]
      },
      {
        "dev":"group0.1",
        "read_buffers_reserved":0,
        "use_read_buffer_limit":0,
        "read_buffers_allowed":96
      },
      {
        "dev":"group0.2",
        "read_buffers_reserved":0,
        "use_read_buffer_limit":0,
        "read_buffers_allowed":96
      },
      {
        "dev":"group0.3",
        "read_buffers_reserved":0,
        "use_read_buffer_limit":0,
        "read_buffers_allowed":96
      }
    ],
    "ungrouped_engines":[
      {
        "dev":"engine0.1"
      },
      {
        "dev":"engine0.2"
      },
      {
        "dev":"engine0.3"
      }
    ]
  }
]
常见问题与解决方案
Unable to turn on user SVA feature:
# dmesg | grep idxd
[    7.927615] idxd 0000:f2:01.0: enabling device (0144 -> 0146)
[    7.927634] idxd 0000:f2:01.0: Unable to turn on user SVA feature.
[    7.947937] idxd 0000:f2:01.0: Intel(R) Accelerator Device (v100)
[    7.947971] idxd 0000:f2:02.0: enabling device (0140 -> 0142)
[    7.947990] idxd 0000:f2:02.0: Unable to turn on user SVA feature.
[    7.987380] idxd 0000:f2:02.0: Intel(R) Accelerator Device (v100)
[ 1543.197818] idxd 0000:f2:01.0: Unable to turn on user SVA feature.
[ 1543.202996] idxd 0000:f2:01.0: Intel(R) Accelerator Device (v100)
[ 1543.203158] idxd 0000:f2:02.0: Unable to turn on user SVA feature.
[ 1543.208112] idxd 0000:f2:02.0: Intel(R) Accelerator Device (v100)
相关 Issue:
Unable to turn on user SVA feature when intel_iommu=on,sm_on #46
CPU Information: 4th Gen Intel® Xeon® Scalable Processors
Issue with using Data Streaming Accelerator
Trouble configuring Data Streaming Accelerator (DSA)
Data Streaming Accelerator (DSA) driver idxd reports “Unable to turn on user SVA feature”.
这个问题网上目前没有找到可行的解决方案,很多 issue 都未解决,最后经过无数次尝试,解决办法是需要开启 5 级页表支持(这是我某天在配置 Linux Kernel 开发环境的时候无意间发现的)。DSA 的官方手册中提到“如果 BIOS 不支持 5 级页表,可以在启动参数中加上 no5lvl 以强制开启 4 级页表”,实测没有用。
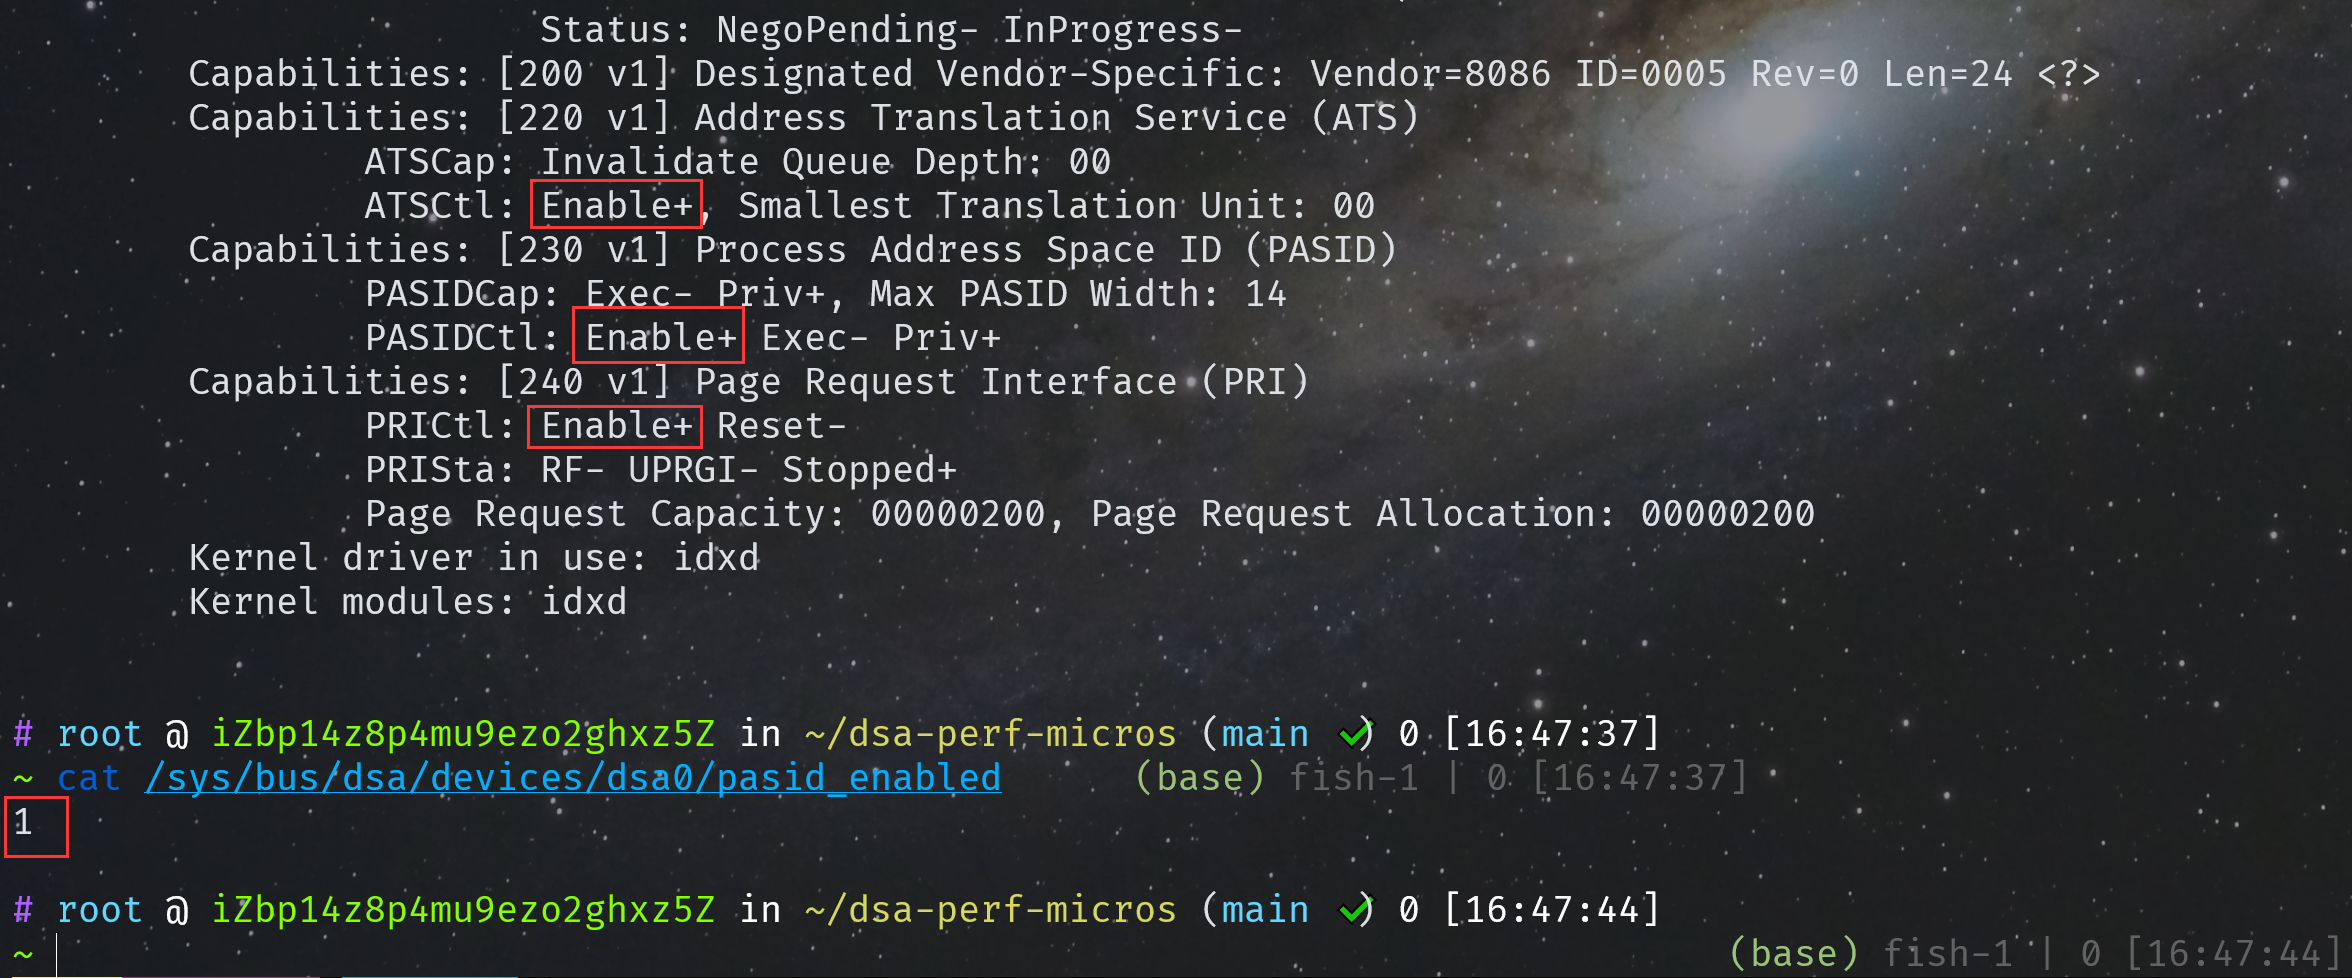
lspci -vvv -s e7:01.0
正常情况下显示应该如下:
另外,如果在配置 DSA 的时候遇到了类似下面的问题,或者提示 wq size 不合法之类的:
libaccfg: accfg_device_set_read_buffer_limit: dsa0: write failed: Operation not permitted
device set read_buffer_limit value failed
Parse json and set device fail: -1
解决办法是重新加载 idxd 模块,
modprobe -r idxd
modprobe idxd
DSA 介绍
DSA 的架构图如下:
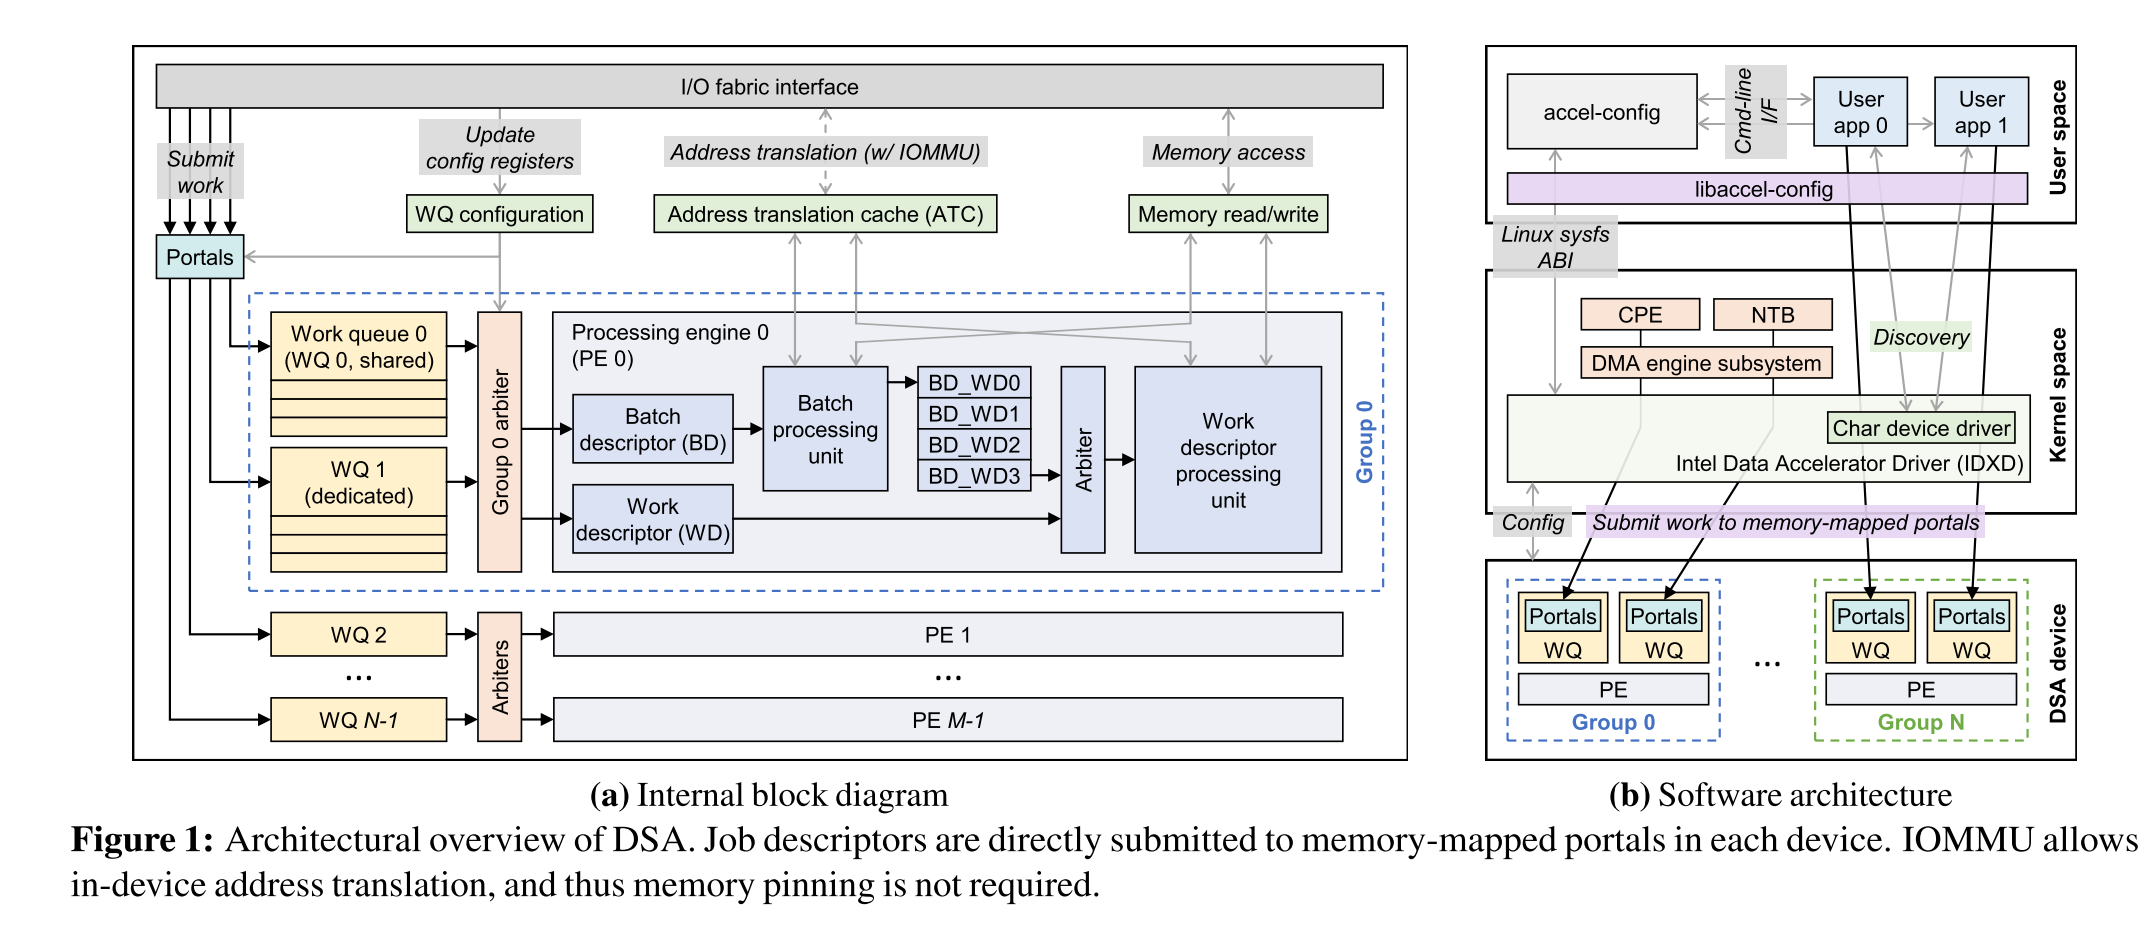
DSA 的基本运行单元是一个 group,可以灵活配置任意数量的 WQ(work queues)和 PE(processing engines)。WQ 又分为两种:
- DWQ(Dedicated WQ):面向单个客户端提交 descriptors。
- SWQ(Shared WQ):可以由多个软件客户端共享,无需线程间同步。
DSA 支持如下操作:
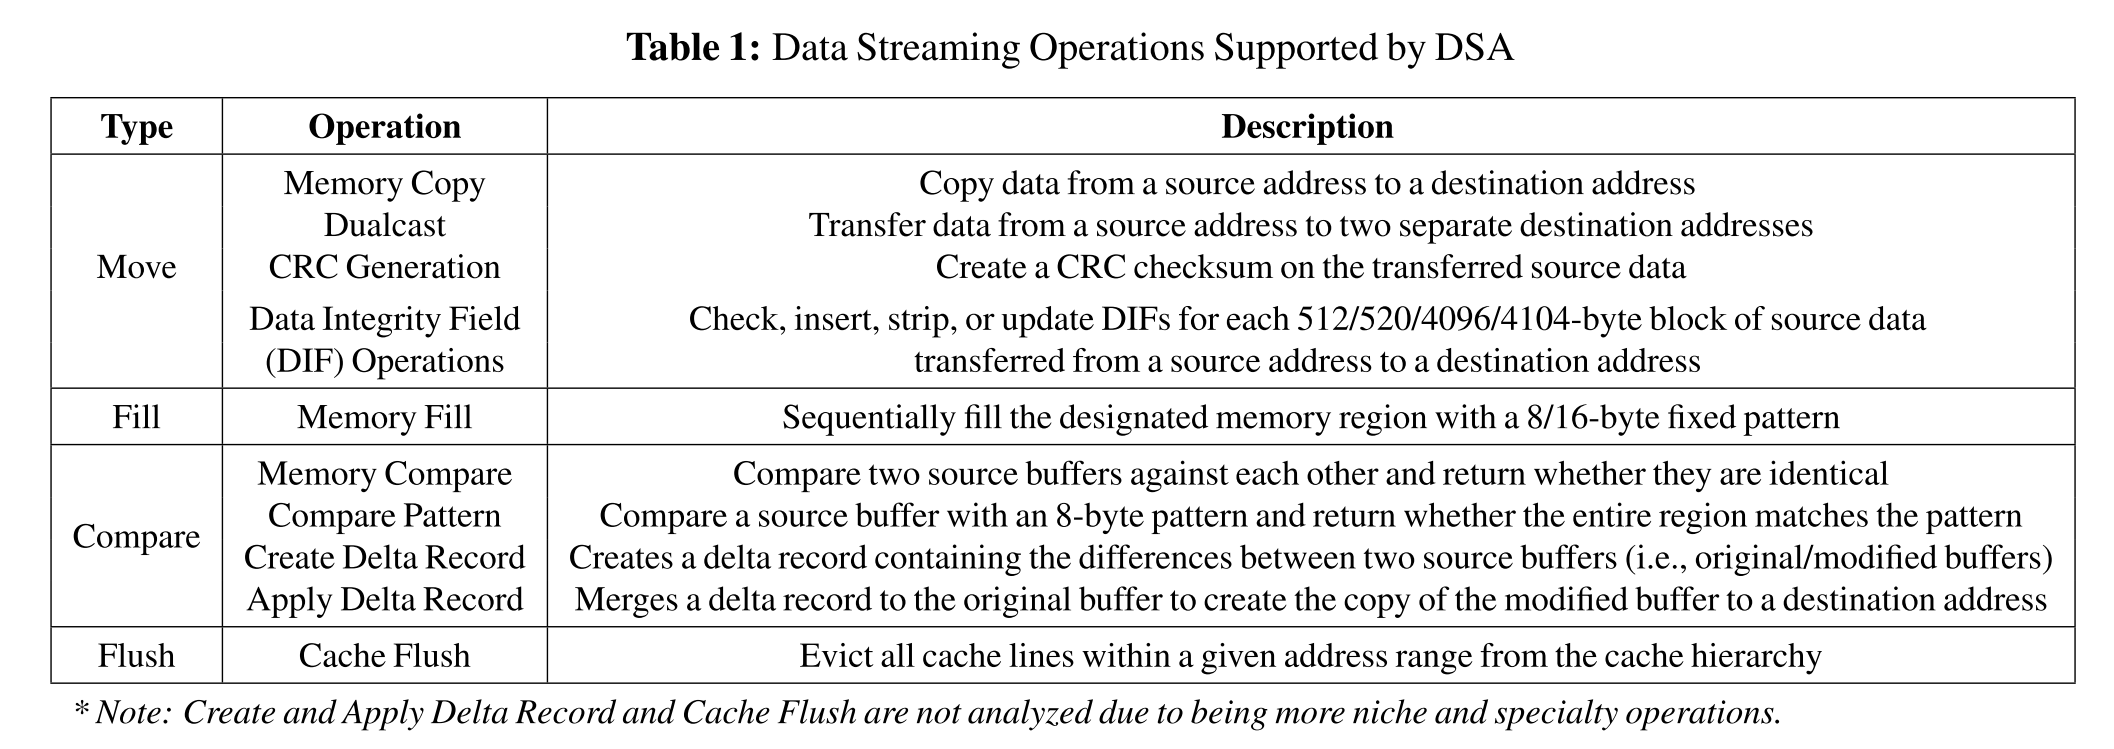
可以在 linux/idxd.h 中找到 DSA 的 opcode,
/* Opcode */
enum dsa_opcode {
    DSA_OPCODE_NOOP = 0,
    DSA_OPCODE_BATCH,
    DSA_OPCODE_DRAIN,
    DSA_OPCODE_MEMMOVE,
    DSA_OPCODE_MEMFILL,
    DSA_OPCODE_COMPARE,
    DSA_OPCODE_COMPVAL,
    DSA_OPCODE_CR_DELTA,
    DSA_OPCODE_AP_DELTA,
    DSA_OPCODE_DUALCAST,
    DSA_OPCODE_CRCGEN = 0x10,
    DSA_OPCODE_COPY_CRC,
    DSA_OPCODE_DIF_CHECK,
    DSA_OPCODE_DIF_INS,
    DSA_OPCODE_DIF_STRP,
    DSA_OPCODE_DIF_UPDT,
    DSA_OPCODE_CFLUSH = 0x20,
};
DSA 在 Completion Polling 过程有同步(Synchronous offloading)和异步(Asynchronous offloading)两种等待办法。
同步就是通过 while 循环一直等待,直到 comp.status == 0,官方手册的示例代码如下:
retry = 0;
while (comp.status == 0 && retry++ < COMP_RETRY_MAX);
if (comp.status == DSA_COMP_SUCCESS) {
    /* Successful completion */
} else {
    /* Descriptor failed or timed out
    * See the “Error Codes” section of the Intel® DSA Architecture Specification for
    * error code descriptions
    */
}
为了减少无用的 CPU 等待时间,把 CPU 资源让度给其它线程,DSA 也支持异步等待,可以通过 pause 指令或者 UMONITOR/UMWAIT 指令实现。pause 实现的官方手册的示例代码如下:
#include <x86gprintrin.h>

retry = 0;
while (comp.status == 0 && retry++ < COMP_RETRY_MAX)
    __mm_pause();
UMONITOR/UMWAIT sequence to reduce power consumption while polling,
#include <x86gprintrin.h>

/*
* C0.2 Improves performance of the other SMT thread(s)
* on the same core, and has larger power savings
* but has a longer wakeup time.
*/

#define UMWAIT_STATE_C0_2 0
#define UMWAIT_STATE_C0_1 1

retry = 0;
while (comp.status == 0 && retry++ < MAX_COMP_RETRY) {
    _umonitor(&comp);
    if (comp.status == 0) {
        uint64_t delay = __rdtsc() + UMWAIT_DELAY;
        _umwait(UMWAIT_STATE_C0_1, delay);
    }
}
DSA 测试
笔者通过 dsa-perf-micros 进行测试。例如测试 Dedicated WQ Bandwidth,
./src/dsa_perf_micros -n128 -s4k -i1000 -c -f -w0 -zF,F -o3
命令参数解释如下:
-n128提交队列深度为 128 ❓(buffer count)-s4k传输大小为 4KB-i10001000 iterations-c通过 SoC 结构获得更高的 movdir64b 指令吞吐量-fSet the cache control flag in descriptors-w0Dedicated Queue-zF,FComma separated list of directives for data placement for respective buffers. The specifiers are -P (fetch into the L1 cache), -D (demote to LLC), -F (flush to memory)-o3操作为 MEMMOVE(DSA_OPCODE_MEMMOVE=3)
如果进行异步测试,那么添加参数 -x 0x000100。查询源码可以确认 misc_flags 的 bit[7:8] => pause(7)/umwait(8) in completion wait。
笔者花了两三天的时间,对照着 A Quantitative Analysis and Guidelines of Data Streaming Accelerator in Modern Intel Xeon Scalable Processors 论文,复现了部分测试结果,完成了 DSA 测试 Shell 脚本编写,以及 Python Matplotlib 绘图脚本编写,一键运行可以完成所有测试,并绘制所有图片。
由于论文中有很多参数其实并没有说清楚,下面的测试中,没有特别说明,均是使用 dsa0-1e1w-d 的配置。Work Queue Size 为 128,buffer count 也是 128,对于 DSA,迭代测试 1000 次;对于 CPU,迭代测试 25 次(因为 CPU 模式的测试速度太慢了)。
Figure 2:Throughput improvements of data streaming operations over their software counterparts with varying transfer sizes (batch size: 1). Memory Fill and NT-Memory Fill refer to allocating and non-allocating writes (similar to regular store and nt-store), respectively.
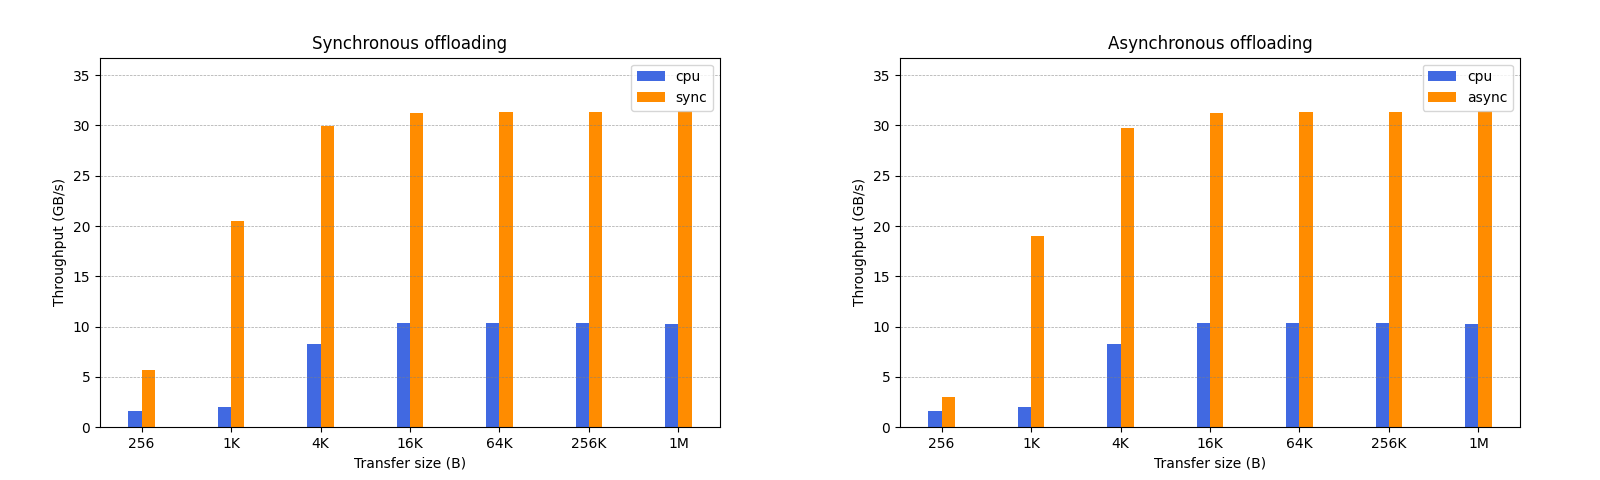
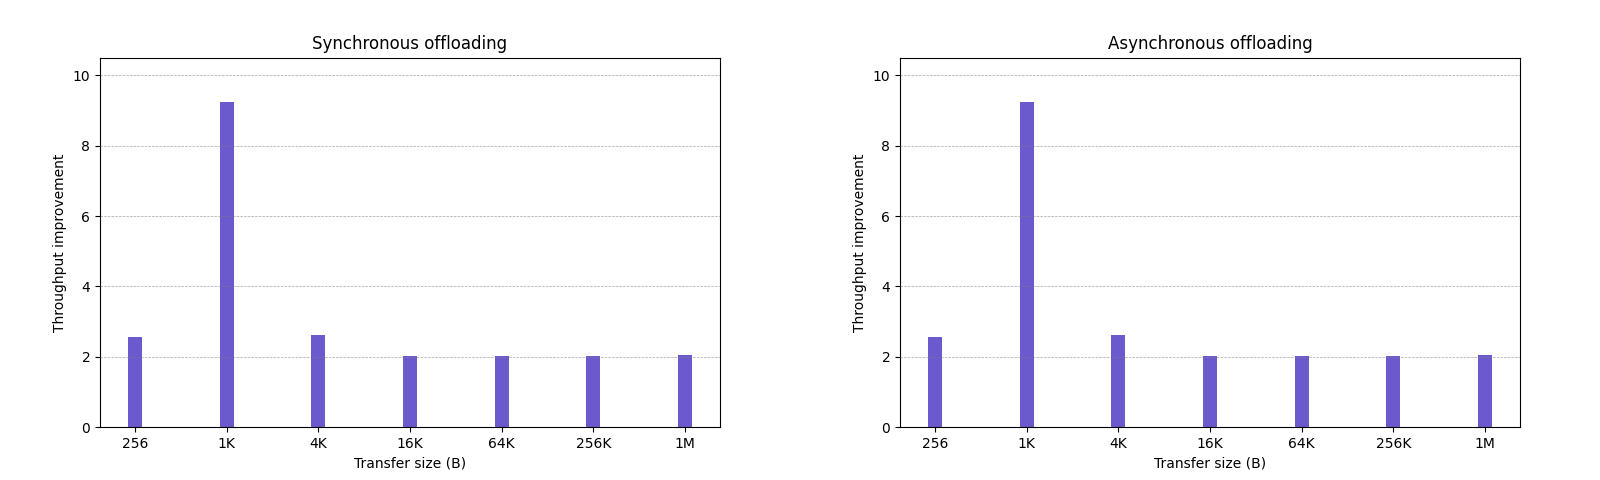
从图中可以看出,当传输大小 >= 4KB 时,基本就能跑满 PCIE 的带宽。不过有一点比较奇怪的是,我这边没有测出来同步和异步的区别,与论文中的图片数据不太一致。
Figure3:Throughput of DSA’s Memory Copy operation on Sync or Async offloading with varying transfer sizes and batch sizes (BS)
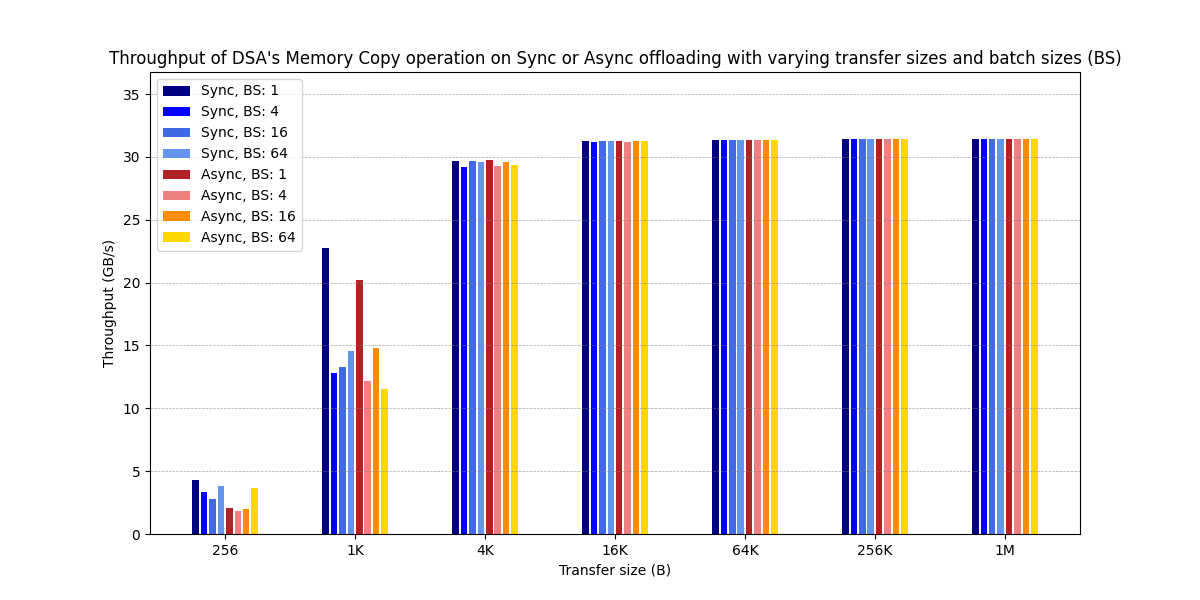
笔者的测试数据要比论文中图片的测试数据表现要好,在 BS = 1 的情况下表现非常好。
Figure 4:Throughput of DSA’s asynchronous Memory Copy operation with different WQ sizes (WQS)
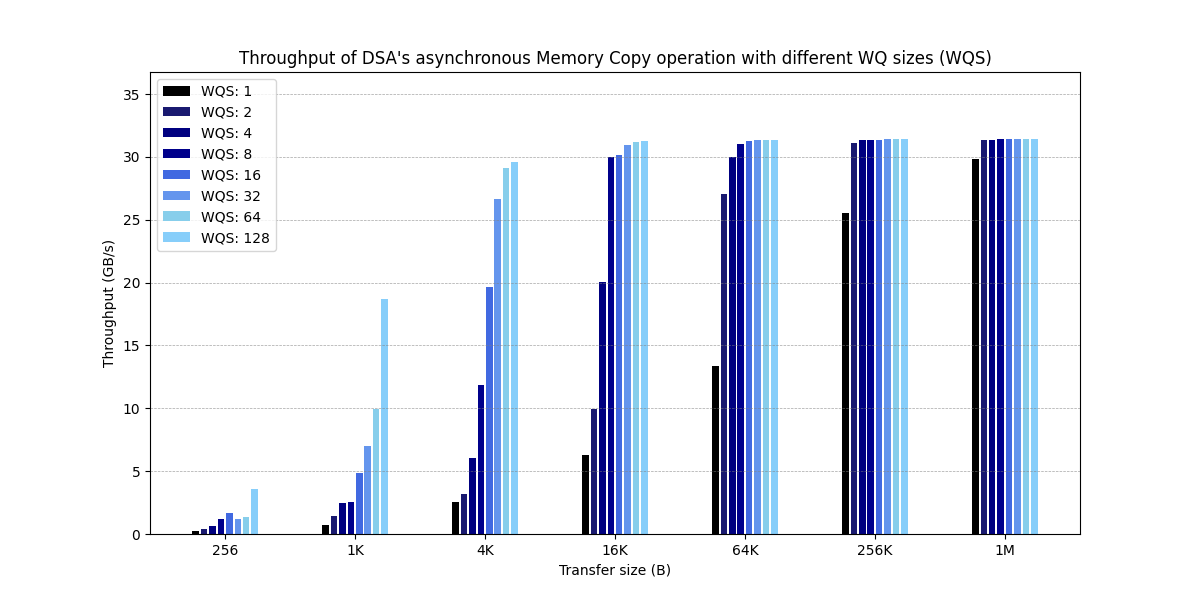
这张图与论文的原图看着最为接近,还是要比论文中图片的测试数据表现要好,尤其是 1K WQS 128 的情况下。BTW,这张图测试的时候 queue size 与 buffer count 保持一致。
Figure 6-a:Throughput (bars) and latency (lines) impact when using different memory configurations (synchronous mode, batch size: 1). Each configuration is labeled as [<Device>: <Source buffer>,<Destination buffer>].

这张图展示了不同 socket 之间传输的情况,数据与论文原图也比较接近。同理,也是在 1K 条件下,表现比论文图更好。
Figure 7:Performance impact of the number of PEs on Memory Copy with varying transfer sizes (TS) and batch sizes (BS) using one WQ
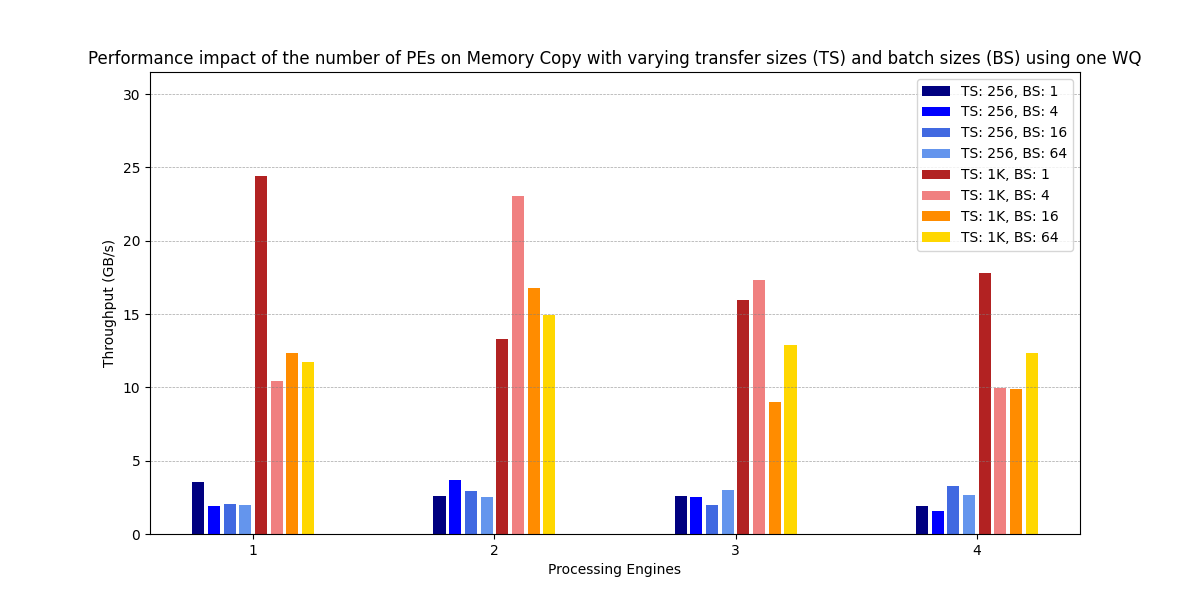
这张图的数据与原图差距也有点大,很奇怪,PE 越多,反而表现越差,不知道为什么。这张图的数据效果没有原图好。
剩下的图,有些测试比较麻烦,暂时就没有测了。关于更多测试参数和测试方法,见下文脚本代码。
DSA 测试脚本
下面是笔者写的 DSA 测试脚本和 Python Matplotlib 绘图脚本。一键运行可以自动配置 DSA,一次性测完所有数据,并一次性画完以上介绍的所有 Figure。当然也可以注释掉部分代码,只测其中部分图。
测试结果会保存在 results/${VERSION} 文件夹里面,
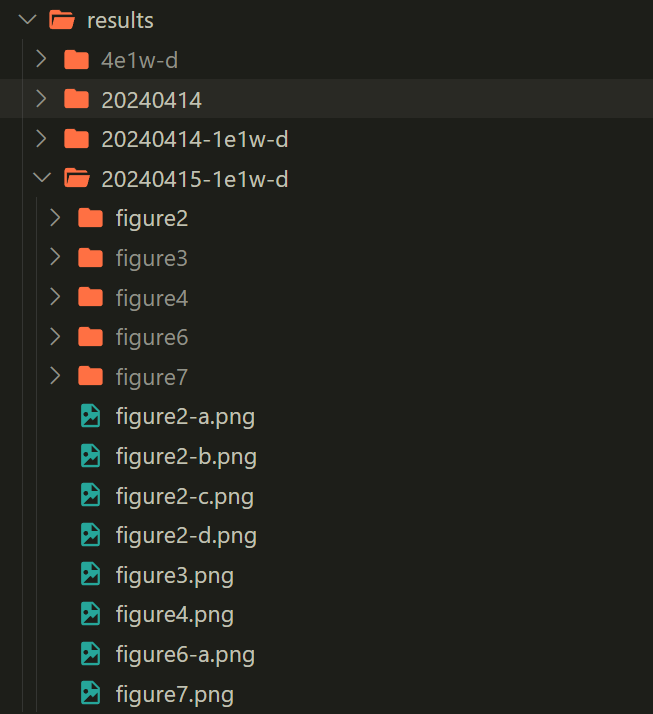
Shell 测试脚本
#!/bin/bash
# Author: LRL

set -e

VERSION="20240414-1e1w-d"

WQs=1
WQ_MODE="d" # d for dedicated, s for shared
WQ_SIZE_DEFAULT=128
ENGINES=1
DSA_ID=0

DSA_CONF="dsa${DSA_ID}-${ENGINES}e${WQs}w-${WQ_MODE}"
# timestamp=$(date +"%Y%m%d%H%M")
LOG_DIR_PREFIX="results/${VERSION}"
[[ ! -d ${LOG_DIR_PREFIX} ]] && mkdir -p ${LOG_DIR_PREFIX}

readonly LOG_DIR_PREFIX DSA_CONF DSA_ID ENGINES WQ_MODE WQs VERSION

function setup_dsa() {
    local wq_size=$1
    if [[ -z ${wq_size} ]]; then
        local wq_size=${WQ_SIZE_DEFAULT}
        local conf="${DSA_CONF}.conf"
    else
        local conf="${DSA_CONF}-wqsz${wq_size}.conf"
    fi
    echo -e "\n==> Setting DSA <==\n"
    ./scripts/setup_dsa.sh -d dsa${DSA_ID} -w ${WQs} -m ${WQ_MODE} -e ${ENGINES} -s "${wq_size}"
    accel-config list | tee "${LOG_DIR}/${conf}"
}

function func_cache_flush() {
    echo 3 > /proc/sys/vm/drop_caches
    # free -h
    sync
    # free -h
}

function set_args() {
    if [[ -z ${transfer_size} || -z ${iterations} || -z ${buffer_count} || -z ${mode} || ("${mode}" != "cpu" && -z ${batch_size})]]; then
        echo -e "\nERROR: some args are empty\n"
        exit 1
    fi

    args="-s${transfer_size} -i${iterations} -n${buffer_count}"

    # set mode
    if [[ "${mode}" == "async" ]]; then
        args+=" -x 0x000100"
    elif [[ "${mode}" == "cpu" ]]; then
        args+=" -m"
    fi

    # set batch size
    if [[ "${mode}" != "cpu" && -n ${batch_size} ]]; then
        args+=" -b${batch_size}"
    fi

    # set NUMA node
    if [[ -n ${lr} ]]; then
        [[ ${lr} == "L,L" ]] && args+=" -S${LOCAL_NODE},${LOCAL_NODE}"
        [[ ${lr} == "L,R" ]] && args+=" -S${LOCAL_NODE},${REMOTE_NODE}"
        [[ ${lr} == "R,L" ]] && args+=" -S${REMOTE_NODE},${LOCAL_NODE}"
        [[ ${lr} == "R,R" ]] && args+=" -S${REMOTE_NODE},${REMOTE_NODE}"
    fi

    [[ -n ${other_args} ]] && args+=" ${other_args}"
}

# remember to set $filename
function run_test() {
    if [[ -z ${filename} ]]; then
        echo -e "\nERROR: filename is empty\n"
        exit 1
    fi

    func_cache_flush
    set_args

    PREFIX_COMMAND=""
    [[ -n ${LOCAL_NODE} ]] && PREFIX_COMMAND="numactl -N ${LOCAL_NODE}"

    local command
    if [[ "${mode}" != "cpu" ]]; then
        # shellcheck disable=SC2086
        DSA_PERF_MICROS_LOG_LEVEL=info ${PREFIX_COMMAND} ./src/dsa_perf_micros ${args} 2>&1 | tee ${LOG_DIR}/"${filename}"
        command="DSA_PERF_MICROS_LOG_LEVEL=info ${PREFIX_COMMAND} ./src/dsa_perf_micros ${args} 2>&1 | tee ${LOG_DIR}/${filename}"
    else
        # shellcheck disable=SC2086
        ${PREFIX_COMMAND} ./src/dsa_perf_micros ${args} 2>&1 | tee ${LOG_DIR}/"${filename}"
        command="${PREFIX_COMMAND} ./src/dsa_perf_micros ${args} 2>&1 | tee ${LOG_DIR}/${filename}"
    fi

    echo "${command}" | tee -a ${LOG_DIR}/"${filename}"
    unset filename
}

function figure2() {
    #  DSA_PERF_MICROS_LOG_LEVEL=info ./src/dsa_perf_micros -s256 -i1000 -c -f -w0 -zF,F -o3 2>&1 | tee ./results/4e1w-d-sync-256.log

    # Figure 2
    LOG_DIR="${LOG_DIR_PREFIX}/figure2"
    [[ ! -d ${LOG_DIR} ]] && mkdir -p ${LOG_DIR}

    MODE="sync async cpu"
    TRANSFER_SIZE="256 1K 4K 16K 64K 256K 1M"

    batch_size=1
    buffer_count=${WQ_SIZE_DEFAULT}
    other_args="-c -w0 -zF,F -o3"

    setup_dsa ""

    for mode in ${MODE}; do
        if [[ ${mode} == "cpu" ]]; then
            iterations=25 # cpu test is too slow
        else
            iterations=1000
        fi
        for transfer_size in ${TRANSFER_SIZE}; do
            filename="${mode}-${transfer_size}.log"
            run_test
        done
    done
}

function figure3() {
    # Figure 3
    LOG_DIR="${LOG_DIR_PREFIX}/figure3"
    [[ ! -d ${LOG_DIR} ]] && mkdir -p ${LOG_DIR}

    MODE="sync async"
    TRANSFER_SIZE="256 1K 4K 16K 64K 256K 1M"
    BATCH_SIZE="1 4 16 64"

    buffer_count=${WQ_SIZE_DEFAULT}
    iterations=1000
    other_args="-c -w0 -zF,F -o3"

    # Batch size 64 requires mannual config, config file should exist !!!
    local res
    res=$(accel-config list)
    if [[ ${#res} -gt 3 ]]; then
        accel-config disable-device dsa${DSA_ID}
    fi
    accel-config load-config -c ./${DSA_CONF}.conf -e

    for batch_size in ${BATCH_SIZE}; do
        for mode in ${MODE}; do
            for transfer_size in ${TRANSFER_SIZE}; do
                filename="${mode}-${batch_size}-${transfer_size}.log"
                run_test
            done
        done
    done
}

function figure4() {
    # Figure 4
    LOG_DIR="${LOG_DIR_PREFIX}/figure4"
    [[ ! -d ${LOG_DIR} ]] && mkdir -p ${LOG_DIR}

    WQ_SIZE="1 2 4 8 16 32 64 128"
    TRANSFER_SIZE="256 1K 4K 16K 64K 256K 1M"

    mode="async"
    batch_size=1
    iterations=1000
    other_args="-c -w0 -zF,F -o3"

    for wq_size in ${WQ_SIZE}; do
        setup_dsa "${wq_size}"
        buffer_count=${wq_size}
        for transfer_size in ${TRANSFER_SIZE}; do
            filename="${wq_size}-${transfer_size}.log"
            run_test
        done
    done
}

function figure6() {
    # Figure 6
    LOG_DIR="${LOG_DIR_PREFIX}/figure6"
    [[ ! -d ${LOG_DIR} ]] && mkdir -p ${LOG_DIR}

    LR="L,L L,R R,L R,R"
    MODE="cpu sync"
    TRANSFER_SIZE="256 1K 4K 16K 64K 256K 1M"

    LOCAL_NODE=0
    REMOTE_NODE=1
    batch_size=1
    buffer_count=${WQ_SIZE_DEFAULT}
    other_args="-c -w0 -zF,F -o3"

    setup_dsa ""

    for lr in ${LR}; do
        for mode in ${MODE}; do
            if [[ ${mode} == "cpu" ]]; then
                iterations=25 # cpu test is too slow
            else
                iterations=1000
            fi
            for transfer_size in ${TRANSFER_SIZE}; do
                filename="${mode}-${lr}-${transfer_size}.log"
                run_test
                if [[ ${lr} == "L,R" ]]; then
                    filename="${mode}-${lr}-${transfer_size}-latency.log"
                    other_args_bak=${other_args}
                    other_args="${other_args} -q1"
                    run_test
                    other_args=${other_args_bak}
                fi
            done
        done
    done

    unset lr LR LOCAL_NODE REMOTE_NODE
}

function figure7() {
    # Figure 7
    LOG_DIR="${LOG_DIR_PREFIX}/figure7"
    [[ ! -d ${LOG_DIR} ]] && mkdir -p ${LOG_DIR}

    local _ENGINES="1 2 3 4"
    TRANSFER_SIZE="256 1K"
    BATCH_SIZE="1 4 16 64"

    mode="sync"
    buffer_count=${WQ_SIZE_DEFAULT}
    iterations=1000
    other_args="-c -w0 -zF,F -o3"

    for engines in ${_ENGINES}; do
        # Batch size 64 requires mannual config, config file should exist !!!
        local res
        res=$(accel-config list)
        if [[ ${#res} -gt 3 ]]; then
            accel-config disable-device dsa${DSA_ID}
        fi
        accel-config load-config -c ./"${DSA_CONF}-${engines}.conf" -e
        for transfer_size in ${TRANSFER_SIZE}; do
            for batch_size in ${BATCH_SIZE}; do
                filename="${transfer_size}-${batch_size}-${engines}.log"
                run_test
            done
        done
    done
}

function main() {
    figure2
    figure3
    figure4
    figure6
    figure7
}

main "$@"
Python 绘图脚本
# Author: LRL
import matplotlib.pyplot as plt
from matplotlib.axes import Axes
import re

def is_number(num):
    try:
        float(num)
        return True
    except ValueError:
        return False

def read(filename: str) -> list[float]:
    ret = []
    with open(f"{LOG_DIR}/{filename}", mode='r') as f:
        data = f.readlines()
    for s in data:
        t = re.split(' |,', s)
        if t[0] != "GB":
            continue
        # ret.extend([t[4], t[6], t[9]])
        for x in t:
            if is_number(x):
                ret.append(x)
    if len(ret) == 0:
        print(filename)
    ret = list(map(float, ret))
    return ret

def draw_yticks_line():
    # 获取y轴的刻度位置
    yticks = plt.yticks()[0]
    # 为每个y轴的刻度绘制水平虚线
    for tick in yticks:
        plt.axhline(y=tick, color='gray', linestyle='--', linewidth=0.5, alpha=0.7)


def draw_figure2():
    TRANSFER_SIZE = "256 1K 4K 16K 64K 256K 1M".split()
    MODE = "sync async cpu".split()
    global LOG_DIR
    LOG_DIR = f"{LOG_DIR_PREFIX}/figure2"

    data: dict[str, list[float]] = {}
    for mode in MODE:
        data[mode] = []
        for transfer_size in TRANSFER_SIZE:
            GB_ps = read(f"{mode}-{transfer_size}.log")[0]
            data[mode].append(GB_ps)
    # print(data)

    n = len(TRANSFER_SIZE)
    bar_width = 0.15
    r1 = [x for x in range(n)]
    r2 = [x + bar_width for x in r1]

    plt.figure(figsize=(8, 4.8))
    plt.bar(r1, data['cpu'], width=bar_width, color='royalblue', label='cpu')
    plt.bar(r2, data['sync'], width=bar_width, color='darkorange', label='sync')
    plt.xticks([x - 0.5 * bar_width + 2 * bar_width / 2 for x in r1], TRANSFER_SIZE)
    draw_yticks_line()
    plt.xlabel('Transfer size (B)')
    plt.ylabel('Throughput (GB/s)')
    plt.title('Synchronous offloading')
    plt.legend()
    # plt.show()
    plt.savefig(f"{LOG_DIR_PREFIX}/figure2-a.png", format='png')

    plt.clf()
    plt.bar(r1, data['cpu'], width=bar_width, color='royalblue', label='cpu')
    plt.bar(r2, data['async'], width=bar_width, color='darkorange', label='async')
    draw_yticks_line()
    plt.xticks([x - 0.5 * bar_width + 2 * bar_width / 2 for x in r1], TRANSFER_SIZE)
    plt.xlabel('Transfer size (B)')
    plt.ylabel('Throughput (GB/s)')
    plt.title('Asynchronous offloading')
    plt.legend()
    # plt.show()
    plt.savefig(f"{LOG_DIR_PREFIX}/figure2-b.png", format='png')

    plt.clf()
    sync_improve = [(y - x) / x for x, y in zip(data['cpu'], data['sync'])]
    plt.bar(r1, sync_improve, width=bar_width, color='slateblue')
    draw_yticks_line()
    plt.xticks([x for x in r1], TRANSFER_SIZE)
    plt.xlabel('Transfer size (B)')
    plt.ylabel('Throughput improvement')
    plt.title('Synchronous offloading')
    # plt.show()
    plt.savefig(f"{LOG_DIR_PREFIX}/figure2-c.png", format='png')

    plt.clf()
    async_improve = [(y - x) / x for x, y in zip(data['cpu'], data['async'])]
    plt.bar(r1, sync_improve, width=bar_width, color='slateblue')
    draw_yticks_line()
    plt.xticks([x for x in r1], TRANSFER_SIZE)
    plt.xlabel('Transfer size (B)')
    plt.ylabel('Throughput improvement')
    plt.title('Asynchronous offloading')
    # plt.show()
    plt.savefig(f"{LOG_DIR_PREFIX}/figure2-d.png", format='png')

def draw_figure3():
    TRANSFER_SIZE = "256 1K 4K 16K 64K 256K 1M".split()
    MODE = "sync async".split()
    BATCH_SIZE="1 4 16 64".split()
    global LOG_DIR
    LOG_DIR = f"{LOG_DIR_PREFIX}/figure3"

    data: dict[str, dict[str, list[float]]] = {}
    for mode in MODE:
        data[mode] = {}
        for batch_size in BATCH_SIZE:
            data[mode][batch_size] = []
            for transfer_size in TRANSFER_SIZE:
                GB_ps = read(f"{mode}-{batch_size}-{transfer_size}.log")[0]
                data[mode][batch_size].append(GB_ps)
    # print(data)

    n = len(TRANSFER_SIZE)
    bar_width, gap = 0.05, 0.015
    width = bar_width + gap
    r = [x for x in range(n)]
    p = 0
    plt.figure(figsize=(12, 6))
    COLOR="navy blue royalblue cornflowerblue firebrick lightcoral darkorange gold".split()
    for mode in MODE:
        for batch_size in BATCH_SIZE:
            rx = [x + p * width for x in r]
            label_name = f"{mode}".upper()[0] + f"{mode}"[1:] + f", BS: {batch_size}"
            plt.bar(rx, data[mode][batch_size], width=bar_width, color=COLOR[p], label=label_name)
            p += 1
    plt.xticks([x - 0.5 * width + len(MODE) * len(BATCH_SIZE) * width / 2 for x in r], TRANSFER_SIZE)
    draw_yticks_line()
    plt.xlabel('Transfer size (B)')
    plt.ylabel('Throughput (GB/s)')
    plt.title('Throughput of DSA\'s Memory Copy operation on Sync or Async offloading with varying transfer sizes and batch sizes (BS)')
    plt.legend()
    plt.savefig(f"{LOG_DIR_PREFIX}/figure3.png", format='png')

def draw_figure4():
    WQ_SIZE="1 2 4 8 16 32 64 128".split()
    TRANSFER_SIZE="256 1K 4K 16K 64K 256K 1M".split()
    global LOG_DIR
    LOG_DIR = f"{LOG_DIR_PREFIX}/figure4"

    data: dict[str, list[float]] = {}
    for wq_size in WQ_SIZE:
        data[wq_size] = []
        for transfer_size in TRANSFER_SIZE:
            GB_ps = read(f"{wq_size}-{transfer_size}.log")[0]
            data[wq_size].append(GB_ps)
    # print(data)

    n = len(TRANSFER_SIZE)
    bar_width, gap = 0.05, 0.015
    width = bar_width + gap
    r = [x for x in range(n)]
    p = 0
    plt.figure(figsize=(12, 6))
    COLOR="black midnightblue navy darkblue royalblue cornflowerblue skyblue lightskyblue".split()
    for wq_size in WQ_SIZE:
        rx = [x + p * width for x in r]
        plt.bar(rx, data[wq_size], width=bar_width, color=COLOR[p], label=f"WQS: {wq_size}")
        p += 1
    plt.xticks([x - 0.5 * width + len(WQ_SIZE) * width / 2 for x in r], TRANSFER_SIZE)
    draw_yticks_line()
    plt.xlabel('Transfer size (B)')
    plt.ylabel('Throughput (GB/s)')
    plt.title('Throughput of DSA\'s asynchronous Memory Copy operation with different WQ sizes (WQS)')
    plt.legend()
    plt.savefig(f"{LOG_DIR_PREFIX}/figure4.png", format='png')

def draw_figure6():
    LR="L,L L,R R,L R,R".split()
    MODE="cpu sync".split()
    TRANSFER_SIZE="256 1K 4K 16K 64K 256K 1M".split()
    global LOG_DIR
    LOG_DIR = f"{LOG_DIR_PREFIX}/figure6"

    data: dict[str, dict[str, dict[str, list[float]]]] = {}
    for lr in LR:
        data[lr] = {}
        for mode in MODE:
            data[lr][mode] = {}
            data[lr][mode]['GB'], data[lr][mode]['latency'] = [], []
            for transfer_size in TRANSFER_SIZE:
                GB_ps = read(f"{mode}-{lr}-{transfer_size}.log")[0]
                data[lr][mode]['GB'].append(GB_ps)
                if lr == "L,R":
                    latency = read(f"{mode}-{lr}-{transfer_size}-latency.log")[2]
                    data[lr][mode]['latency'].append(latency / 1000.0)
    # print(data['L,R']['cpu']['latency'], data['L,R']['sync']['latency'])
    n = len(TRANSFER_SIZE)
    bar_width, gap = 0.05, 0.015
    width = bar_width + gap
    r = [x for x in range(n)]
    p = 0
    fig, ax1 = plt.subplots(figsize=(15, 6))
    ax1: Axes = ax1
    COLOR="firebrick navy lightcoral blue darkorange royalblue gold cornflowerblue".split()
    for lr in LR:
        for mode in MODE:
            rx = [x + p * width for x in r]
            label_name = "CPU" if mode == "cpu" else "DSA"
            label_name = f"{label_name}: {lr}"
            ax1.bar(rx, data[lr][mode]['GB'], width=bar_width, color=COLOR[p], label=label_name)
            p += 1
    ax1.set_xticks([x - 0.5 * width + len(LR) * len(MODE) * width / 2 for x in r], TRANSFER_SIZE)
    ax1.set_xlabel('Transfer size (B)')
    ax1.set_ylabel('Throughput (GB/s)')
    ax1.set_title('Local (L) and remote (R) sockets')
    draw_yticks_line()

    ax2: Axes = ax1.twinx()
    COLOR="lightcoral cyan".split()
    p = 0
    for mode in MODE:
        lr = "L,R"
        label_name = "CPU" if mode == "cpu" else "DSA"
        label_name = f"{label_name}: {lr}"
        ax2.plot([x - 0.5 * width + len(LR) * len(MODE) * width / 2 for x in r], data[lr][mode]['latency'], color=COLOR[p], label=label_name)
        p += 1
    ax2.set_ylabel('Latency (us)')

    lines, labels = ax1.get_legend_handles_labels()
    lines2, labels2 = ax2.get_legend_handles_labels()
    ax2.legend(lines + lines2, labels + labels2)
    plt.savefig(f"{LOG_DIR_PREFIX}/figure6-a.png", format='png')

def draw_figure7():
    ENGINES="1 2 3 4".split()
    TRANSFER_SIZE="256 1K".split()
    BATCH_SIZE="1 4 16 64".split()
    global LOG_DIR
    LOG_DIR = f"{LOG_DIR_PREFIX}/figure7"

    data: dict[str, dict[str, list[float]]] = {}
    for transfer_size in TRANSFER_SIZE:
        data[transfer_size] = {}
        for batch_size in BATCH_SIZE:
            data[transfer_size][batch_size] = []
            for engines in ENGINES:
                GB_ps = read(f"{transfer_size}-{batch_size}-{engines}.log")[0]
                data[transfer_size][batch_size].append(GB_ps)
    # print(data)

    n = len(ENGINES)
    bar_width, gap = 0.05, 0.015
    width = bar_width + gap
    r = [x for x in range(n)]
    p = 0
    plt.figure(figsize=(12, 6))
    COLOR="navy blue royalblue cornflowerblue firebrick lightcoral darkorange gold".split()
    for transfer_size in TRANSFER_SIZE:
        for batch_size in BATCH_SIZE:
            rx = [x + p * width for x in r]
            label_name = f"TS: {transfer_size}, BS: {batch_size}"
            plt.bar(rx, data[transfer_size][batch_size], width=bar_width, color=COLOR[p], label=label_name)
            p += 1
    plt.xticks([x - 0.5 * width + len(TRANSFER_SIZE) * len(BATCH_SIZE) * width / 2 for x in r], ENGINES)
    draw_yticks_line()
    plt.xlabel('Processing Engines')
    plt.ylabel('Throughput (GB/s)')
    plt.title('Performance impact of the number of PEs on Memory Copy with varying transfer sizes (TS) and batch sizes (BS) using one WQ')
    plt.legend()
    plt.savefig(f"{LOG_DIR_PREFIX}/figure7.png", format='png')


def main():
    draw_figure2()
    draw_figure3()
    draw_figure4()
    draw_figure6()
    draw_figure7()


LOG_DIR_PREFIX = "results/20240414-1e1w-d"
LOG_DIR = ""
main()
References
Intel® Data Streaming Accelerator User Guide
Enabling Intel Data Streaming Accelerator on Lenovo ThinkSystem Servers
Matplotlib 3.8.4 documentation

%%%
赞,很有帮助
hello,请问你测量过ENQCMD的submission latency吗?那篇paper里的Figure 5里显示submission latency是5us,但我觉得这个时间长度有点太久了。感觉100ns的话比较合适。
我还有一个问题想要请教,这个DSA我感觉不算是PCIe的设备,更像是一个on-chip的DMA engine。所以想请教一下在你的测试中,跑满PCIe的带宽是什么情况下跑满的呢?是指SSD作为PCIe设备吗?(大概就是,你的这个test是从哪里的data copy到哪里去呢,如果只是memory里面copy的话,那为什么会涉及到PCIe的带宽呢?)
非常感谢!!
EQCMD(s) 指令应该是用于 SWQ 的,我这里面的测试应该都是使用的 DWQ,对应 MOVDIR64B 指令来 submit。那篇 DSA paper 里你说的那个图确实数据确实有问题,我之前也发现了。拷贝 4KB 所需的总用时也就才 1000+ ns,2MB 总用时大概是 2w+ ns,你估计的 100ns submit 没问题。
至于 PCIE 这块,其实我对这部分的硬件结构原理也不太懂。DSA 算是 CPU 里的一个协处理器,对外表现为一个 PCIE 设备,在 PCI 总线上能够看到 DSA device 的 Bus:Device.Function (BDF),也有一些 MMIO 寄存器可以读取和配置。另外 DSA 也可以操作通过 PCIE 挂载的 CXL 内存。在内核中 IDXD driver 代码也是位于 DMA 子系统下的,因此可以通过内核的 DMA Engine API 来操作 DSA。
最后回答你的问题,我实测出来单个 DSA 的带宽上限是 32GBps,似乎恰好对应 PCIE 4.0 x 16 的带宽,我记得这一点我在哪里看到过,速度上限会受到 PCIE 带宽的限制。然后 DSA 只能处理 in-memory 的操作,因此 data copy 都是在内存里完成的,可以是2-socket 的 NUMA 内存(即我的测试环境),和 SSD 没有关系。至于为什么会涉及到 PCIE 以及受限于 PCIE 带宽,似乎是因为 DMA 需要依赖 PCIE 总线才能完成,这块细节我也不太确定和明白。
很感谢你的详细的回复!
我觉得你说的很对,那篇paper里面有关submission latency的预估是不太准确的。不过参考这篇ENQCMD有关的patent可以看到,里面的column 10:
我感觉这ENQCMD的latency主要取决于system的configuration。而Intel DSA的latency应该是仅仅差不多10s or 100s of nanoseconds。
我还发现,那篇paper里Figure 3,4都涉及到了throughput,而想满足最大的throughput,就必须要尽量用多个work descriptors去submit,也就是通过并行来提高带宽。如果只是单一的single work descriptor submission,那基本上offload的task就必须要考虑submission latency,以及data transfer latency。不过据我的了解,DSA的data transfer都是通过DMA来完成的,那么就意味着DSA要去program 那个DMA controller,比如写上starting physical address,以及transfer size。这个步骤好像是叫做setup latency。然后后续的数据传输的latency应该是很快的(几ns)。但setup latency据说有的时候会达到us的级别。我其实不太懂的是,如果offload了很多的task,都是基于不同的physical address的话,那data transfer是怎么能达到满的throughput的呢?而且,如果是每一次data transfer都要有program DMA controller的步骤的话,那这中间的latency岂不是应该会更高?我怎么想也想不清楚这一点。。所以只能推测是不同的tasks都是target相同的address,这样就可以一次data transfer来满足多个tasks了。欢迎一起讨论!
我理解的是 DSA 本身就算是一个 DMA controller 了,它不需要再额外依赖主板芯片组上的其它 DMA controller。传输数据的 latency 基本是与 transfer size 正相关的,几 ns 应该做不到,并且 DSA 在 transfer size 比较小的时候,传输效率不如 CPU,因为 pipeline 的原因(那篇 paper 里也有提到)。至于如何打满带宽,你只需要把每个 DSA 里的 PE 都全部启用,然后多用几个 DSA device 来并行传输就能打满带宽了(可以把需要传输的数据块切片然后 dispatch 到多个 DSA 来传输),让 pipeline 不间断,和传输数据的地址是否相同没关系,是否地址相同、是否物理地址连续都可以打满带宽。至于你提到的其它方面过于底层了,我也没研究过了
如有疑问,欢迎继续讨论!因为我在利用 DSA 的特性做了一点相关研究工作,
对它有一定了解(不过我也没有 Intel 相关技术人员的支持😂)。