笔者仓库传送门。以下笔记 ch0-3, 7 比较简略,ch4-6, 8 记录了详细实验思路和代码实现。由于笔者没有参加训练营,已经错过了自动评测的时间,故无法通过 Github CI 测评(目测是他们 CI 环境坏了)。
第零章:实验环境配置
笔者使用的环境是 WSL Ubuntu 20.04,之前曾在上面完成了 xv6 实验,已经配置好了 risc-v toolchains 和 qemu。
由于笔者使用的是 qemu 8.0.5,因此需要替换 rustabi-qemu.bin 为最新版 Releases · rustsbi/rustsbi-qemu,目前选取的是 Prereleased 2024-03-24 的 debug 版本。、
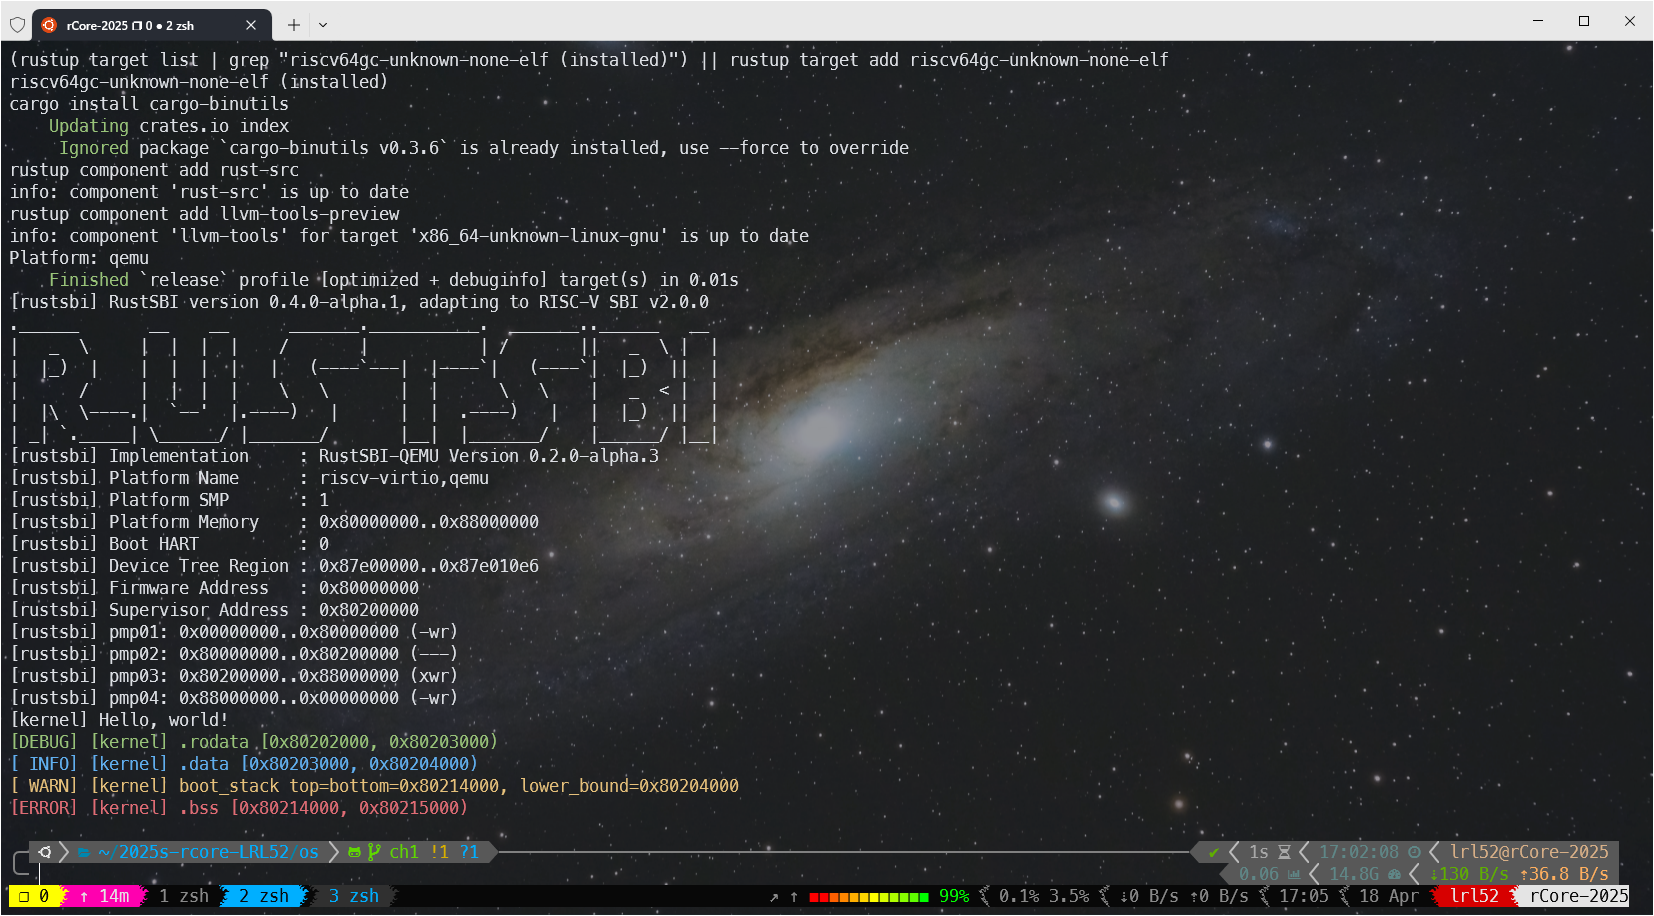
rCore 2025,启动!
第一章:应用程序与基本执行环境
以下内容由 GPT 生成。
syscall 内联汇编
fn syscall(id: usize, args: [usize; 3]) -> isize {
    let mut ret;
    unsafe {
        core::arch::asm!(
            "ecall",
            inlateout("x10") args[0] => ret,
            in("x11") args[1],
            in("x12") args[2],
            in("x17") id,
        );
    }
    ret
}
你这段代码是一个 最小 RISC-V 用户程序的例子,#![no_std] + #![no_main],不依赖标准库,直接从 _start 函数启动,并通过 syscall(系统调用)来退出进程。
我们来逐步讲解这段代码中 syscall 的实现原理,特别是:
- RISC-V 架构上的 syscall 调用规范
- Rust 中使用内联汇编
asm!的方式 - 参数如何传递,返回值如何获取
🧱 整体结构
fn syscall(id: usize, args: [usize; 3]) -> isize
id: 系统调用编号(比如 93 表示 exit)args: 系统调用的前 3 个参数(最多支持 3 个)
🧩 RISC-V Syscall 调用规范
RISC-V 的 syscall(系统调用)通过 ecall 指令触发,由内核捕获并处理。
RISC-V 调用约定:
| 寄存器 | 用途 |
|---|---|
a0 (x10) |
参数 1 / 返回值 |
a1 (x11) |
参数 2 |
a2 (x12) |
参数 3 |
| … | 参数 4-7:a3~a6(可选) |
a7 (x17) |
系统调用号 |
ecall |
触发系统调用(软中断) |
📌 在这个例子中只用了前 3 个参数(x10, x11, x12)和系统调用号(x17)。
🧪 关键代码分析:asm! 汇编部分
unsafe {
    core::arch::asm!(
        "ecall",                             // 触发系统调用
        inlateout("x10") args[0] => ret,     // x10: 参数 1,同时接收返回值
        in("x11") args[1],                   // x11: 参数 2
        in("x12") args[2],                   // x12: 参数 3
        in("x17") id,                        // x17: syscall 编号
    );
}
语法说明:
core::arch::asm!()是 Rust 的 稳定内联汇编语法"ecall"是实际执行的指令in("reg") val表示将val放入指定寄存器inlateout("x10") args[0] => ret:- 将
args[0]放入x10(即a0)寄存器 => ret表示这个寄存器的值在 syscall 执行后会被写回到ret变量中(表示返回值)
- 将
为什么是 inlateout 而不是 in?
- 因为 syscall 的返回值是在
a0/x10寄存器返回的! - 所以这个寄存器是 既作为输入,也作为输出:用
inlateout就表示这一点
🧨 sys_exit 的作用
pub fn sys_exit(xstate: i32) -> isize {
    syscall(SYSCALL_EXIT, [xstate as usize, 0, 0])
}
- 构造一个
exit系统调用(编号 93) - 参数就是退出状态码
xstate - 调用 syscall 函数发出请求,内核接管,终止进程
🚀 程序入口 _start
#[no_mangle]
extern "C" fn _start() {
    sys_exit(9);
}
#[no_mangle]:告诉编译器不要对函数名做变换(保留_start)extern "C":使用 C ABI 以兼容链接器的期望_start是程序的启动点(手写入口,不依赖标准库)
运行时,程序执行 _start(),调用 sys_exit(9) 发出 exit 系统调用,内核结束这个进程。
🧠 总结:关键知识点
| 点 | 内容 |
|---|---|
ecall |
RISC-V 中触发系统调用 |
x10~x17 |
按照 RISC-V 调用规范传递参数、获取返回值 |
asm! |
Rust 内联汇编宏,用于和底层直接交互 |
inlateout |
同时传递参数和获取输出 |
#![no_std] |
禁用标准库,常用于内核/嵌入式编程 |
_start |
自定义程序入口,等价于 C 的 main() 前的启动代码 |
如果你想进一步试试,比如:
- 自己实现
sys_write给 stdout 打印东西 - 用
objdump看最终生成的汇编 - 用 QEMU 跑你这个最小程序
我也可以一步步带你做!需要我带你下一步搞一下吗?😎
print 格式化宏
#[macro_export]
macro_rules! print {
    ($fmt: literal $(, $($arg: tt)+)?) => {
        $crate::console::print(format_args!($fmt $(, $($arg)+)?));
    }
}

#[macro_export]
macro_rules! println {
    ($fmt: literal $(, $($arg: tt)+)?) => {
        print(format_args!(concat!($fmt, "\n") $(, $($arg)+)?));
    }
}
好的!这段代码定义了两个常见的宏 print! 和 println!,它们是自定义版本的 Rust std::print! / std::println! 宏,用于将内容输出到宿主机的控制台。
我们来逐句、逐个语法点讲清楚这些宏的写法和背后的原理。
🔧 整体结构:宏定义
#[macro_export]
macro_rules! print {
    ...
}
macro_rules!是 Rust 的 声明式宏(declarative macro)定义语法。#[macro_export]让宏可以从 crate 外部被调用(必须写在 crate 根目录下)。$crate::console::print(...)表示调用当前 crate 的console模块中的print函数。$crate是一个特殊的 token,表示这个宏定义所在的 crate(这样就不怕被导入时路径变了)。
🧱 看 print! 的规则:
macro_rules! print {
    ($fmt: literal $(, $($arg: tt)+)?) => {
        $crate::console::print(format_args!($fmt $(, $($arg)+)?))
    }
}
解释匹配部分:
($fmt: literal $(, $($arg: tt)+)?)
这表示宏的参数要匹配这样的形式:
$fmt: literal:第一个参数是一个字符串字面量(即"Hello"、"num = {}"这种)。$(, $($arg: tt)+)?:$(...)是一个重复匹配。,表示后面必须有一个逗号。$($arg: tt)+:匹配一个或多个tt(token tree),即所有类型的 Rust 代码片段。?表示“可选”——也就是说,你可以只写格式字符串,不跟参数。
📌 例子:
print!("Hello");                  // 只匹配 $fmt
print!("Number: {}", 42);         // 匹配 $fmt 和 $arg
替换部分:
$crate::console::print(format_args!($fmt $(, $($arg)+)?))
format_args!()是一个内置宏,作用类似format!(),但不会生成String,而是返回一个Arguments对象(适合给print、write用)。- 它会展开成
format_args!("num = {}", x)这样的形式。 $(, $($arg)+)?的写法代表“如果后面有参数,就加上这些参数”,否则省略。
✅ 再看 println!:
macro_rules! println {
    ($fmt: literal $(, $($arg: tt)+)?) => {
        $crate::console::print(format_args!(concat!($fmt, "\n") $(, $($arg)+)?))
    }
}
与 print! 不同的地方:
使用了 concat!:
concat!($fmt, "\n")
concat!()是另一个内置宏,作用是把多个字面量字符串在编译期拼接起来。- 它把格式字符串
$fmt和换行符"\n"拼成一个新的字符串。 - 这样就实现了 println 的自动换行!
📌 举个例子:
println!("Hello");               // 实际变成 print("Hello\n")
println!("Num = {}", 123);       // 实际变成 print("Num = {}\n", 123)
🧠 知识点小结
| 语法 | 含义 |
|---|---|
macro_rules! |
声明宏 |
$name: tt |
匹配任意的 Rust token |
$name: literal |
匹配字面量(如字符串、数字) |
$(...)? |
匹配可选部分 |
$(...)+ |
匹配一个或多个 |
concat!() |
编译期拼接字符串 |
format_args!() |
构造格式化参数(不分配内存) |
$crate:: |
引用当前 crate 中的路径,避免命名冲突 |
🚀 拓展阅读 / 建议
你可以试着自己写一个 errorln! 宏,把输出内容标成红色,或者输出到 stderr,这样对宏的掌握会更深入。
要不要我来帮你写一个 errorln! 版本来练手?😄
ANSI 转义序列
impl Log for SimpleLogger {
    fn enabled(&self, _metadata: &Metadata) -> bool {
        true
    }
    fn log(&self, record: &Record) {
        if !self.enabled(record.metadata()) {
            return;
        }
        let color = match record.level() {
            Level::Error => 31, // Red
            Level::Warn => 93,  // BrightYellow
            Level::Info => 34,  // Blue
            Level::Debug => 32, // Green
            Level::Trace => 90, // BrightBlack
        };
        println!(
            "\u{1B}[{}m[{:>5}] {}\u{1B}[0m",
            color,
            record.level(),
            record.args(),
        );
    }
    fn flush(&self) {}
}
CSI (Control Sequence Introducer) sequences
CSI序列 由 ESC [、若干个(包括0个)“参数字节”、若干个“中间字节”,以及一个“最终字节”组成。
wiki 解释:For Control Sequence Introducer, or CSI, commands, the ESC [ (written as \e[ or \033[ in several programming languages) is followed by any number (including none) of “parameter bytes” in the range 0x30–0x3F (ASCII 0–9:;<=>?), then by any number of “intermediate bytes” in the range 0x20–0x2F (ASCII space and !"#$%&'()*+,-./), then finally by a single “final byte” in the range 0x40–0x7E (ASCII @A–Z[\]^_a–z{|}~`).
下面我们来依次拆解这条转义序列以及它在字符串中的位置和作用:
"\u{1B}[{}m[{:>5}] {}\u{1B}[0m"
总体思路:这是一个 ANSI 转义序列,用于在终端上输出带有颜色等效果的文本。其中用到了 Rust 的格式化占位符,以及对 Esc 字符的 Unicode 转义来组合出完整的控制命令。
1. \u{1B} — 转义字符 Esc
\u{1B}对应的是 Unicode 码位U+001B,即 ASCII 表里的 ESC (Escape) 字符。- 在终端上,
ESC字符结合后续的方括号和数字,就构成了 ANSI 控制码(ANSI escape code)。 - 换言之,
"\u{1B}["一般会写作"\x1B["或"\033[",它们都是同一个字节值0x1B。
2. [{}m — 设置显示属性(颜色)
- 完整序列形如:
x1B [ 31 m
\x1B [ 32 m
\x1B [ 90 m
...
其中
31、32、90等数字是 ANSI 颜色代码。 -
在宏里写成
"[{}m", 其中{}是一个占位符,会被替换成color的数值(如 31, 32 等)。 -
当终端解析到
\u{1B}[31m时,就会将后续文字显示为红色(比如31对应红色),\u{1B}[32m则对应绿色,依此类推。
3. [{:>5}] — 输出的日志级别,右对齐 5 格宽度
- 紧随其后的部分
"[{:>5}]"中的{:>5}是 Rust 格式化字符串的一个语法,用来右对齐输出内容,并固定最小宽度为 5 个字符。 - 这里拿到的是
record.level()(如INFO,ERROR等)。举例:{:>5}->INFO可能输出为INFO(前面带一空格),如果是WARN可能输出为WARN等。- 这在日志打印时是一种常见做法,保证日志级别对齐,增强可读性。
4. {} — 输出日志内容
- 在
"[{:>5}] {}\u{1B}[0m"中最后的{}代表record.args(),即日志的正文。 - Rust 的
format!/println!会将这个占位符替换成实际要输出的内容。
5. \u{1B}[0m — 还原/重置终端颜色
- 最后一段
"\u{1B}[0m"同样是一个 ANSI 转义序列,表示“重置所有属性到默认状态”(也可以称为“关闭所有属性”)。 - 这通常用于在打印完成后把颜色切换回默认值,避免影响后续文字的显示。
第二章:批处理系统
sscratch 是何时被设置为内核栈顶的?
rCore 启动后第一次切换到用户程序的时候会调用 batch::run_next_app(); 其中会调用 __restore,KERNEL_STACK.push_context 会返回 push 后的内核栈栈顶,作为 __restore 的函数参数放在 a0 寄存器中,然后 mv sp, a0,sp 指向当前内核栈栈顶,最后 sret 前 csrrw sp, sscratch, sp,内核栈栈指针被交换到 sscratch 里。
第三章:多道程序与分时多任务
这个 Lab 太简单当初没有记笔记。
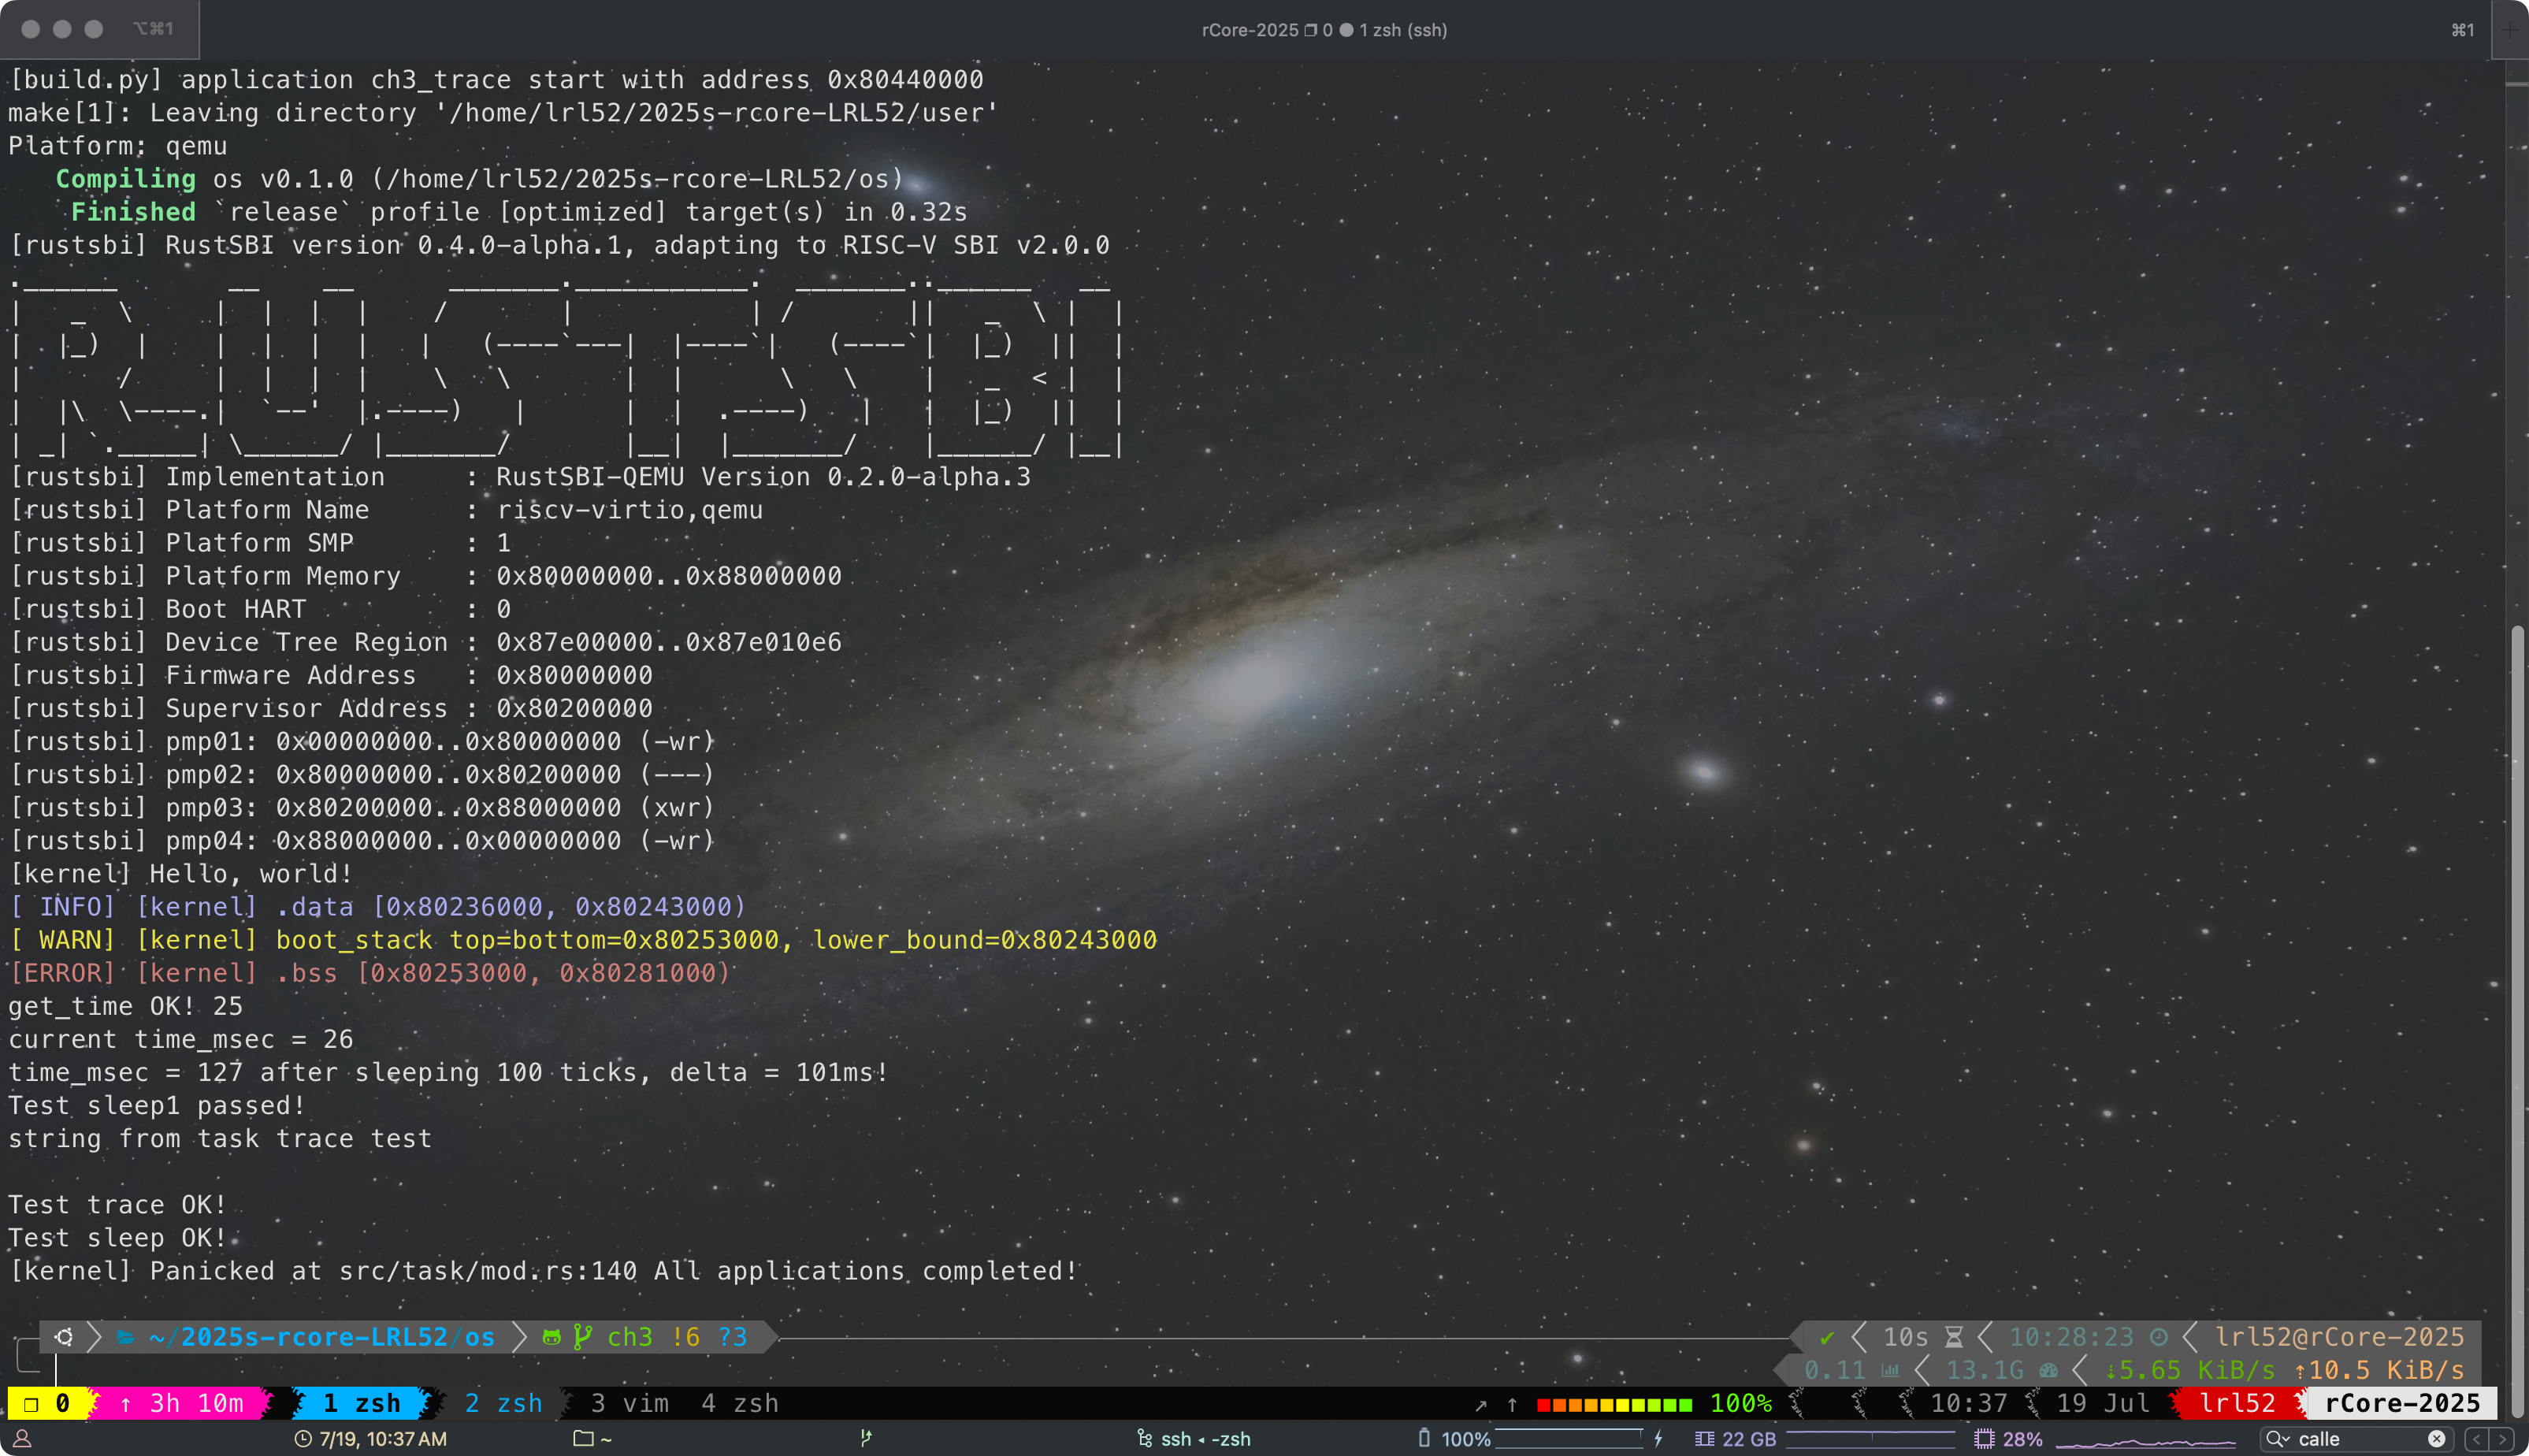
Lab 3 通过
第四章:地址空间
这一节的信息量比较大,这里简单记录下实验过程。
在重写 sys_get_time 的时候,我发现 rCore 竟然没提供拿到 current TCB 的接口,要知道在 Linux 中可以通过 current 宏拿到 task_struct 或者在 xv6 中也能通过 myproc() 接口拿到。于是我就想添加一个拿到当前 TCB 的接口,不过经过一番研究后又发现 rCore 的设计无法安全地直接拿到,受到 UPSafeCell 的借用限制和,无法从中借出一个 &'static mut TaskControlBlock。不过可以通过裸指针绕过生命周期限制,或者 core::mem::transmute 强行延长生命周期。(这里想拿 TCB 是想直接从 TCB 里拿 page_table,但 rCore 的设计是建议从 current user token 直接构造 page_table,所以后面还是按照 rCore 的设计来写的没有用上 current TCB)
    /// Get the current 'Running' task's task control block.
    fn get_current_tcb(& self) -> &'static mut TaskControlBlock {
        let mut inner = self.inner.exclusive_access();
        let current_task = inner.current_task;
        let tcb = &mut inner.tasks[current_task];
        unsafe {
            // SAFETY: `inner` is an `UPSafeCell`, so we can safely get a mutable reference
            // to the current task's TCB.
            &mut *(tcb as *mut TaskControlBlock)
            // core::mem::transmute::<&mut TaskControlBlock, &'static mut TaskControlBlock>(tcb)
        }
    }
sys_get_time 的实现在于让我们熟悉第一次在 rCore 内核里手动 translate 地址。由于内核对所有可用内存地址空间都是有恒等映射的,所以只需把用户态的地址翻译成物理地址,就能够直接写入了。其中 PhysAddr::get_mut 是个泛型函数,实现了 PA 到任意 type 的 cast。于是第一版就这么 easy 地实现了,就是 VA/PA/VPN/PPN 之间的转换写起来比较烦,用了很多 into()。
/// YOUR JOB: get time with second and microsecond
/// HINT: You might reimplement it with virtual memory management.
/// HINT: What if [`TimeVal`] is splitted by two pages ?
pub fn sys_get_time(ts: *mut TimeVal, _tz: usize) -> isize {
    trace!("kernel: sys_get_time");
    let token = current_user_token();
    let page_table = PageTable::from_token(token);
    let va = VirtAddr::from(ts as usize);
    let vpn = va.floor();
    let ppn = page_table.translate(vpn).unwrap().ppn();
    let offset = va.page_offset();
    let pa: PhysAddr = (Into::<usize>::into(Into::<PhysAddr>::into(ppn)) + offset).into();
    let ts: &mut TimeVal = pa.get_mut();
    let us = get_time_us();
    *ts = TimeVal {
        sec: us / 1_000_000,
        usec: us % 1_000_000,
    };
    0
    // 上面这个实现并不完美,无法处理跨页的情况
}
然后上面这个实现并不完美,无法处理物理地址不连续跨页的情况(虽然概率很小)。这下我明白了 translated_byte_buffer 设计的用意,可写字节流就可以避免这个问题。把 TimeVal 视作源字节流,copy 到 translated_byte_buffer 里。
pub fn sys_get_time(ts: *mut TimeVal, _tz: usize) -> isize {
    trace!("kernel: sys_get_time");
    let token = current_user_token();
    let buf = translated_byte_buffer(token, ts as *const u8, core::mem::size_of::<TimeVal>());
    let us = get_time_us();
    let ts = TimeVal {
        sec: us / 1_000_000,
        usec: us % 1_000_000,
    };
    let src = unsafe {
        core::slice::from_raw_parts(&ts as *const TimeVal as *const u8, core::mem::size_of::<TimeVal>())
    };
    let mut offset = 0;
    for dst in buf {
        let len = dst.len();
        dst.copy_from_slice(&src[offset..offset + len]);
        offset += len;
    }
    0
}
sys_trace 的实现就不赘述了,需要注意 SV39 地址的定义,
    /// Check if the virtual address is valid
    /// 在启用 SV39 分页模式下,只有低 39 位是真正有意义的。SV39 分页模式规定 64 位虚拟地址的
    /// 这 25 位必须和第 38 位相同,否则 MMU 会直接认定它是一个 不合法的虚拟地址。也就是说,
    /// 所有 2^{64} 个虚拟地址中,只有最低的 256GiB(当第 38 位为 0 时)以及最高的(当第 38
    /// 位为 1 时)是合法的虚拟地址。
    pub fn is_valid(addr: usize) -> bool {
        addr <= 0x3F_FF_FF_FF_FF_usize || addr >= 0xFF_FF_FF_C0_00_00_00_00_usize
    }
在 sys_mmap 和 sys_munmap 的实现里,current_tcb 就可以用上了。TCB 里的 MemorySet 里的 MapArea (相当于 VMA)很有用,可以知道已映射的地址空间范围,以及是否与新映射的范围有冲突。不过我发现 rCore 的设计里 MemorySet 和 MapArea 里的字段都是 private 的,拿到 TCB 后也没法直接访问。经过一番观察和思考,我觉得添加新的 API 也不太方便和通用,权衡后我决定把 private 字段权限改为 public,虽然这样违反了设计原则,但是权衡后感觉这样还是会好实现很多。能拿到 VMA,就能够判断区间交,相比起来看了下一些其它实现,他们干脆尝试一页一页的 translate 来检查待映射区间的所有页面,我这样实现还是要高效很多。
pub fn sys_mmap(start: usize, len: usize, prot: usize) -> isize {
    trace!("kernel: sys_mmap");
    let start_va = VirtAddr::from(start);
    if !start_va.aligned() || (prot & !0x7 != 0) || (prot & 0x7 == 0) {
        trace!("kernel: sys_mmap failed, invalid parameters!");
        return -1;
    }
    let end_va: VirtAddr = VirtAddr::from(start + len).ceil().into();
    let start_vpn: VirtPageNum = start_va.into();
    let end_vpn: VirtPageNum = end_va.into();

    // Check if there are enough free pages
    if end_vpn.0 - start_vpn.0 > FRAME_ALLOCATOR.exclusive_access().free_page_count() {
        trace!("kernel: sys_mmap failed, not enough free pages!");
        return -1;
    }

    // Check if the new memory area overlaps with existing areas
    let current = current_tcb();
    let new_vpn_range = VPNRange::new(start_vpn, end_vpn);
    for area in current.memory_set.areas.iter() {
        if area.vpn_range.has_intersection(&new_vpn_range) {
            trace!("kernel: sys_mmap failed, overlapping memory area!");
            return -1;
        }
    }

    let mut permission = MapPermission::U;
    permission |= MapPermission::from_bits((prot << 1) as u8).unwrap();
    current.memory_set.insert_framed_area(start_va, end_va, permission);
    0
}
对于 sys_munmap,仿照 insert_framed_area 先实现一个 remove_framed_area 方法。
    /// Remove a framed area
    pub fn remove_framed_area(
        &mut self,
        start_va: VirtAddr,
        end_va: VirtAddr,
    ) -> Option<MapArea> {
        let start_vpn = start_va.floor();
        let end_vpn = end_va.ceil();
        if let Some(index) = self
            .areas
            .iter()
            .position(|area| area.vpn_range.get_start() == start_vpn && area.vpn_range.get_end() == end_vpn)
        {
            let mut area = self.areas.remove(index);
            area.unmap(&mut self.page_table);
            Some(area)
        } else {
            None
        }
    }
然后实现就简单了,
// YOUR JOB: Implement munmap.
pub fn sys_munmap(start: usize, len: usize) -> isize {
    trace!("kernel: sys_munmap");
    let start_va = VirtAddr::from(start);
    if !start_va.aligned() {
        trace!("kernel: sys_munmap failed, invalid parameters!");
        return -1;
    }
    let end_va: VirtAddr = VirtAddr::from(start + len).ceil().into();

    let current = current_tcb();
    match current.memory_set.remove_framed_area(start_va, end_va) {
        Some(_) => 0,
        None => -1
    }
}
lazy_static! BUG
接下来是个很隐蔽且 troublesome 的 BUG,这个 BUG 搞了我大半天,害得我晚上都睡不了觉。
BUG 描述:
在 TaskManagerInner 中添加了 syscall_count: [[isize; MAX_SYSCALL_NUM]; MAX_APP_NUM] 字段,并通过 lazy_static! 宏一起初始化,
lazy_static! {
pub static ref TASK_MANAGER: TaskManager = {
        println!("init TASK_MANAGER");
        let num_app = get_num_app();
        println!("num_app = {}", num_app);
        let mut tasks: Vec<TaskControlBlock> = Vec::new();
        for i in 0..num_app {
            tasks.push(TaskControlBlock::new(get_app_data(i), i));
        }
        TaskManager {
            num_app,
            inner: unsafe {
                UPSafeCell::new(TaskManagerInner {
                    tasks,
                    current_task: 0,
                    syscall_count: [[0; MAX_SYSCALL_NUM]; MAX_APP_NUM],
                })
            },
        }
    };
}
当编译开启 debug 选项时,启动 rCore 会出现诡异卡死:
[rustsbi] RustSBI version 0.4.0-alpha.1, adapting to RISC-V SBI v2.0.0
.______       __    __      _______.___________.  _______..______   __
|   _  \     |  |  |  |    /       |           | /       ||   _  \ |  |
|  |_)  |    |  |  |  |   |   (----`---|  |----`|   (----`|  |_)  ||  |
|      /     |  |  |  |    \   \       |  |      \   \    |   _  < |  |
|  |\  \----.|  `--'  |.----)   |      |  |  .----)   |   |  |_)  ||  |
| _| `._____| \______/ |_______/       |__|  |_______/    |______/ |__|
[rustsbi] Implementation     : RustSBI-QEMU Version 0.2.0-alpha.3
[rustsbi] Platform Name      : riscv-virtio,qemu
[rustsbi] Platform SMP       : 1
[rustsbi] Platform Memory    : 0x80000000..0x88000000
[rustsbi] Boot HART          : 0
[rustsbi] Device Tree Region : 0x87e00000..0x87e010e6
[rustsbi] Firmware Address   : 0x80000000
[rustsbi] Supervisor Address : 0x80200000
[rustsbi] pmp01: 0x00000000..0x80000000 (-wr)
[rustsbi] pmp02: 0x80000000..0x80200000 (---)
[rustsbi] pmp03: 0x80200000..0x88000000 (xwr)
[rustsbi] pmp04: 0x88000000..0x00000000 (-wr)
[kernel] Hello, world!
[ INFO] [kernel] .data [0x8022c000, 0x80584000)
[ WARN] [kernel] boot_stack top=bottom=0x80594000, lower_bound=0x80584000
[ERROR] [kernel] .bss [0x80594000, 0x825a4000)
[ INFO] .text [0x80200000, 0x80225000)
[ INFO] .rodata [0x80225000, 0x8022c000)
[ INFO] .data [0x8022c000, 0x80584000)
[ INFO] .bss [0x80584000, 0x825a4000)
[ INFO] physical memory [0x825a4000, 0x88000000)
[ INFO] mapping .text section
[ INFO] mapping .rodata section
[ INFO] mapping .data section
[ INFO] mapping .bss section
[ INFO] mapping physical memory
[kernel] back to world!
remap_test passed!
init TASK_MANAGER
num_app = 11
syscall_count ptr = 0x80525470 num_app ptr = 0x805252d0
syscall_count ptr = 0x80594078, size = 0xfa00
[kernel] IllegalInstruction in application, kernel killed it.
[kernel] IllegalInstruction in application, kernel killed it.
Hello, world from user mode program!
QEMU: Terminated
原因:
lazy_static! 宏在初始化时 [[0; MAX_SYSCALL_NUM]; MAX_APP_NUM] 被临时分配在了栈上,而不是 .bss 段中,从而导致 stack overflow,进而引发各种各样奇怪的问题(heap_allocator 死锁/内核取指异常)!当初始化完成后 syscall_count 才会被移动到 .bss 段里(0x80594078 位于 .bss 段 [0x80584000, 0x825a4000) 中)。如果启用了 release 模式,这种愚蠢的行为似乎会被优化掉,但在 debug 模式下,这个大数组确实被分配在了栈上。而 rCore 的 boot_stack 只有 16KiB(位于区间 0x80594000-0x80584000)。目前的 MAX_APP_NUM 为 16,MAX_SYSCALL_NUM 为 500,如果你把 MAX_APP_NUM 修改为 1,则在 debug 模式下可以正常启动。
GDB 复现:

补充:
lazy_static! {
    /// a `TaskManager` global instance through lazy_static!
    pub static ref TASK_MANAGER: TaskManager = {
        println!("init TASK_MANAGER");
        let num_app = get_num_app();
        println!("num_app = {}", num_app);
        let mut tasks: Vec<TaskControlBlock> = Vec::new();
        for i in 0..num_app {
            tasks.push(TaskControlBlock::new(get_app_data(i), i));
        }
        TaskManager {
            num_app,
            inner: unsafe {
                UPSafeCell::new(TaskManagerInner {
                    tasks,
                    current_task: 0,
                    syscall_count: Box::new([[0; MAX_SYSCALL_NUM]; MAX_APP_NUM]), // ❌
                })
            },
        }
    };
}
以上也是错误写法,这也会在栈上创建临时数组,再 move 到堆上。
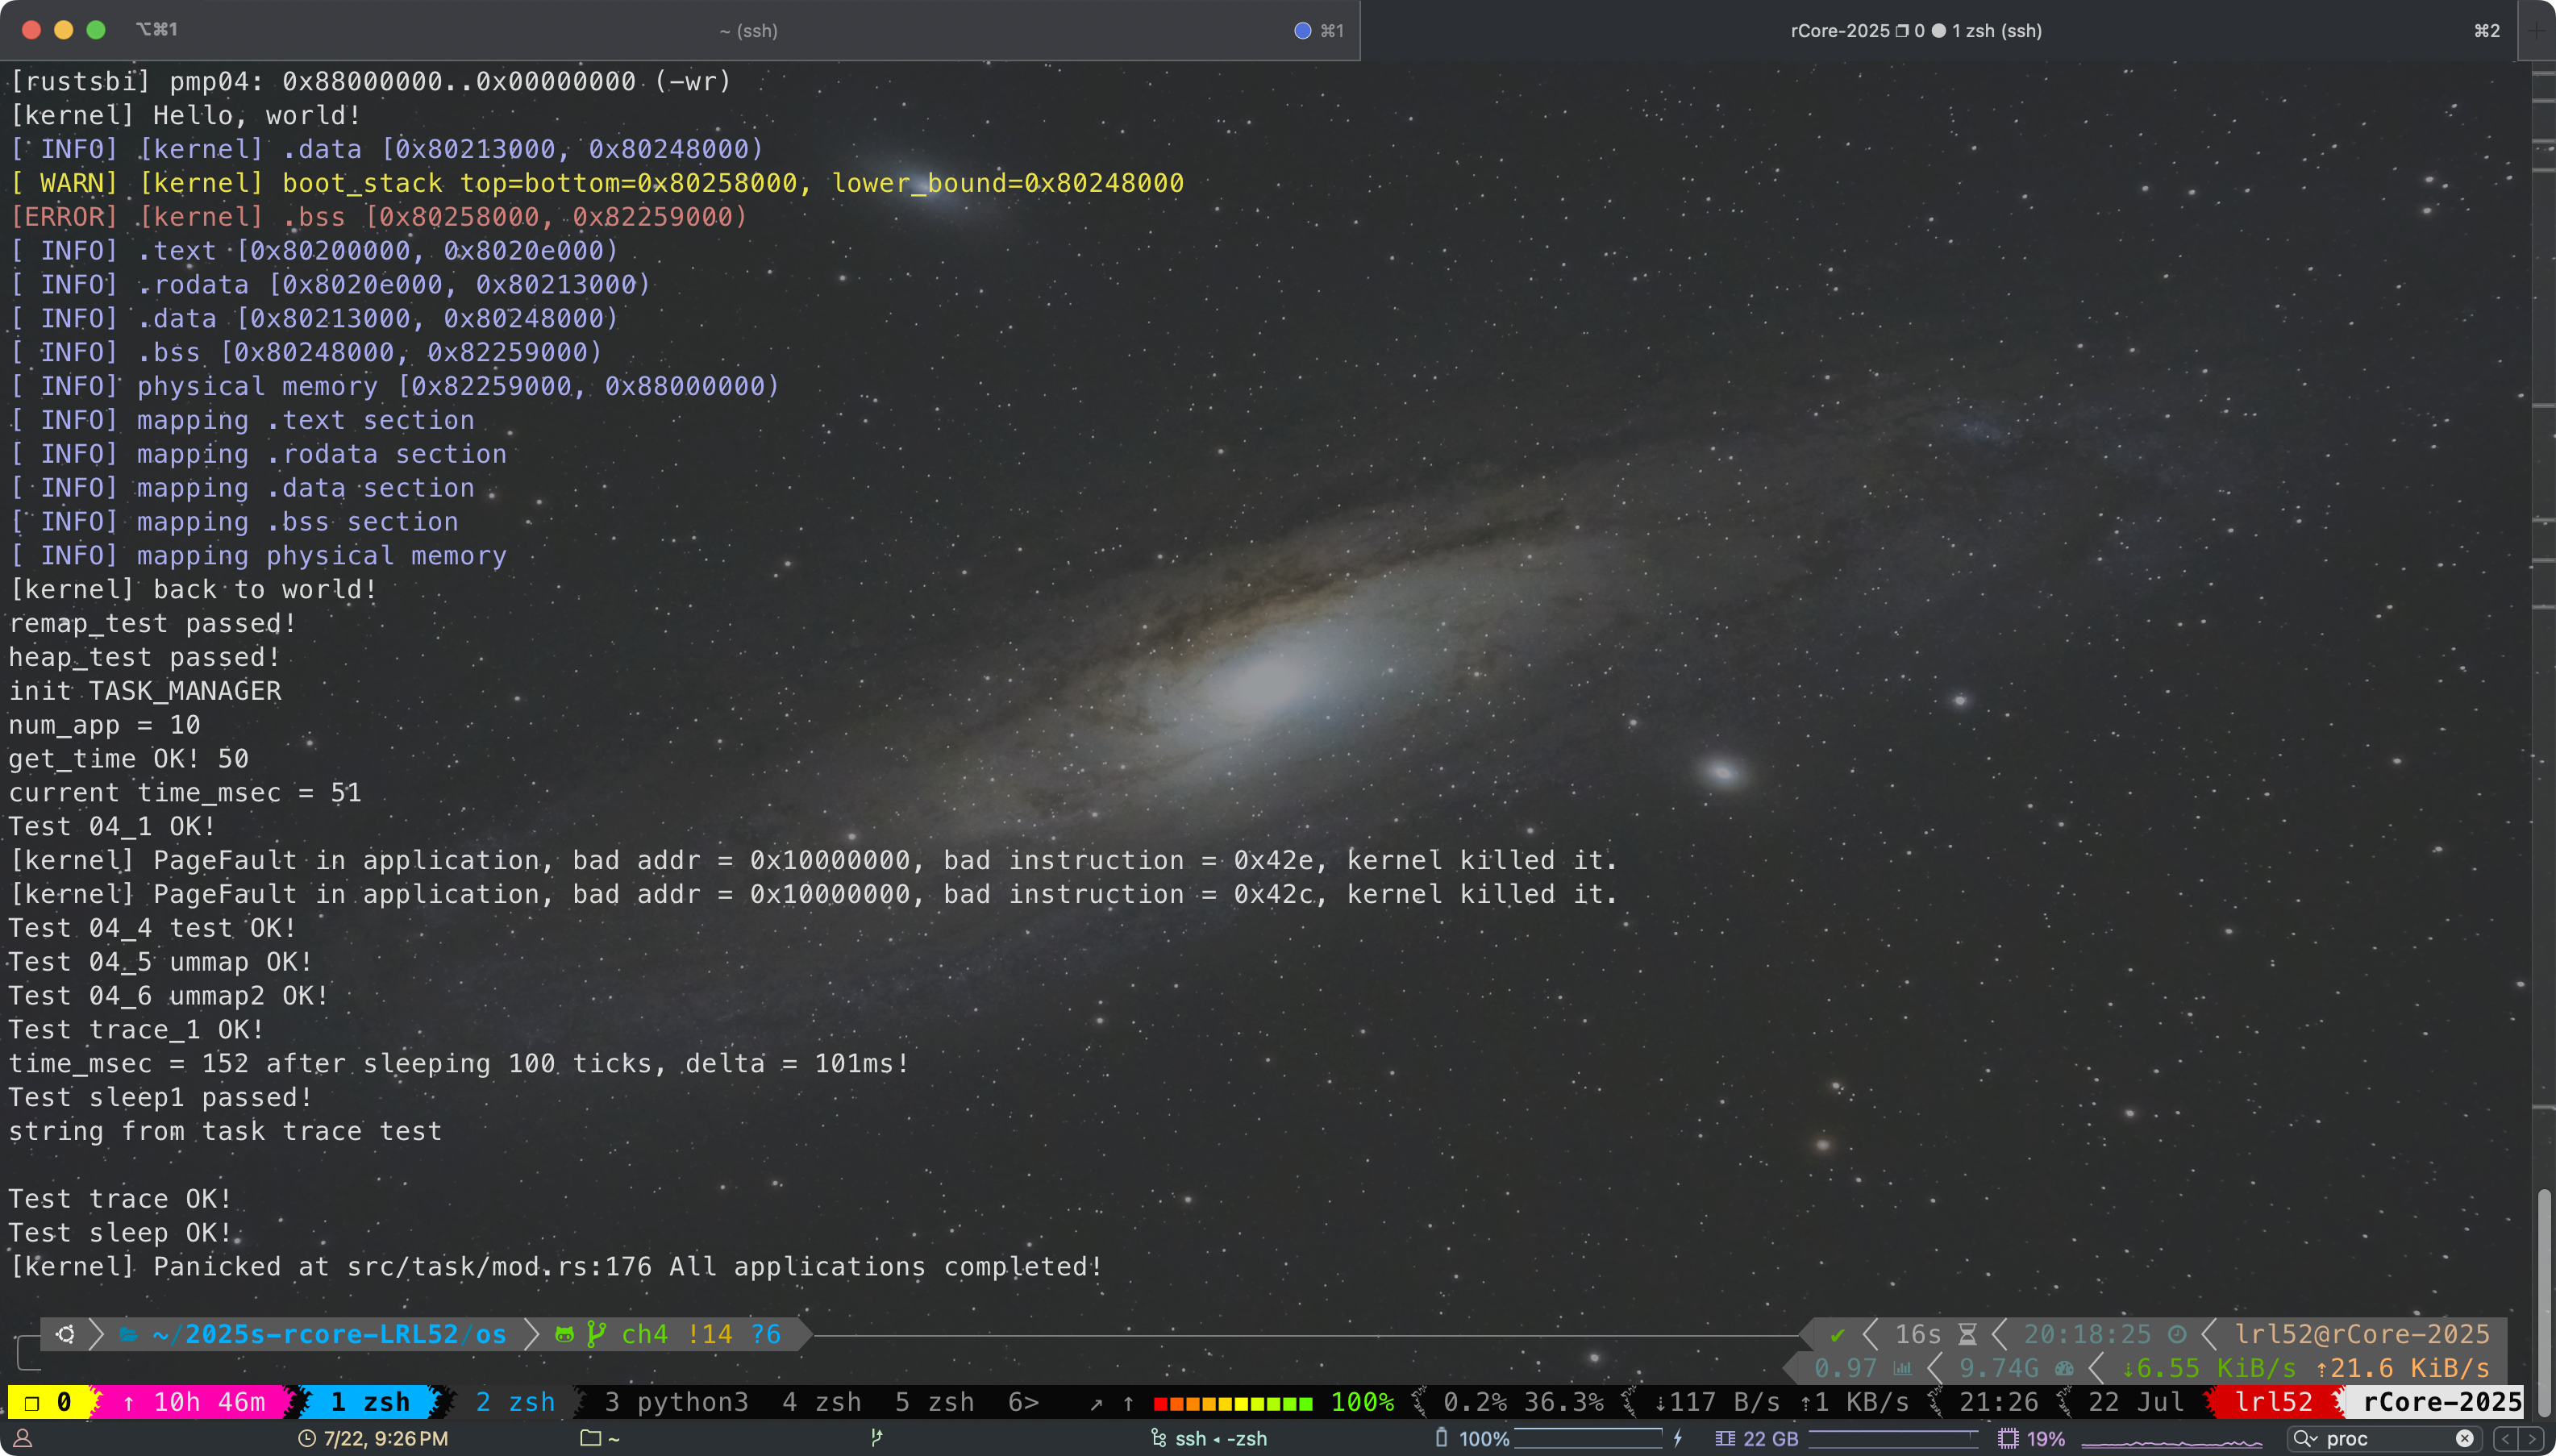
Lab 4 通过
最后是 rCore debug 的一些实践,
用 xv6 的办法调试 rCore 的用户程序时,会在 add-symbol-file 的时候提示 (No debugging symbols found in user/build/elf/ch4_trace1.elf)。在 user/src/linker.ld 里,删除丢弃 .debug 段这一行就行了(这个问题也坑了我半天,百思不得其解为什么我不加 --release 编译没有 debug symbol)
    /DISCARD/ : {
        *(.eh_frame)
        *(.debug*)
    }
参考 xv6 搞了份简单的 .gdbinit 启动脚本,
set confirm off
set architecture riscv:rv64
target remote localhost:1234
symbol-file os/target/riscv64gc-unknown-none-elf/debug/os
set disassemble-next-line auto
set riscv use-compressed-breakpoints yes
第五章:进程及进程管理
对于 sys_spawn 的实现,我们先观察一下 fork 和 exec 的区别,进而我们观察 TaskControlBlock::new 和 TaskControlBlock::fork 的实现,从中找到可以复用的函数。由于 spwawn 是直接启一个新进程,因此可以直接复用 TaskControlBlock::new 的逻辑,然后再设置一下父子指针互相指向一下,最后把这个进程加到任务队列里。
/// YOUR JOB: Implement spawn.
/// HINT: fork + exec =/= spawn
pub fn sys_spawn(path: *const u8) -> isize {
trace!("kernel:pid[{}] sys_spawn", current_task().unwrap().pid.0);
let current_task = current_task().unwrap();
let token = current_user_token();
let path = translated_str(token, path);
let elf_data = get_app_data_by_name(&path);
if elf_data.is_none() {
trace!("kernel: sys_spawn failed, app not found: {}", path);
return -1;
}
let new_task = Arc::new(TaskControlBlock::new(elf_data.unwrap()));
// set the parent of the new task to the current task
let mut parent_inner = current_task.inner_exclusive_access();
parent_inner.children.push(new_task.clone());
let mut child_inner = new_task.inner_exclusive_access();
child_inner.parent = Some(Arc::downgrade(¤t_task));
drop(child_inner); // 提前释放 child_inner,因为 add_task 也需要获取可变引用
// add the new task to the scheduler
add_task(new_task.clone());
new_task.pid.0 as isize
}
⚠️ 注意,由于 add_task 的时候也需要调用 new_task.inner_exclusive_access(),为了避免可变引用被借用两次,需要在 add_task 之前收到 drop(后来我发现也可以像 sys_fork 那样提前保存 pid 就不用了)。这是一个很 simple 的 BUG,由于借用两次会 panic,调试时我们只需要在 os/src/lang_items.rs 的 panic 函数内打个断点,然后再 backtrace 就能轻松找到问题,但也就是这个很 simple 的 BUG,让我发现 rCore ch5 的 debug mode 无法正常用,为了找出原因又熬夜找 bug 了很久。。。
在 manager.rs 中实现 stride 调度算法,只需要更换掉 TaskManager 里 ready_queue 就行了,不需要更改 run_tasks() 的任何代码。在 TCB 里添加两个新字段:
    /// Stride for stride scheduling algorithm
    pub stride: Stride,

    /// Priority for stride scheduling algorithm
    pub priority: Priority
为了能够放进 BinearyHeap,实现一下这 4 个 trait: Ord/PartialOrd/PartialEq/Eq。实际上 BinearyHeap 只要求实现 Ord,但 Ord: Eq + PartialOrd,Eq: PartialEq,所以根据依赖关系 4 个都需要实现。⚠️ 注意 BinaryHeap 是大根堆,为了让 Stride 的小的放堆顶,需要反序。
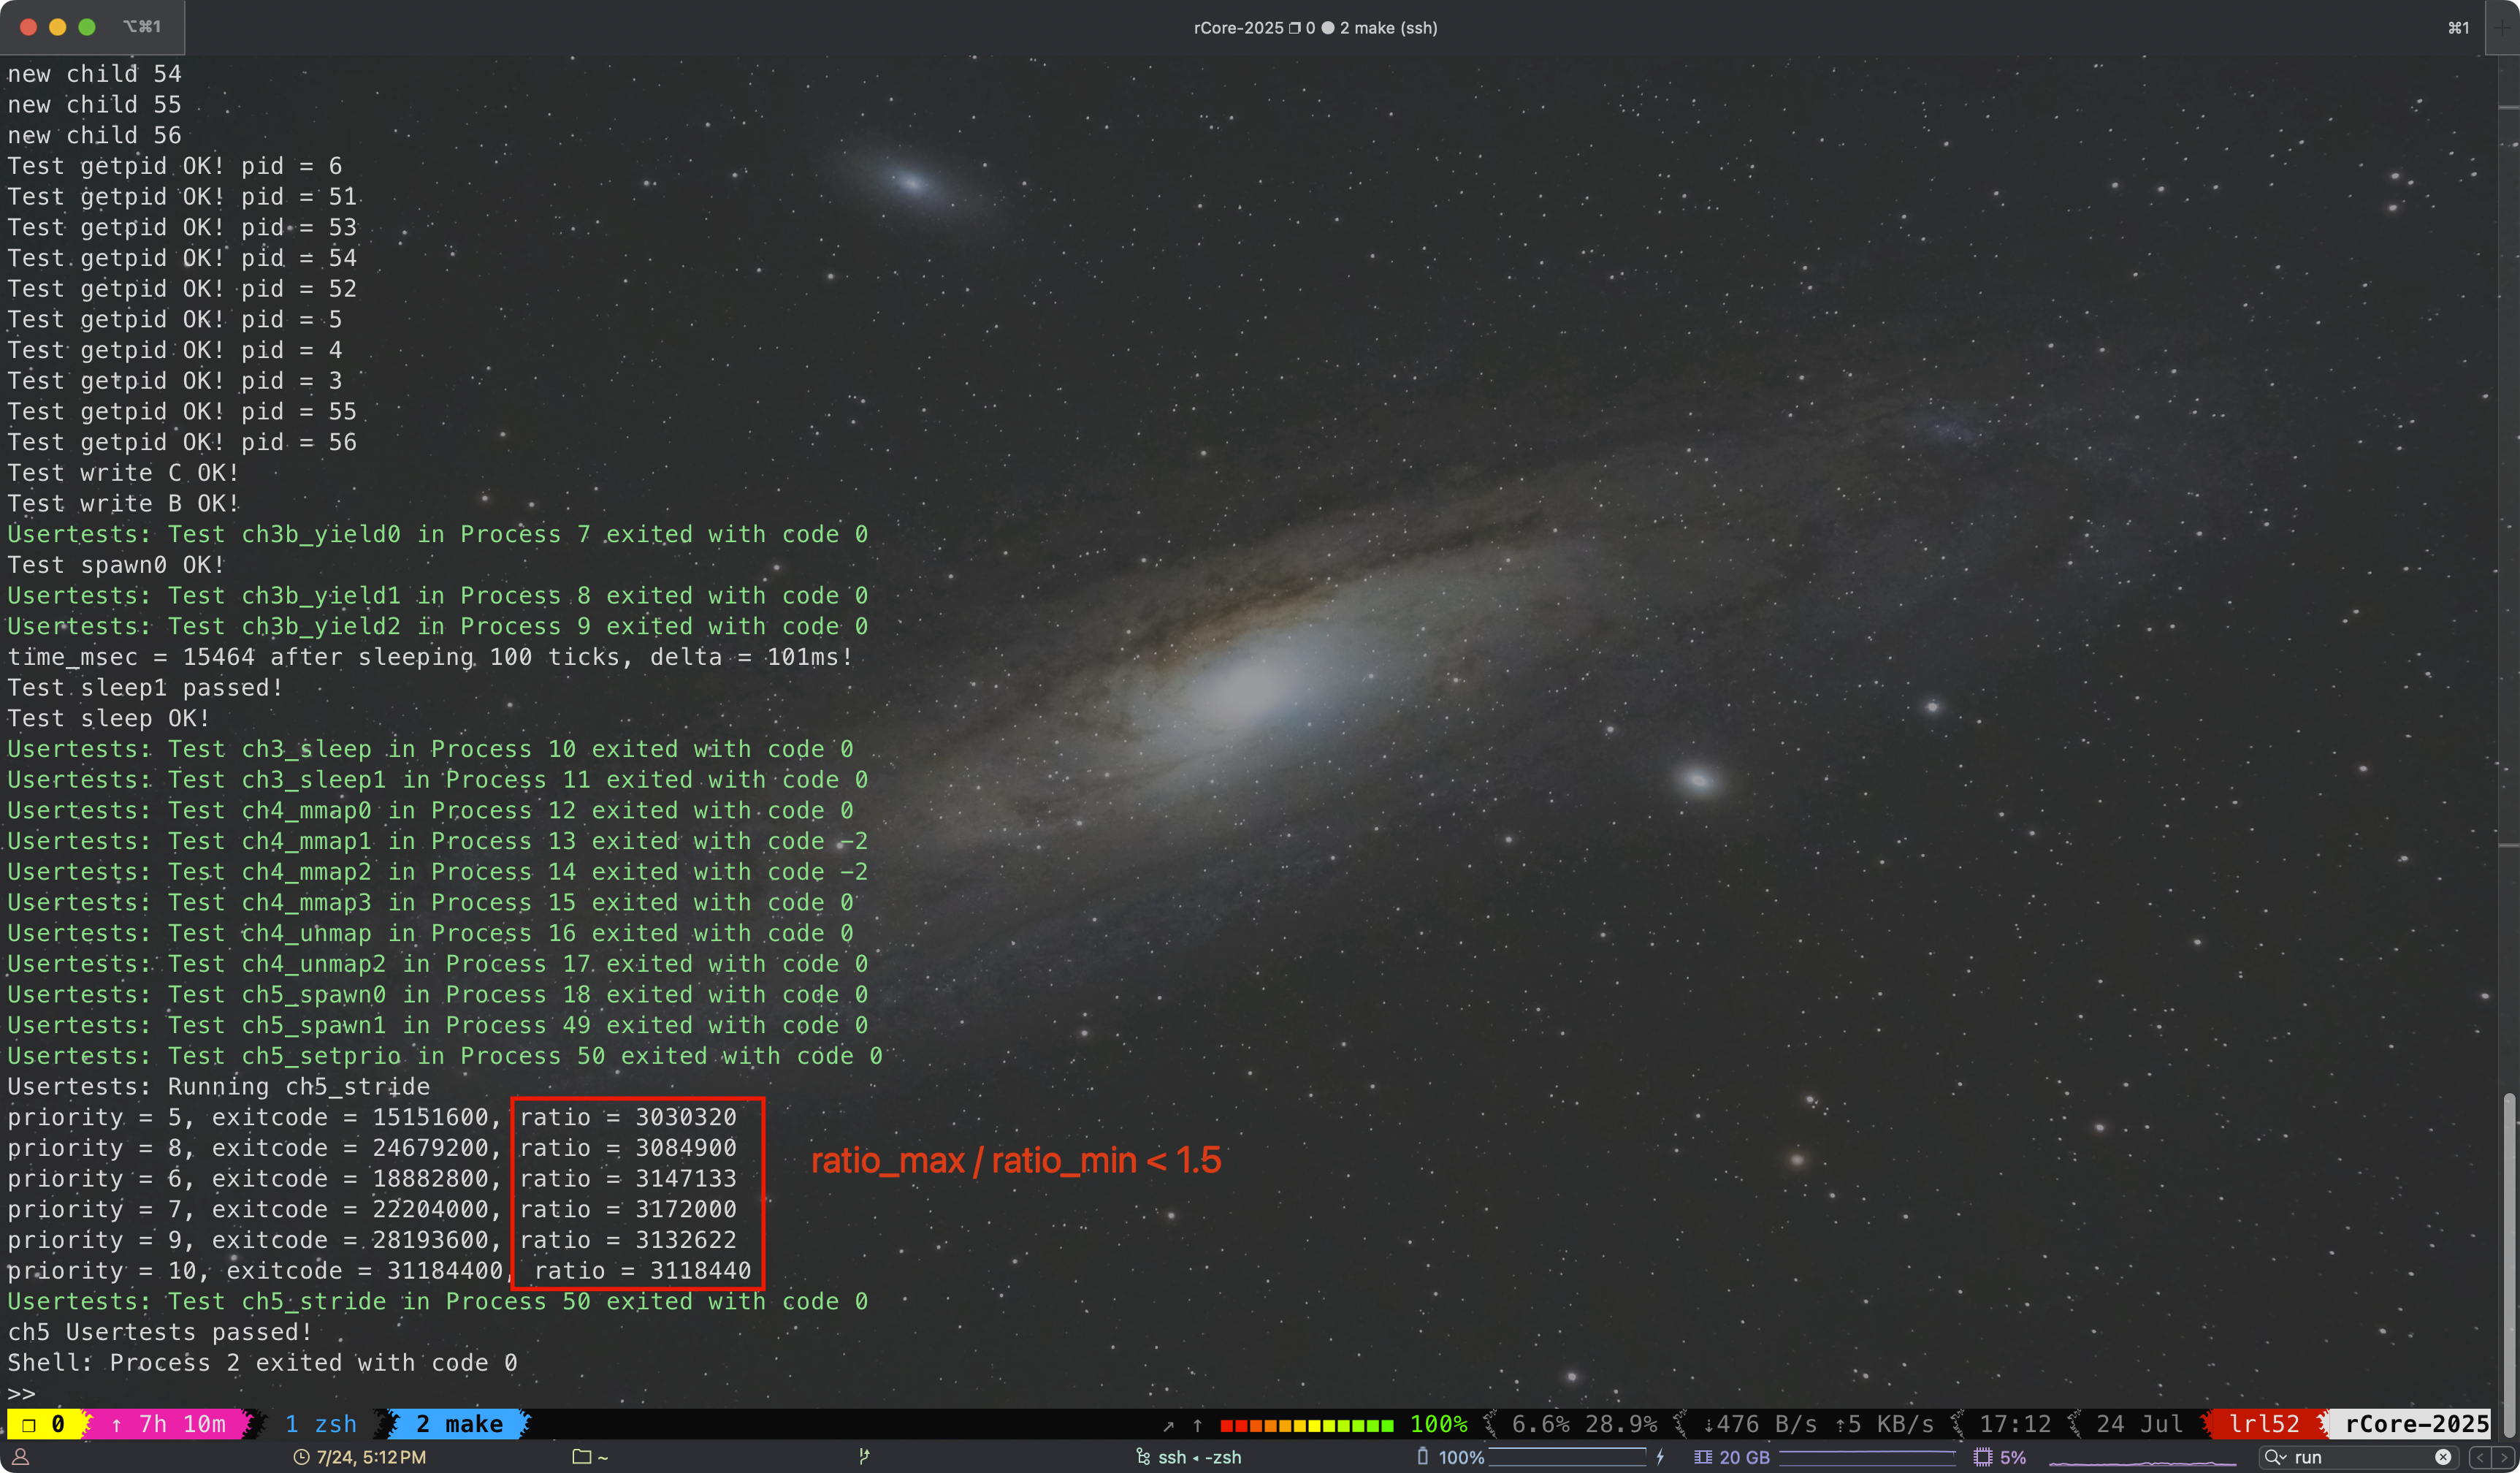
至于溢出处理其实很简单,实验文档里的有些误导和 puzzle 了,文档里说 “TIPS: 使用 8 bits 存储 stride, BigStride = 255″,但代码里又是 struct Stride(u64);,搞得我还以为 Stride 用 u64,但 BigStride 只用 8 位的 255,属实令读者困惑为什么这么做。因为 STRIDE_MAX – STRIDE_MIN <= BigStride / 2,在模 $2^{64}$ 下,STRIDE_MAX – STRIDE_MIN 的距离只需要取较小的一段就行。
#[derive(Copy, Clone)]
/// Stride for stride scheduling algorithm
pub struct Stride(pub u64);

#[derive(Copy, Clone)]
/// Priority for stride scheduling algorithm
pub struct Priority(pub u64);

impl Stride {
    pub const BIG_STRIDE: u64 = u64::MAX;
    pub const HALF: u64 = Stride::BIG_STRIDE / 2;

    pub fn init() -> Self {
        Stride(0)
    }
}

impl PartialEq for Stride {
    fn eq(&self, _other: &Self) -> bool {
        false
    }
}

impl PartialOrd for Stride {
    fn partial_cmp(&self, other: &Self) -> Option<Ordering> {
        Some(self.cmp(other))
    }
}

impl Ord for Stride {
    fn cmp(&self, other: &Self) -> Ordering {
        // 计算 (self - other) 在模 2⁶⁴ 环上的差值
        let diff = self.0.wrapping_sub(other.0);

        // -------------- 关键逻辑 ----------------
        // 若 diff ≤ HALF :说明 self 实际比 other 大(落后),
        // 若 diff > HALF :说明发生回绕,self 实际比 other 小(领先)。
        //
        // BinaryHeap 是大根堆;为了让 pop() 返回“最小 stride 的进程”,
        // 反转顺序,让“较小的”stride 更大。(BinaryHeap 大根堆)
        if diff <= Stride::HALF {
            Ordering::Less      // self 落后 → 视为“较小”,排在后面
        } else {
            Ordering::Greater   // self 领先 → 视为“较大”,优先弹出
        }
    }
}

impl Eq for Stride {}

impl Priority {
    /// Default priority for stride scheduling algorithm
    pub fn init() -> Self {
        Priority(16)
    }
}
此外,还需要定义个 ReadyQueueItem 方便把 Stride 和 TCB 打包放进二叉堆容器里,
struct ReadyQueueItem {
    task: Arc<TaskControlBlock>,
    stride: Stride,
}

impl PartialEq for ReadyQueueItem {
    fn eq(&self, other: &Self) -> bool {
        self.stride == other.stride
    }
}

impl PartialOrd for ReadyQueueItem {
    fn partial_cmp(&self, other: &Self) -> Option<Ordering> {
        self.stride.partial_cmp(&other.stride)
    }
}

impl Ord for ReadyQueueItem {
    fn cmp(&self, other: &Self) -> Ordering {
        self.stride.cmp(&other.stride)
    }
}

impl Eq for ReadyQueueItem {}
最后 TaskManager 的剩余实现就不用多说了,注意 wrapping_add 来让 Rust 允许安全的自动溢出。
/// A simple FIFO scheduler.   (x)
/// A simple stride scheduler. (√)
impl TaskManager {
    ///Creat an empty TaskManager
    pub fn new() -> Self {
        Self {
            // ready_queue: VecDeque::new(),
            ready_queue: BinaryHeap::new(),
        }
    }
    /// Add process back to ready queue
    pub fn add(&mut self, task: Arc<TaskControlBlock>) {
        // self.ready_queue.push_back(task);
        let stride = task.inner_exclusive_access().stride;
        self.ready_queue.push(ReadyQueueItem {
            task,
            stride,
        });
    }
    /// Take a process out of the ready queue
    pub fn fetch(&mut self) -> Option<Arc<TaskControlBlock>> {
        // self.ready_queue.pop_front()
        let item = self.ready_queue.pop();
        if item.is_none() {
            return None;
        }
        let ret = item.unwrap().task;
        {
            let mut inner = ret.inner_exclusive_access();
            inner.stride.0 = inner.stride.0.wrapping_add(Stride::BIG_STRIDE / inner.priority.0);
        }
        Some(ret)
    }
}
sys_set_priority 实现也没什么好说的了,
pub fn sys_set_priority(prio: isize) -> isize {
    trace!("kernel:pid[{}] sys_set_priority", current_task().unwrap().pid.0);
    if prio < 2 {
        trace!("kernel: sys_set_priority failed, invalid priority: {}", prio);
        return -1;
    }
    let current_task = current_task().unwrap();
    let mut inner = current_task.inner_exclusive_access();
    inner.priority = Priority(prio as u64);
    prio
}
另外对于优先级和 Stride,在进程 fork 的时候,我选择让子进程继承父进程的 优先级和 Stride。
rCore 框架 BUG
接下来我简单讲讲 chapter 5 框架 bug 的寻找历程,
BUG 描述:切换到 ch5 的 code base,将 os 的 Makefile 改为 debug 模式,内核启动后会卡死,连 shell 都没法进入。开启 TRACE level 日志,发现经过了 sys_fork 和 sys_exec 后内核就卡死了。
一开始我以为这个 BUG 是我代码的问题,我经过了非常艰难的单步调试试错,把 卡死的位置锁定在了 sys_exec->TaskControlBlock::exec->MemorySet::from_elf->MemorySet::push->MapArea::map->MapArea::map_one->PageTable::map->PageTable::find_pte_create->Vec::push 这里(没办法,gdb 调试时只要赌错了选择跳过这一行就卡死得重来)。并且在执行 push 卡死前,我特意确认了当前 Vec 实例的 capacity 等于 size,需要扩容,因此又是 allocator 卡死了。
发现是标准库的问题,那必然问题不出现在这里。我首先把 code base 切换到了ch5 默认代码,很失望地发现官方代码竟然也是同样的问题也没法调试。
这次的卡死 BUG 其实和上次类似,都是 allocator 卡死(现象一样,但导致的原因和上次不同,卡死过程中执行的代码也和上次不同,上次是 allocator 死锁,这次请见后文分析)。于是我又开始怀疑是不是官方代码哪里没注意在 lazy_static! 的时候爆栈了,我开始仔细查看这次新代码里的 lazy_static 初始化,别说还真让我找到一个可疑的:
lazy_static! {
    /// Creation of initial process
    ///
    /// the name "initproc" may be changed to any other app name like "usertests",
    /// but we have user_shell, so we don't need to change it.
    pub static ref INITPROC: Arc<TaskControlBlock> = Arc::new(TaskControlBlock::new(
        get_app_data_by_name("ch5b_initproc").unwrap()
    ));
}
get_app_data_by_name("ch5b_initproc") 会返回 ELF 字节流,而 ELF size 盲猜肯定爆栈了(kernel_boot_statck 只有 16 KiB)。不过如果真是这个问题,上一个 chapter 应该也存在呀,于是我带着好奇调试 get_app_data 函数,并打印出了 app_start 数组,

用 GPT 算出每一行「后一项 − 前一项」的结果即是 app size,
| 行号 | 计算式 | 差值(16 位十六进制) | 差值(十进制) |
|---|---|---|---|
| 1 | 0x8027f1c8 − 0x802321c0 | 0x000000000004D008 | 315 400 |
| 2 | 0x80318768 − 0x802cb9c0 | 0x000000000004CDA8 | 314 792 |
| 3 | 0x803b3cd8 − 0x803652a0 | 0x000000000004EA38 | 322 104 |
| 4 | 0x80451148 − 0x80402710 | 0x000000000004EA38 | 322 104 |
| 5 | 0x804ed478 − 0x8049f2e0 | 0x000000000004E198 | 319 896 |
| 6 | 0x80589d30 − 0x8053b610 | 0x000000000004E720 | 321 312 |
| 7 | 0x80626b68 − 0x805d8c10 | 0x000000000004DF58 | 319 320 |
| 8 | 0x806c6e28 − 0x80677060 | 0x000000000004FDC8 | 327 112 |
| 9 | 0x80765a48 − 0x80717ef8 | 0x000000000004DB50 | 318 288 |
| 10 | 0x8080ed08 − 0x807bde90 | 0x0000000000050E78 | 331 384 |
虽然 app size 确实爆栈了,但是 get_app_data 实现是 core::slice::from_raw_parts 从 .data 段的数据就地构造,不会发生任何拷贝,因此栈大小不会受到明显影响,我也监视了 sp 全程位于 kernel_boot_stack 范围内。
此时我想到了一个办法,我可以直接监视 sp 的值,通过 GDB 的 watchpoint 来暴力观察 sp 是否一直位于 kernel_boot_stack 范围内。很遗憾的是,GDB 的条件断点或 watch 很鸡肋,开了后 qemu 慢到几乎没法跑,其实哪怕慢个 10 倍都是可以接受的,但实际远不止慢 10 倍。我苦苦等了很久,也没有等来 watchpoint 触发,并且此时的 QEMU 跑了半天该打印的信息都还没输出。
那我只能在代码里插桩判断了,考虑到可能是由于 stackoverflow 导致 allocator 死锁,于是我在里面添加了 check_allocator 检查函数,并把它放在各个关键关键位置:
/// check if the heap allocator is locked
pub fn check_allocator() {
    if HEAP_ALLOCATOR.is_locked() {
        log::error!("Heap allocator has been locked!");
    } else {
        log::info!("Heap allocator is unlocked now.");
    }
}
加了这段代码后,我发现在经过了 70+ 次 check_allocator() 触发后,最后卡死在了log::info! 这句上面。于是我有经历了艰难痛苦的单步调试,调试 log 和 std 源代码里的函数(这确实是个不太明智的决定,不过让我也体验到了调试标准库的经验,调试时 GDB 可能无法正常找到源代码文件,但栈帧上会显示源代码文件名和行号,此时就需要再 vscode 里手动翻找源代码对照着看)。
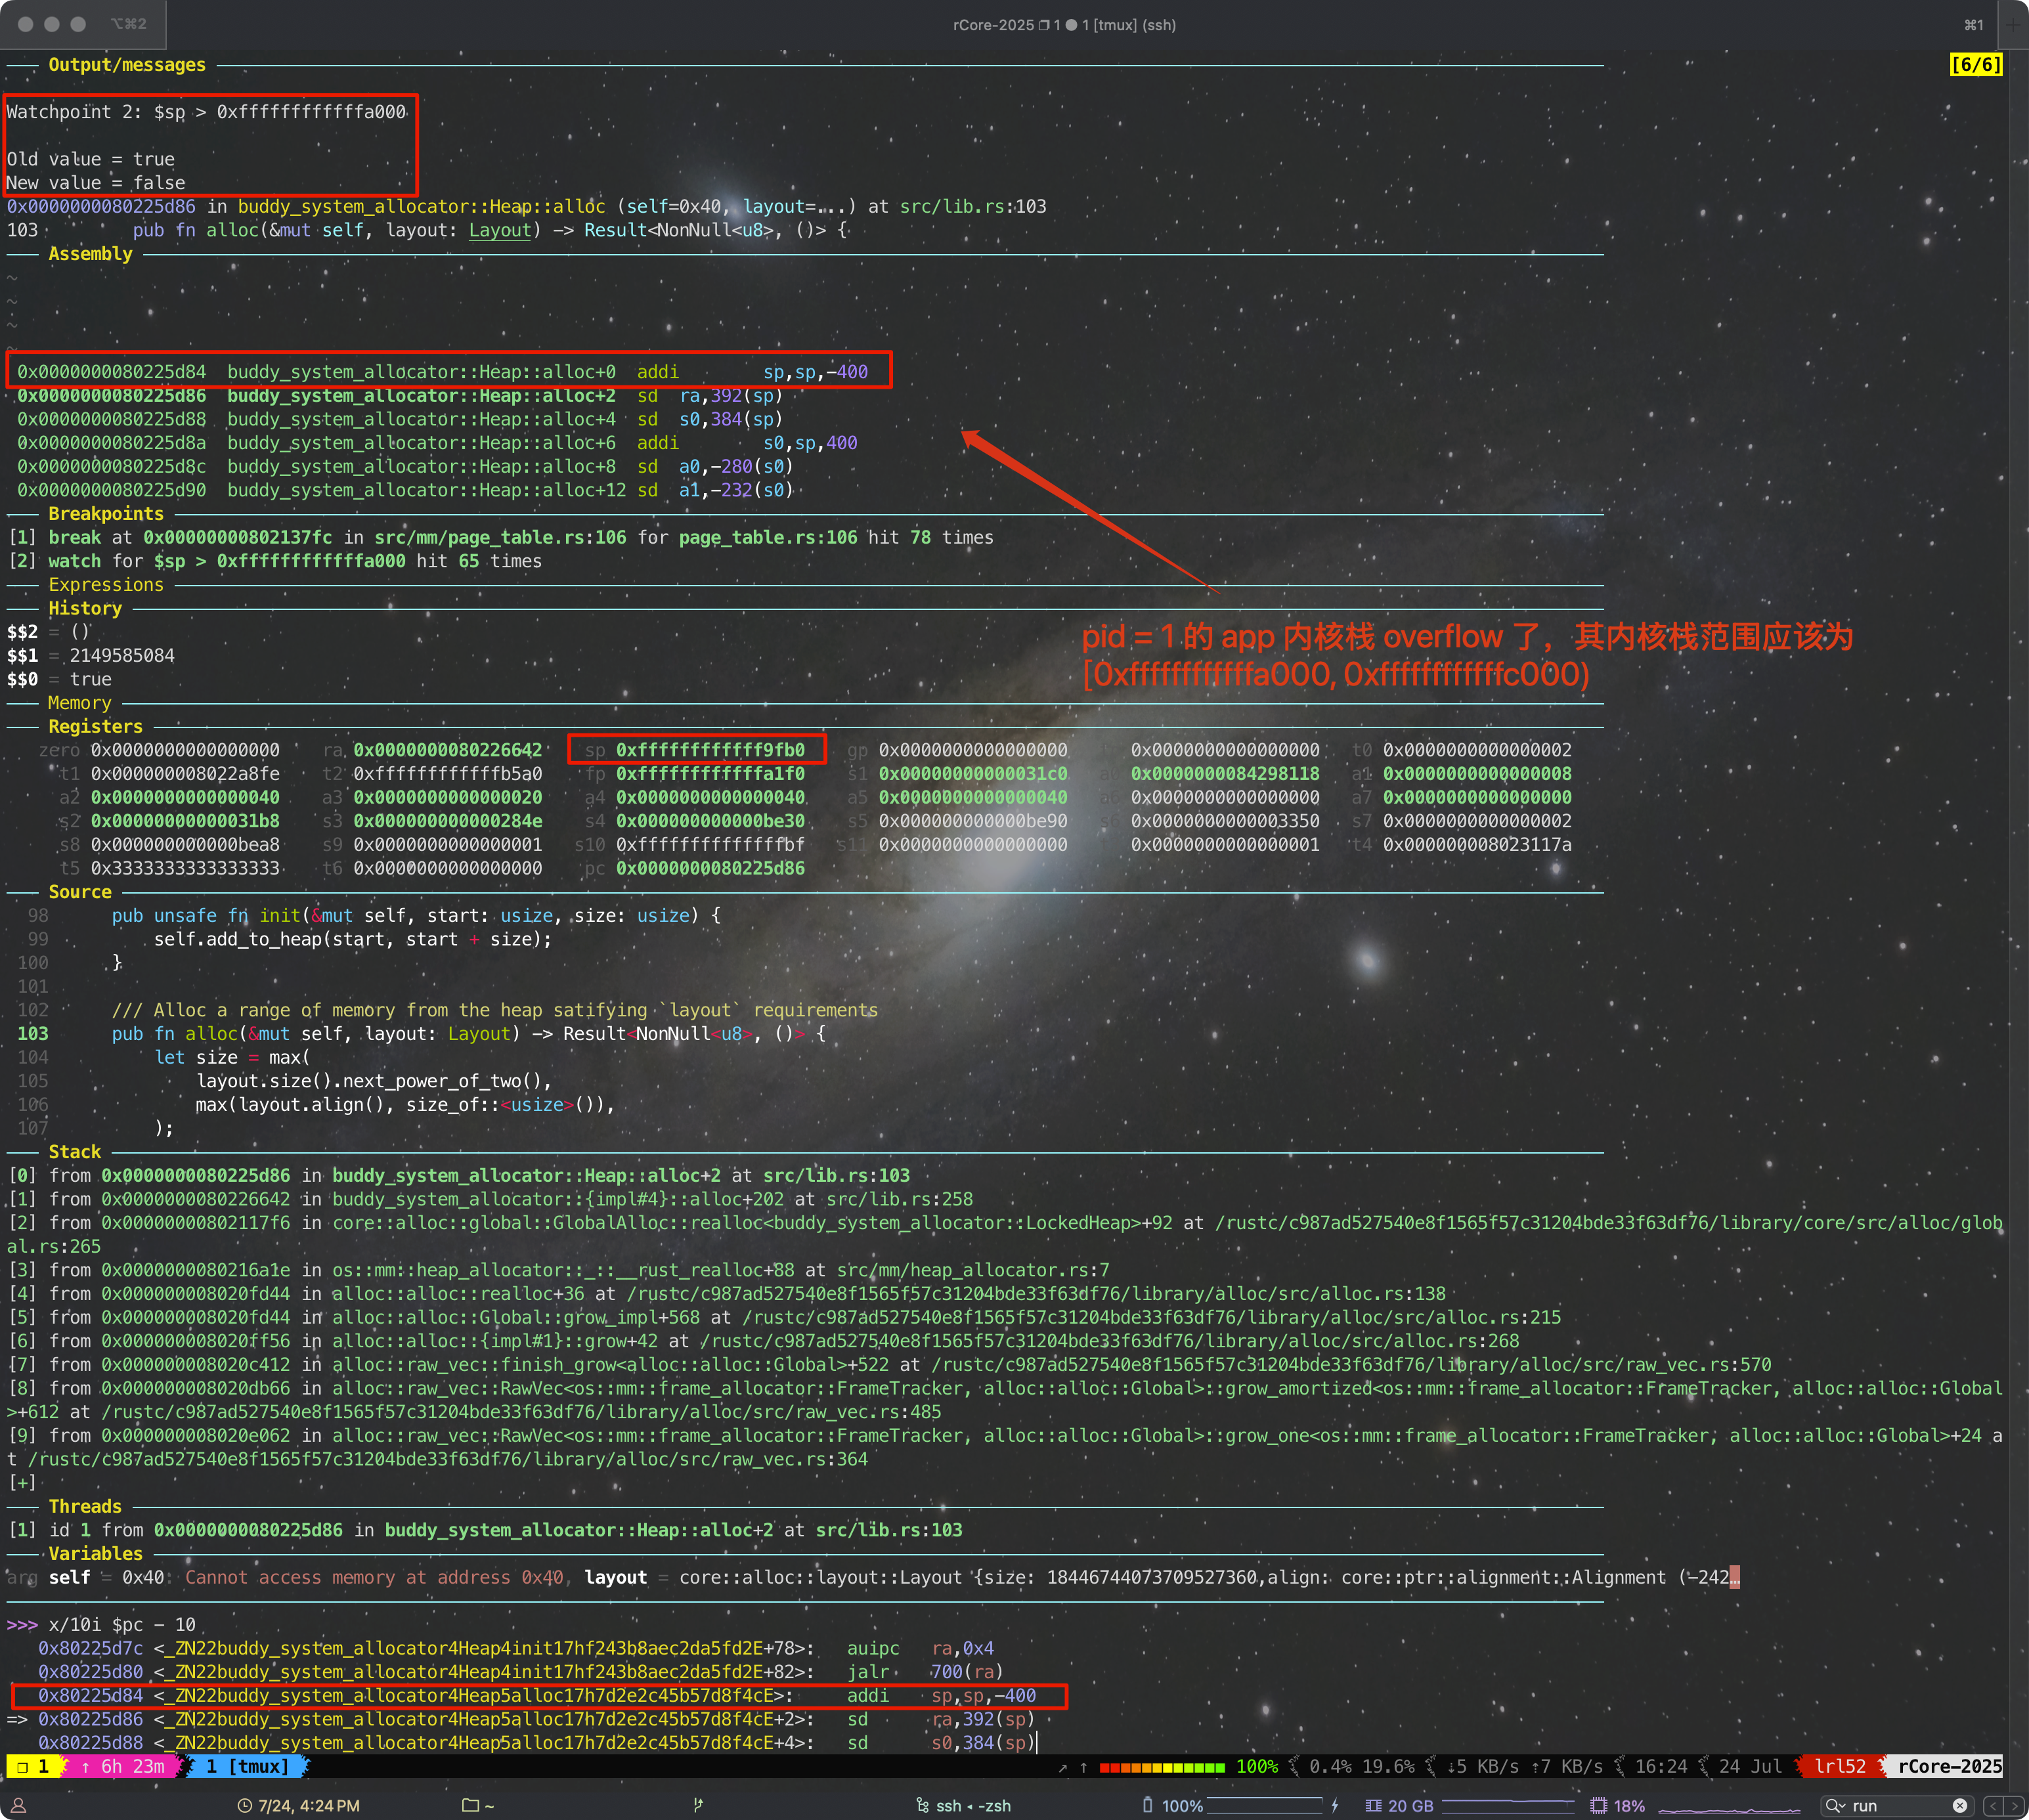
不过意外之中,我进入了卡死循环的代码。QEMU 会不断死循环执行 0xFFFFFFFFFFFFF000 和 0xFFFFFFFFFFFFF004 这两个地址处的代码。这就奇怪了,因为 0xFFFFFFFFFFFFF000 恰好是 TRAMPOLINE 代码,而这段代码应该是从用户态陷入内核态时才会执行的,内核里发生 trap 不应该跳到 trap_from_kernel 吗?
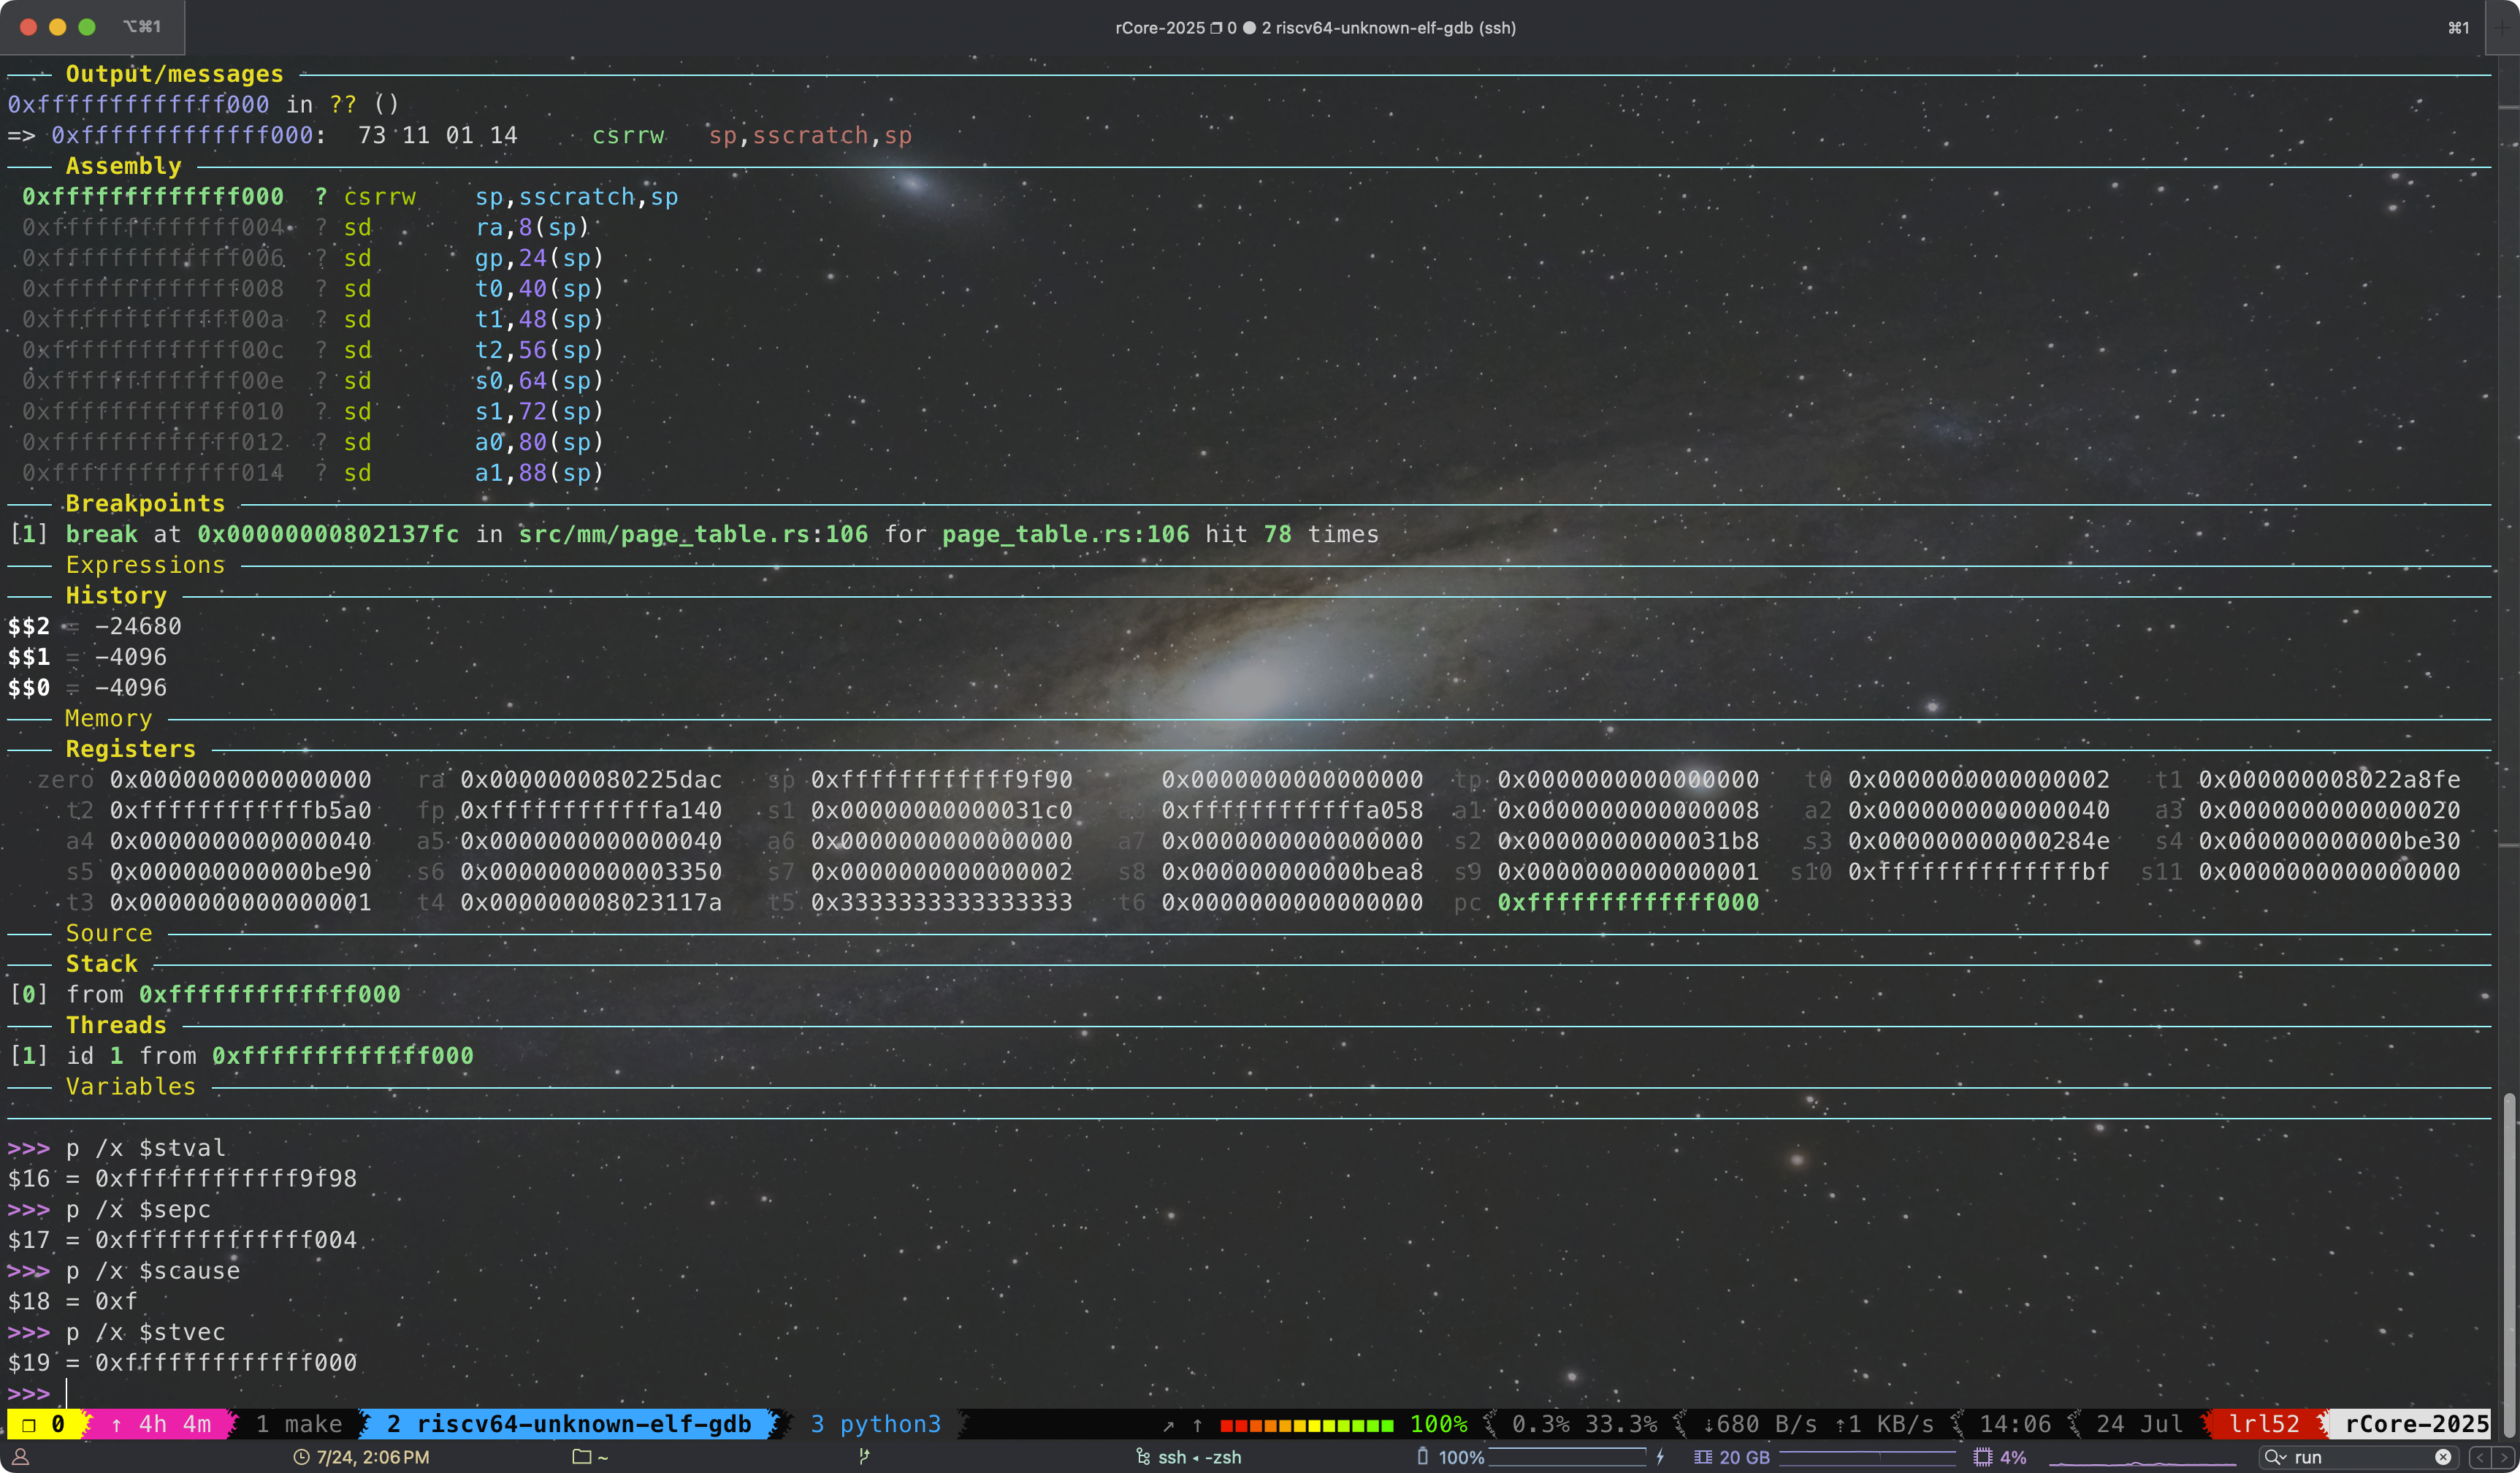
观察 scause 为 0xf 表示发生 trap 的原因是 Store/AMO page fault。sp 此时等于为 0xffffffffffff9f98,可以推断出是 pid = 1 的 app 爆内核栈了,其内核栈范围应该为 [0xffffffffffffa000, 0xffffffffffffc000),并且现在跳到了用户态才该进入的 trap_handler(__alltraps),
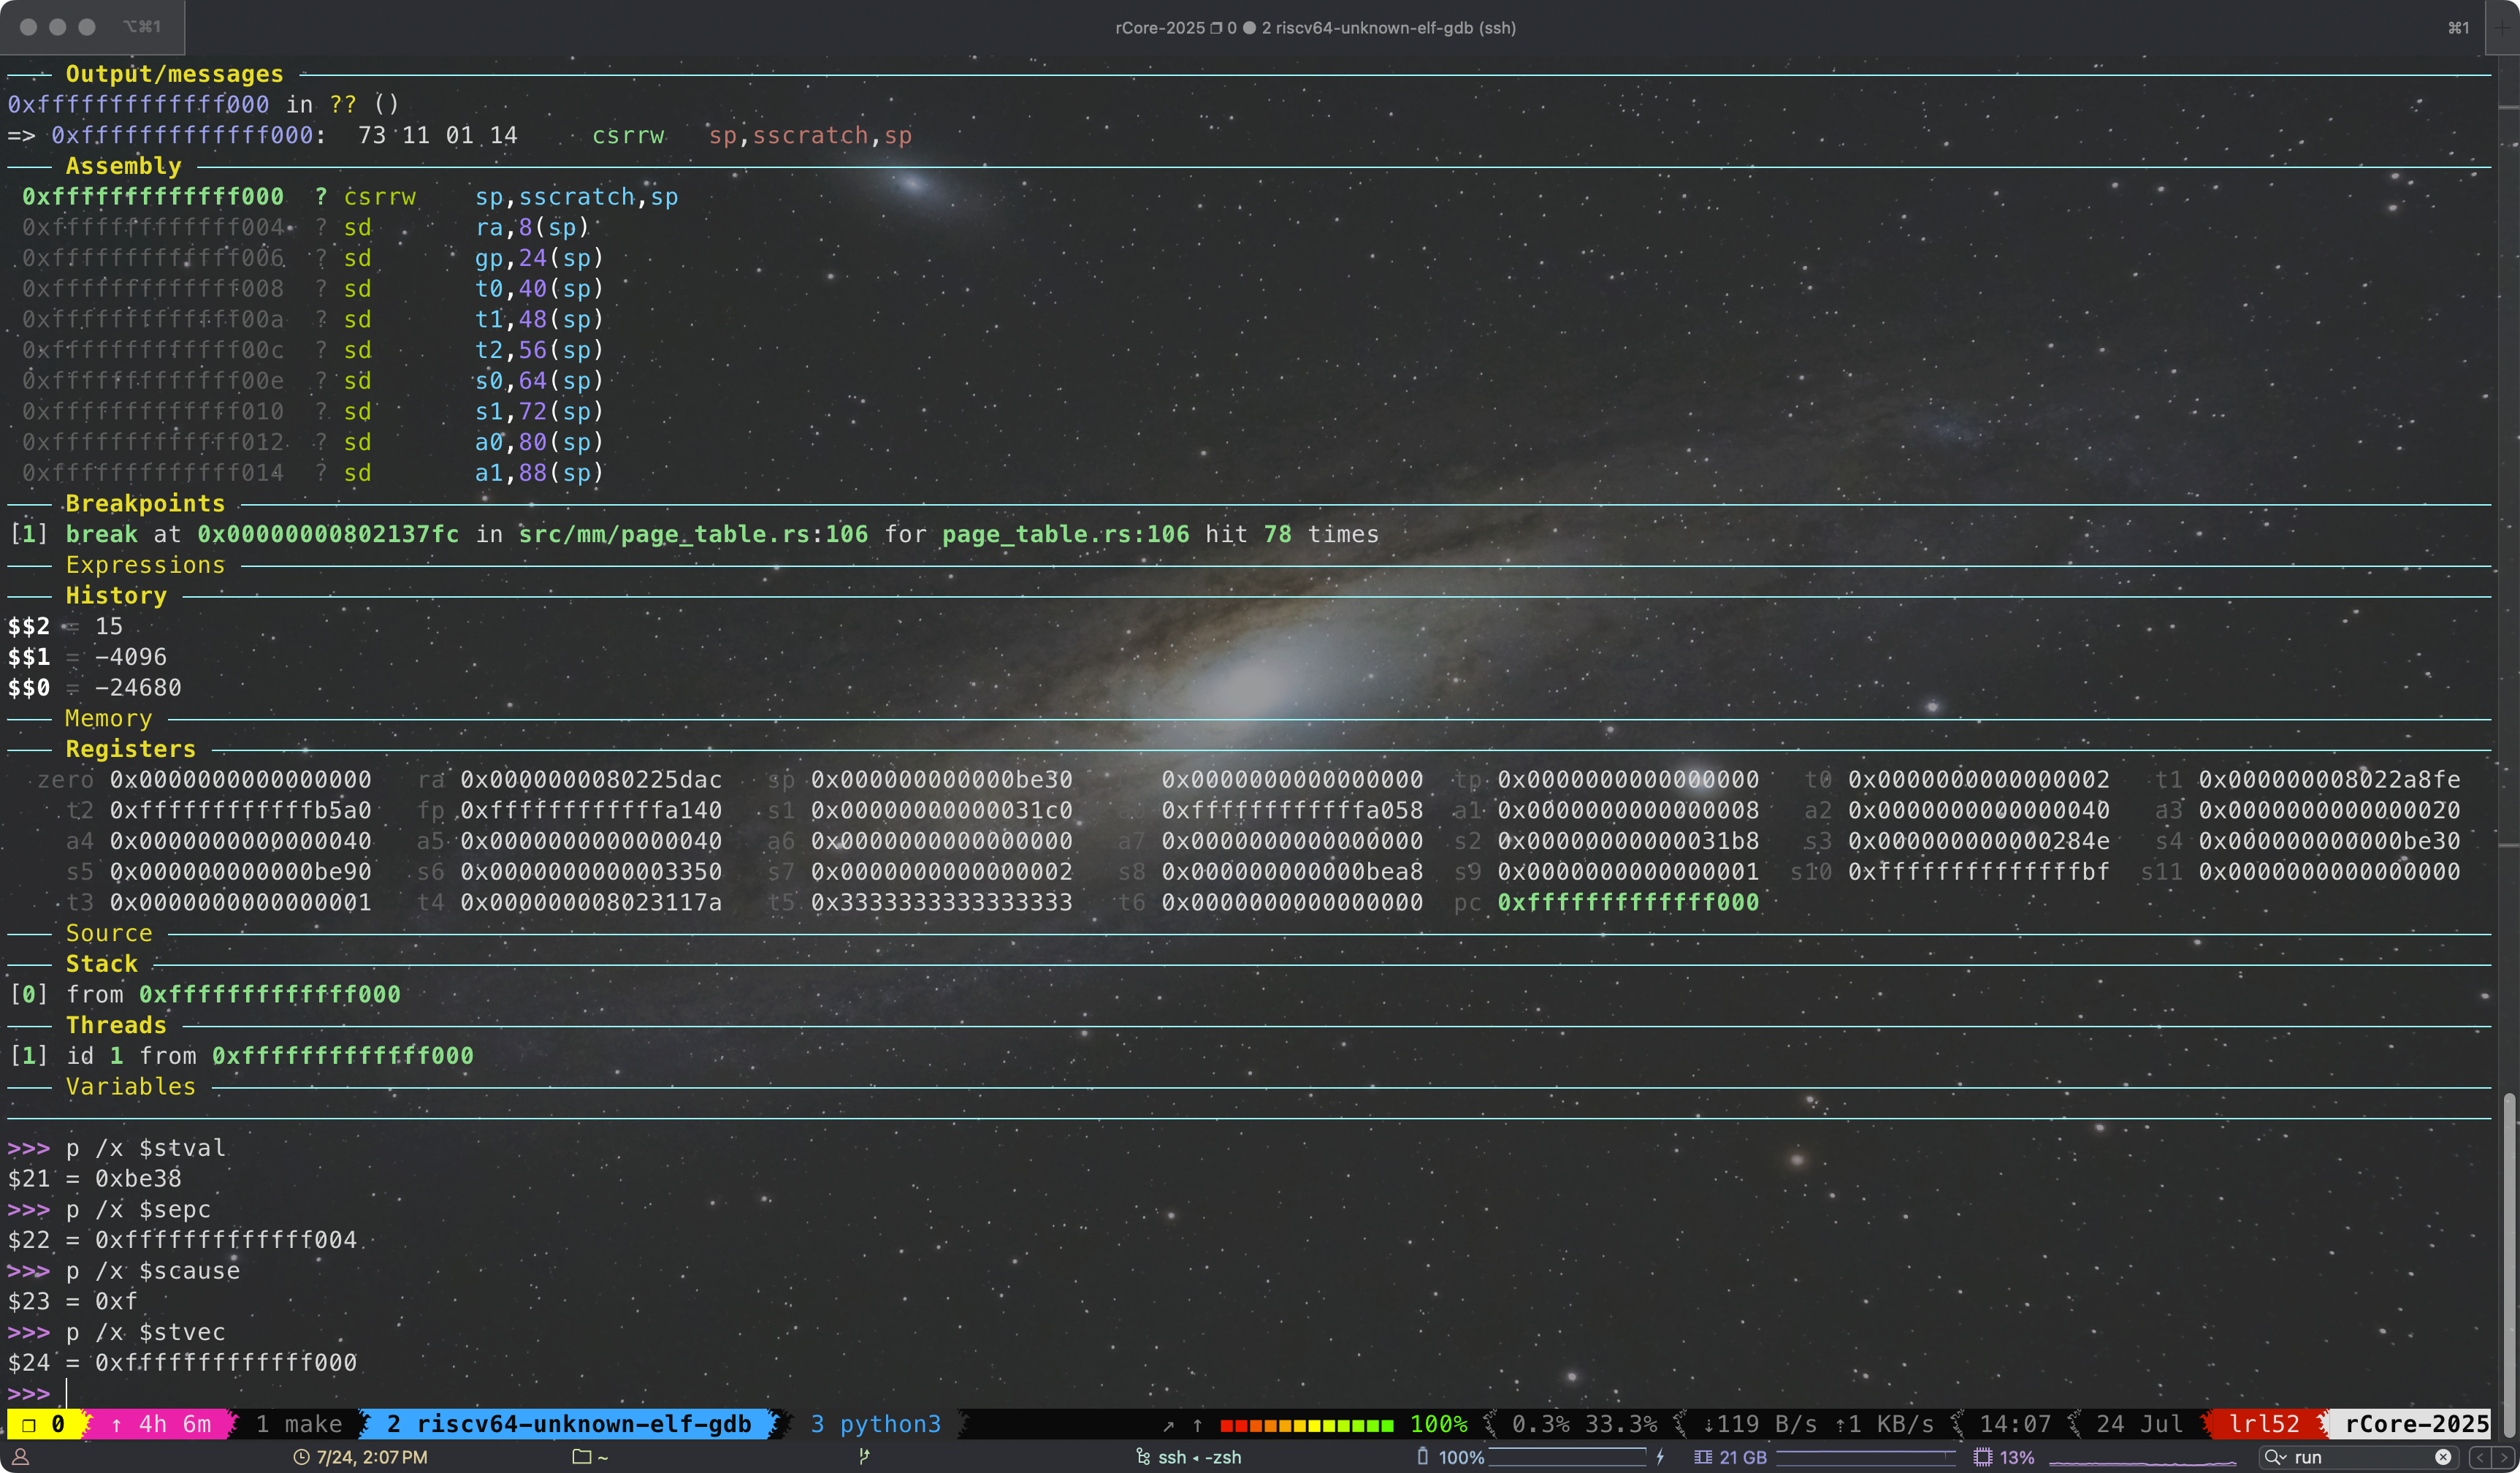
打印出寄存器,可以发现 ra 又与 allocator 有关,
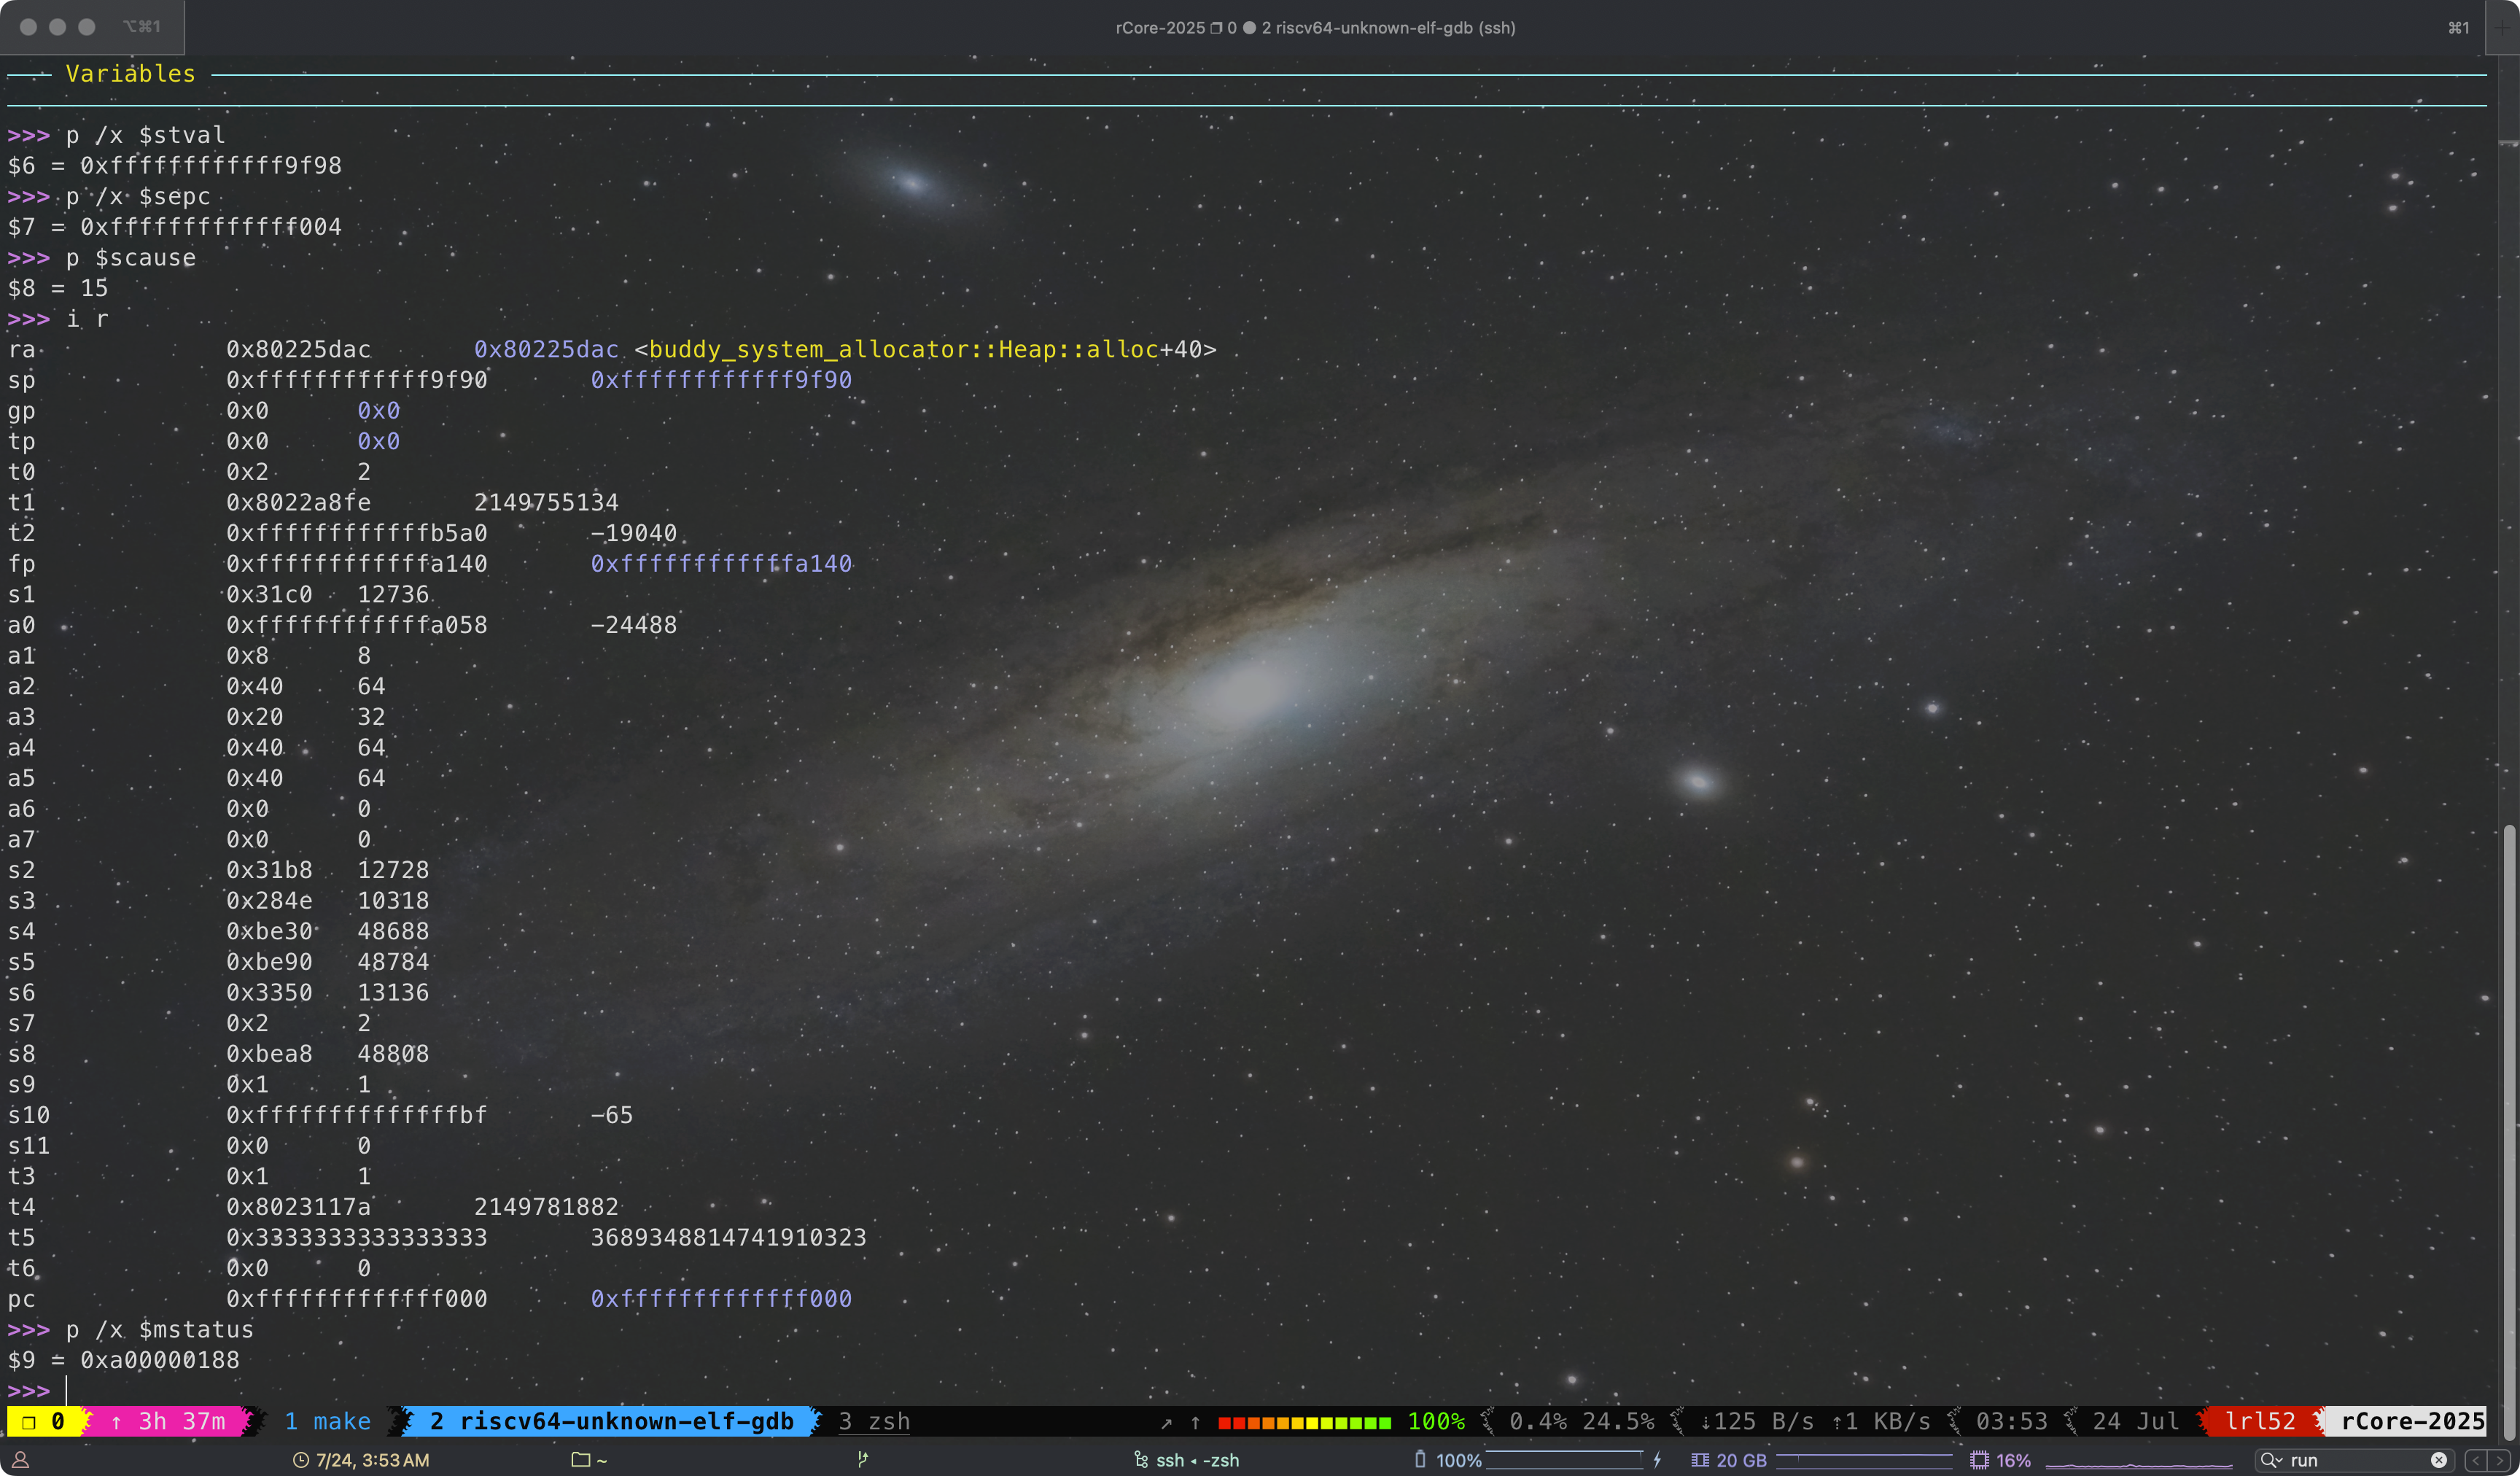
现在除了内核爆栈的问题,现在 rCore 又有新 BUG 了‼️,为什么在 kernel 里没有跳到内核 trap 的入口,为什么 $stvec 没有被设置为 trap_from_kernel(0x8021f5e6)。
接下来调试 set_kernel_trap_entry 函数,发现该函数调用后 $stval 没有被修改。接下来进一步指令级单步调试,问题出现在 csrw stvec, a0 这条指令上,
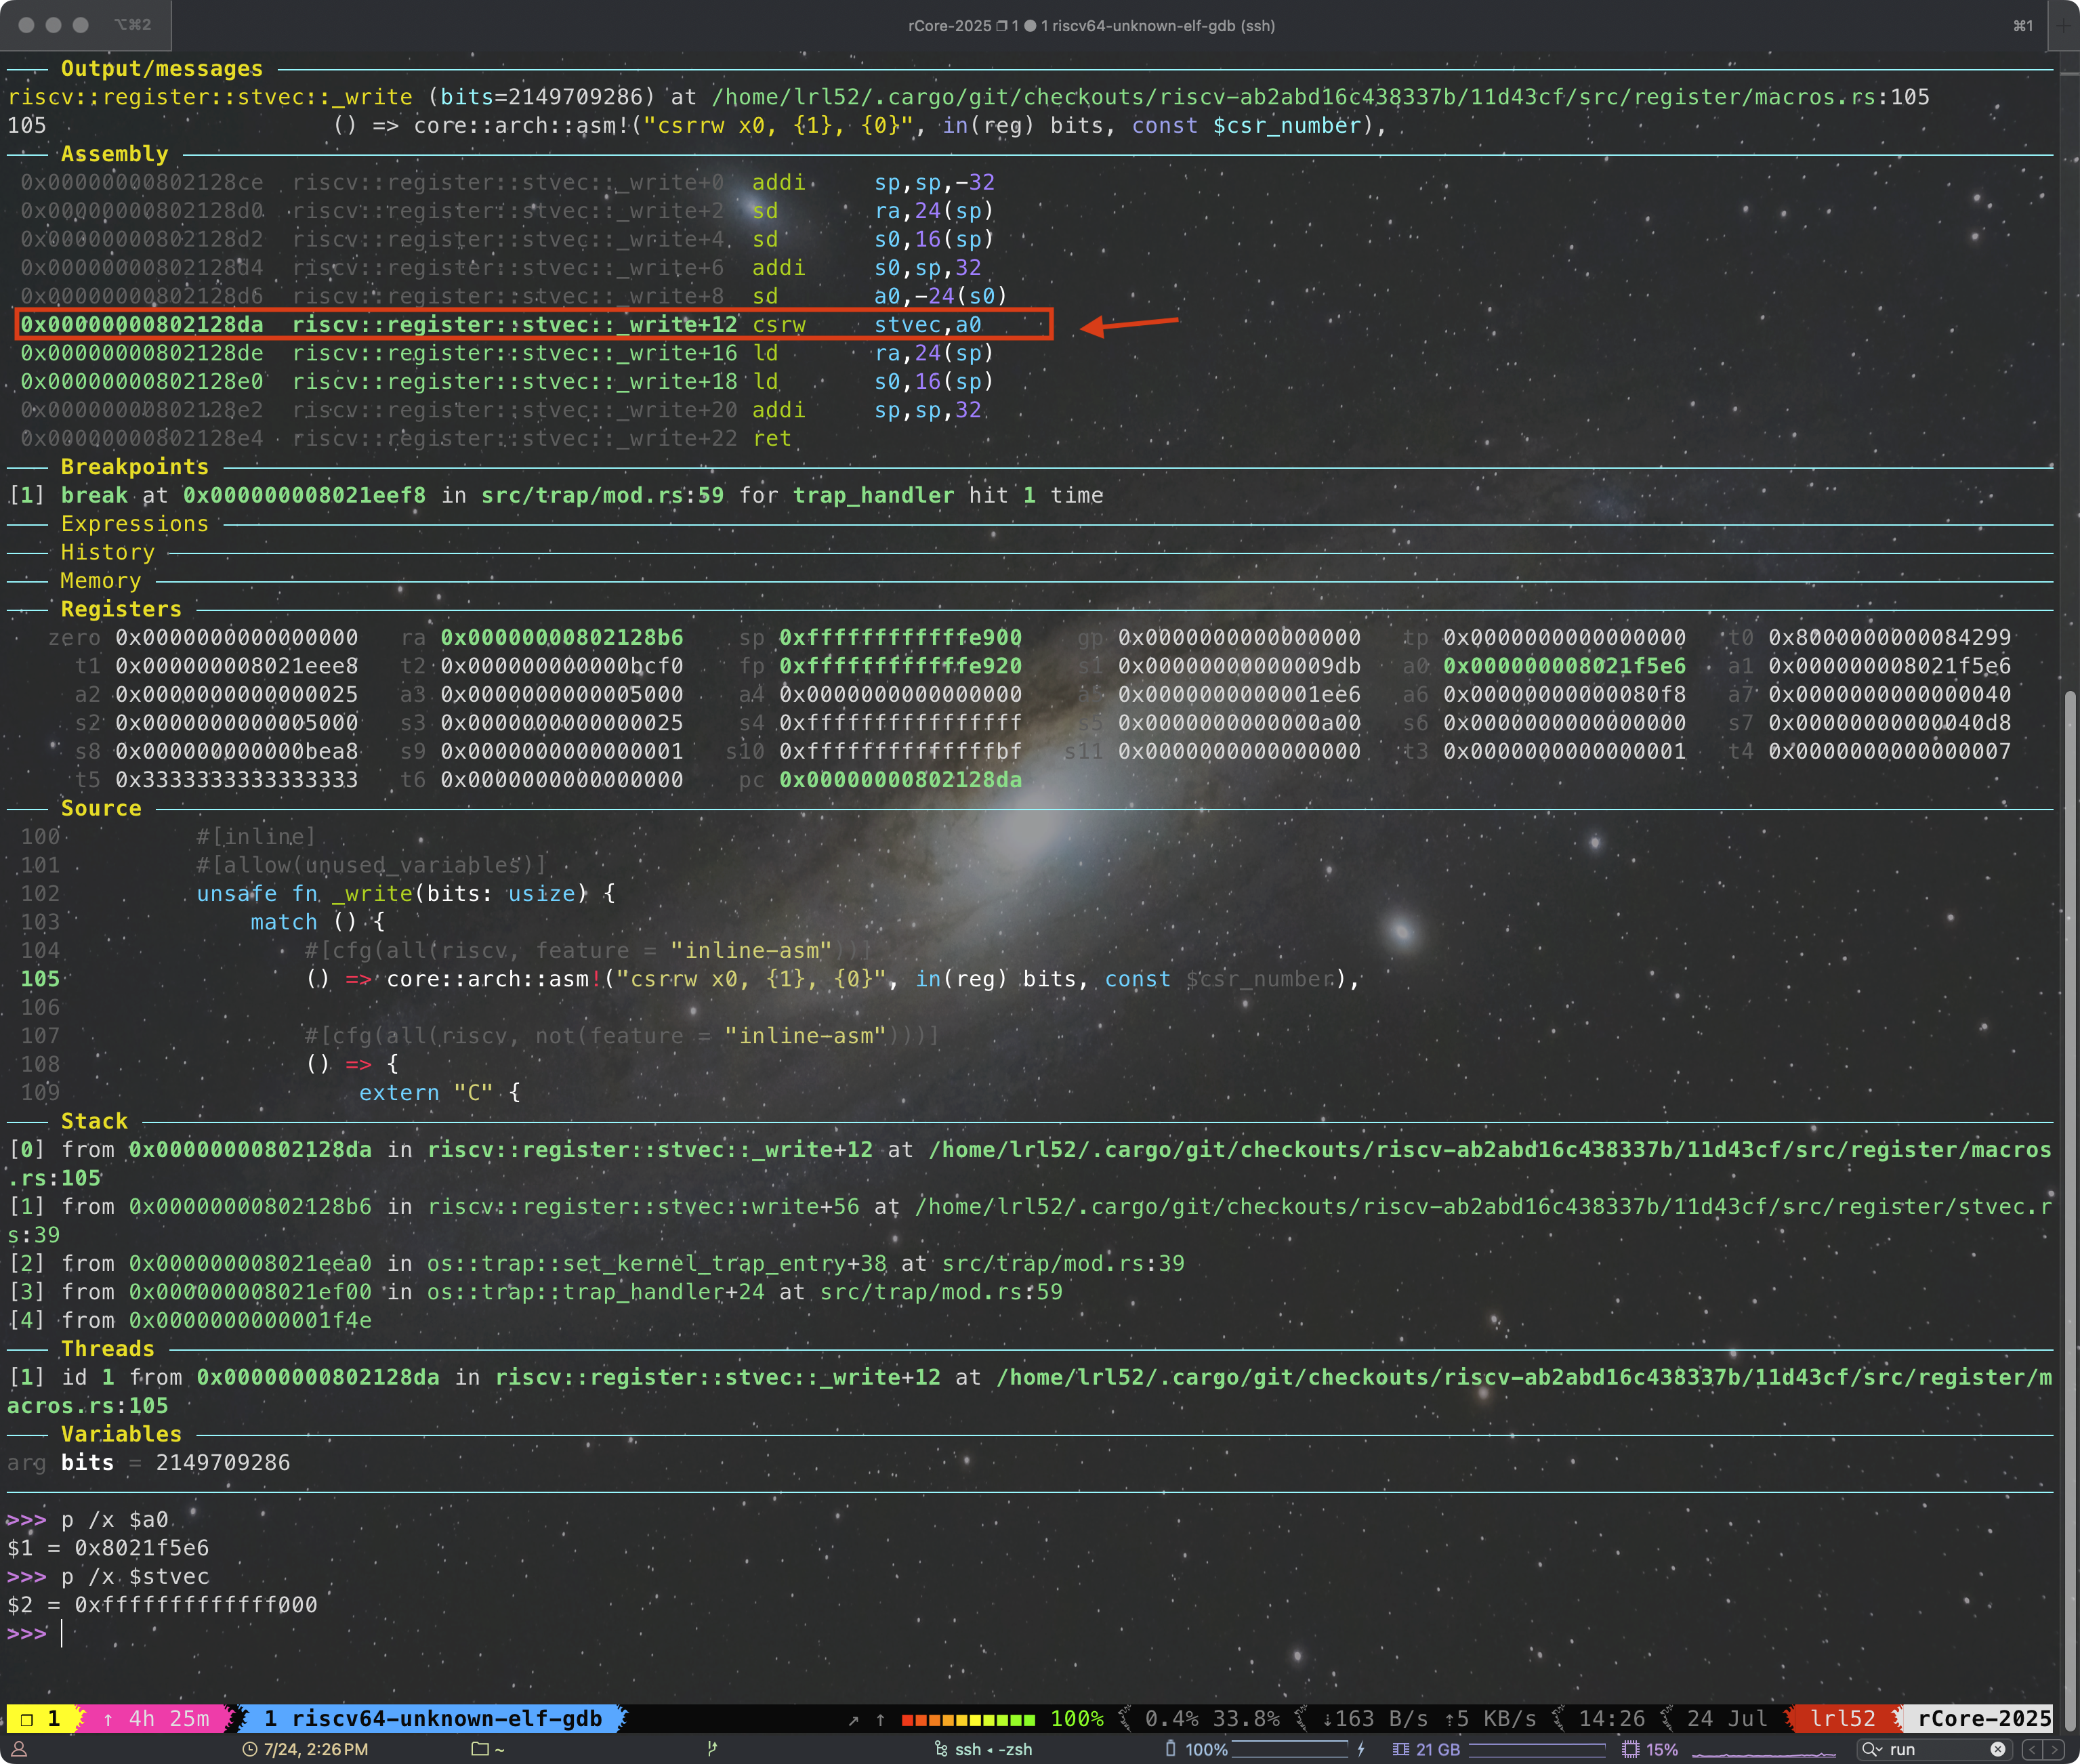
GDB ni 执行后,我竟惊奇地发现 $stvec 没有被更改?
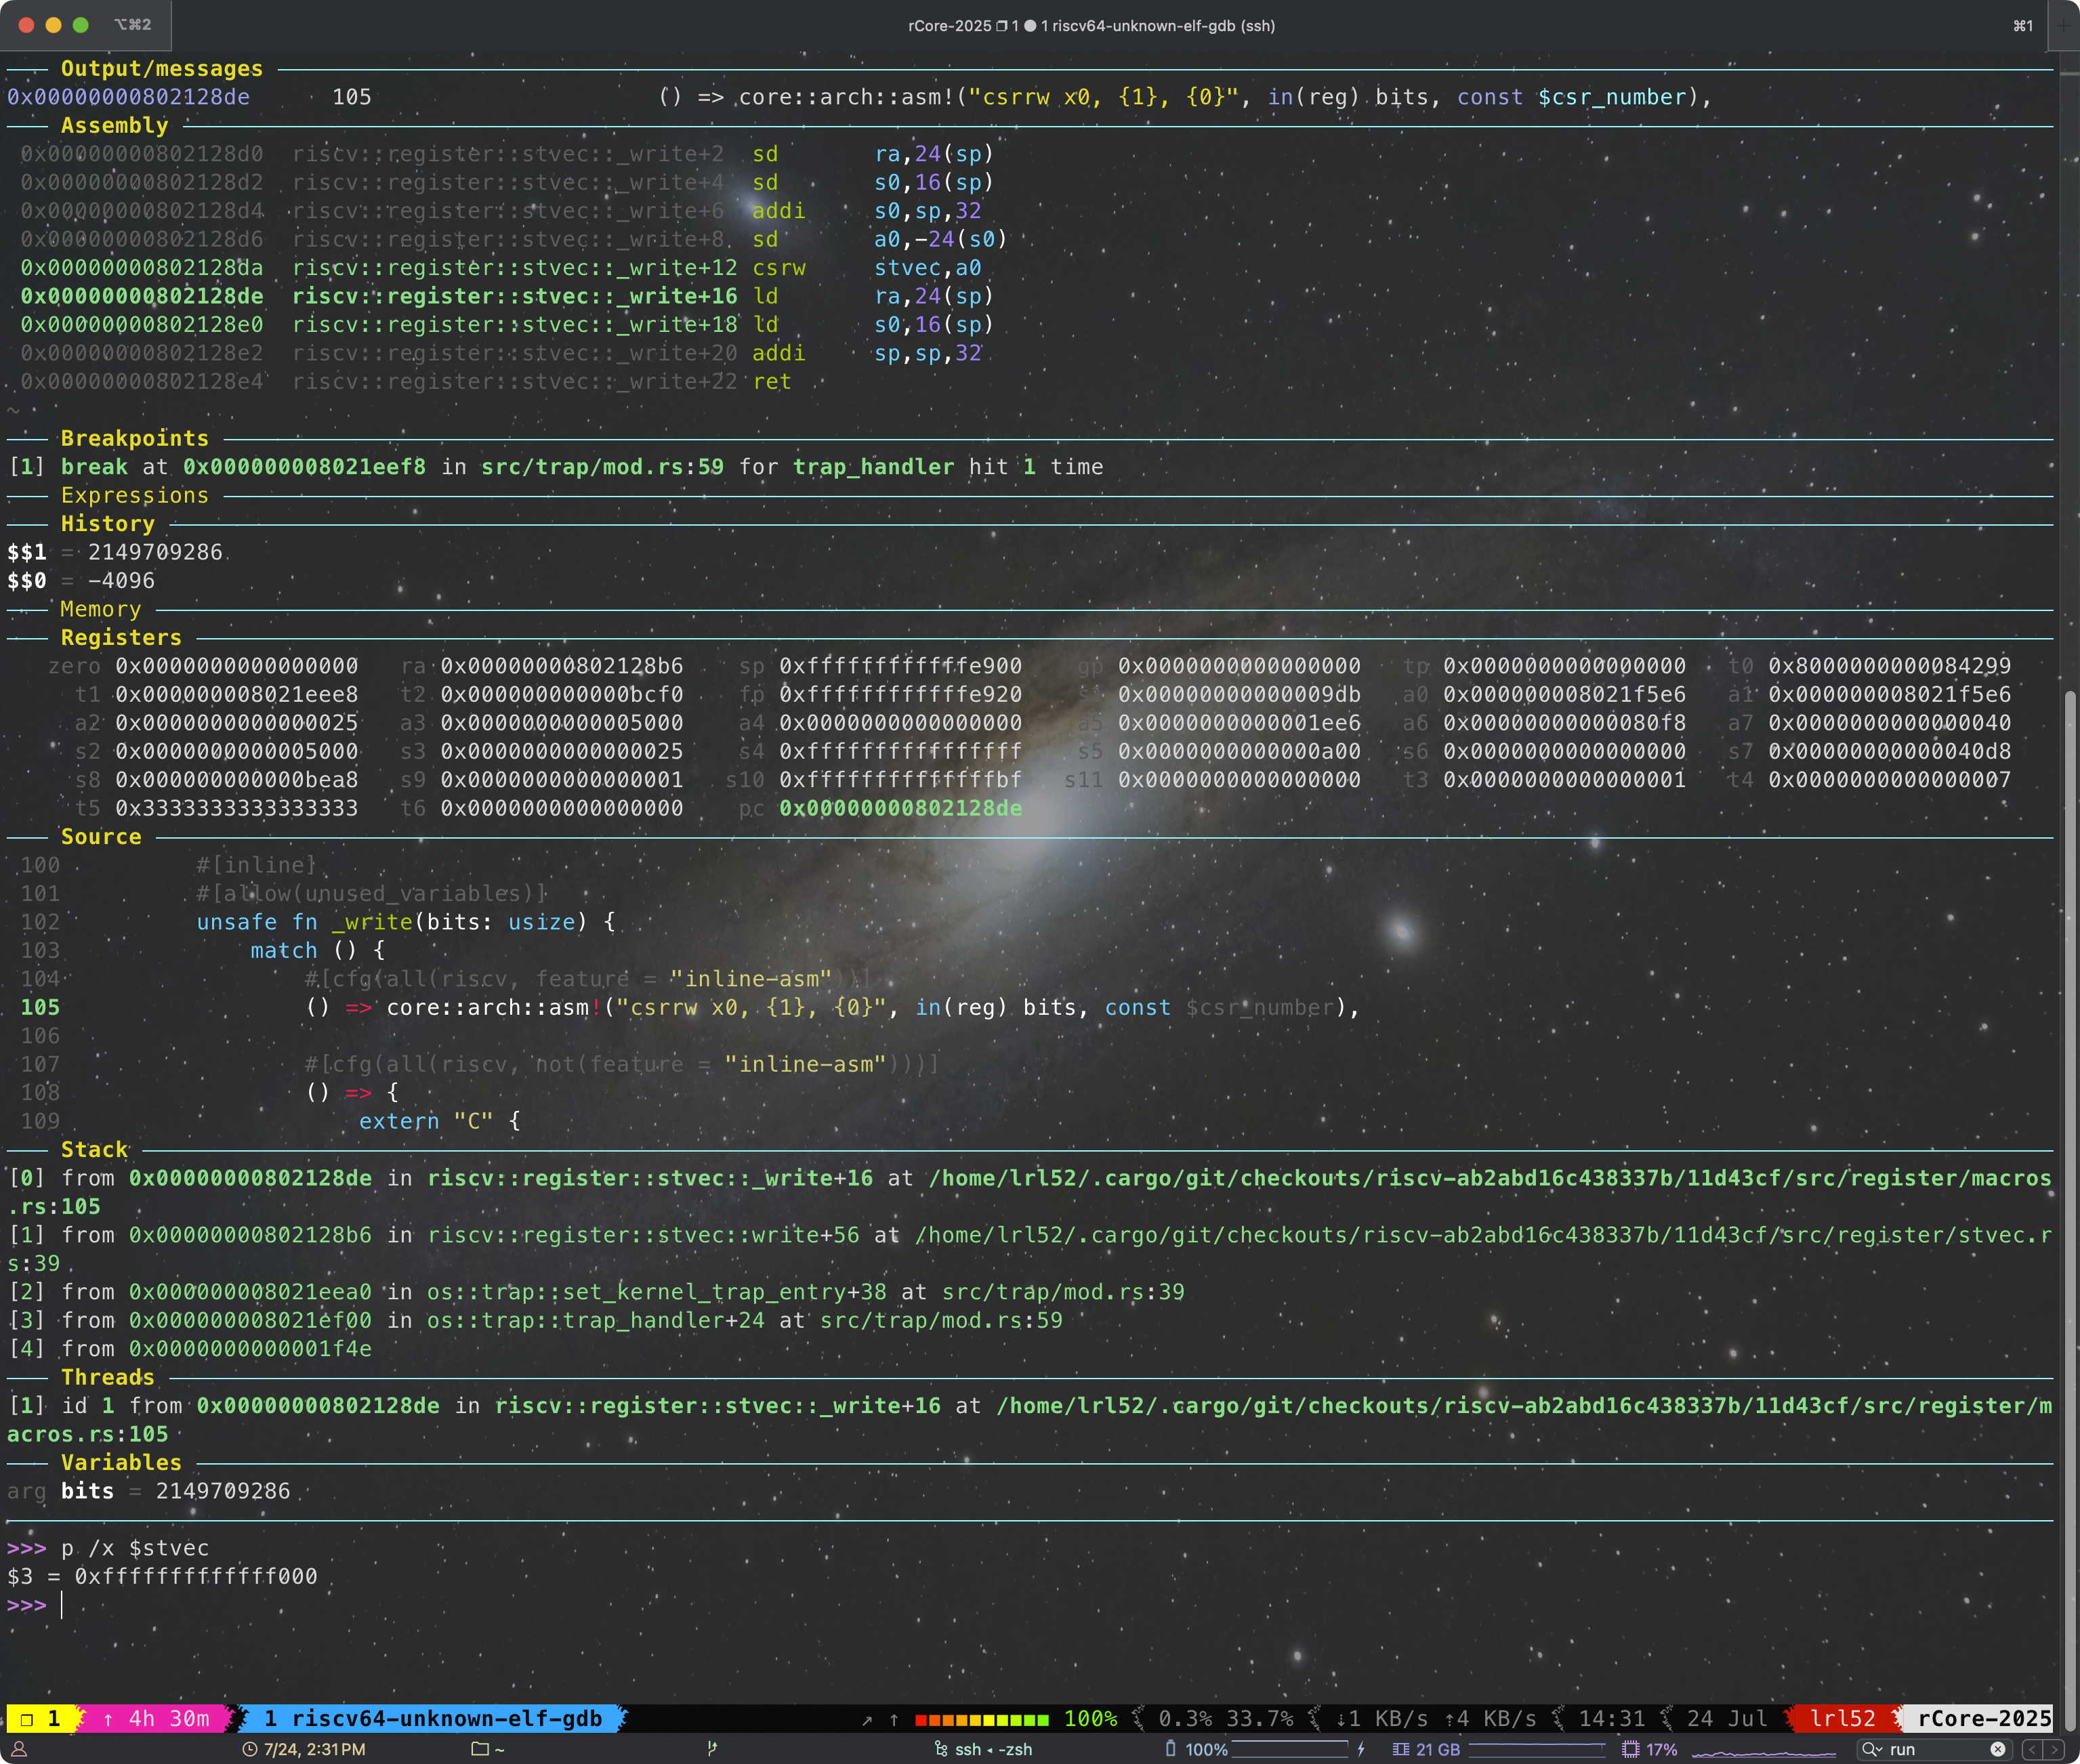
通过询问 GPT 和查询 RSIC-V 手册可知,写入的值 a0 没有 4 字节对齐,写入操作被 QEMU/RUST-SBI 直接忽略。 也即是 set_kernel_trap_entry 函数地址在编译时没有保证 4 字节对齐。

Rust 不支持在函数前加个什么 align 标注就能让地址自动对齐。为了在内核态下 $stvec 能写入地址并正常跳转,参照 __alltraps ,新增一段汇编代码,给 trap_from_kernel 添加一个 wrapper 函数 _trap_from_kernel,新增 os/src/trap/kerneltrap.S,
.globl _trap_from_kernel
.globl trap_from_kernel
.align 2
_trap_from_kernel:
    j trap_from_kernel
然后修改 os/src/trap/mod.rs,
global_asm!(include_str!("trap.S"));
global_asm!(include_str!("kerneltrap.S"));

fn set_kernel_trap_entry() {
    extern "C" {
        /// This function is defined in `kerneltrap.S` and
        /// the address is aligned to 4 bytes
        fn _trap_from_kernel();
    }
    unsafe {
        stvec::write(_trap_from_kernel as usize, TrapMode::Direct);
    }
}
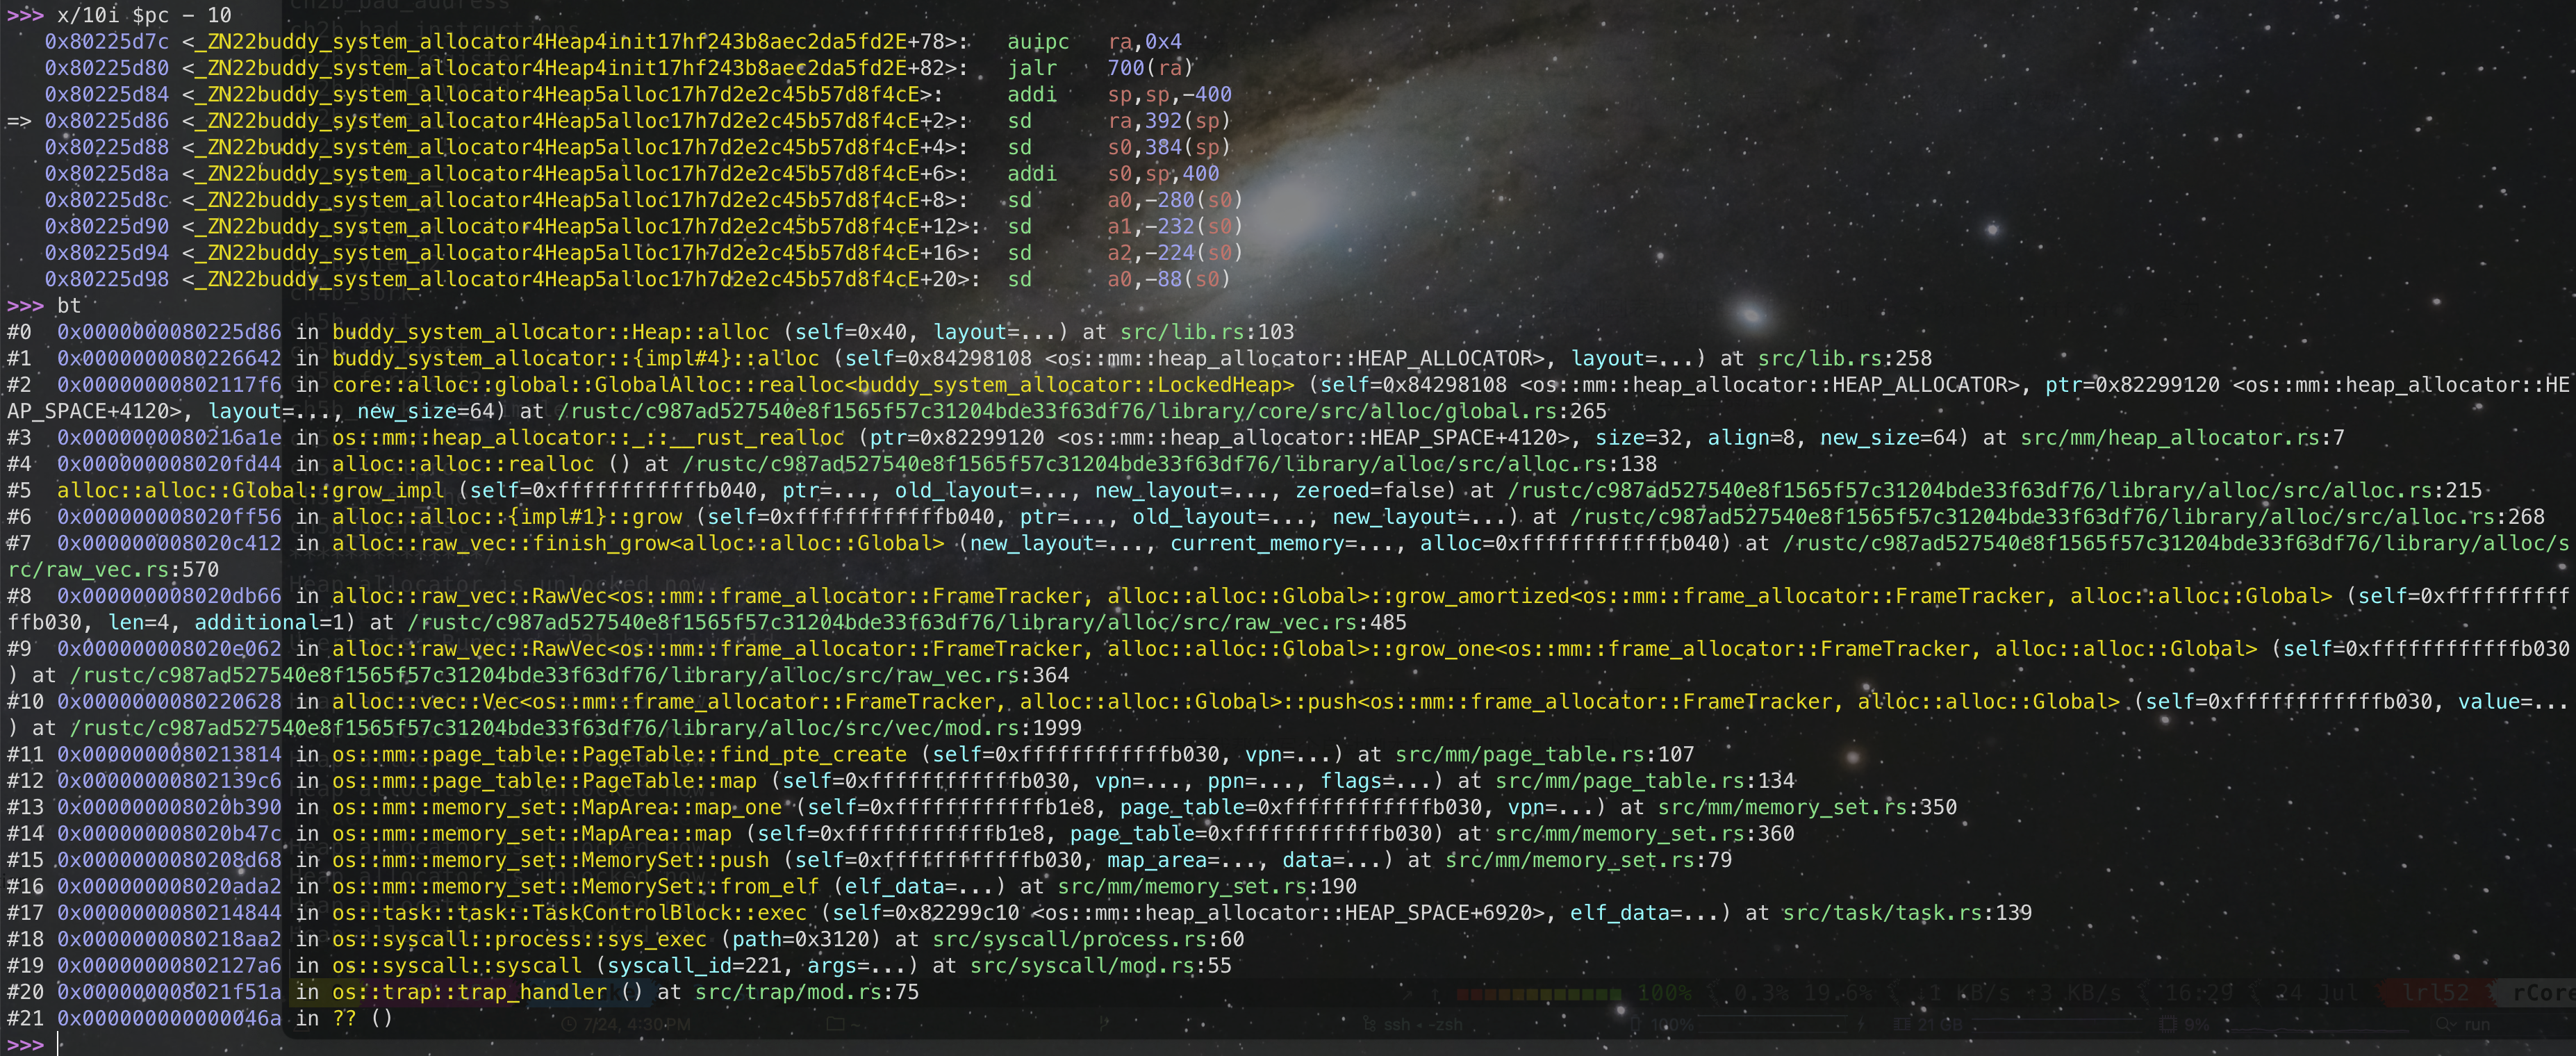
经过这样折腾后,set_kernel_trap_entry 函数终于写入成功,终于能够正常跳转了。但内核启动后依然卡死,而不是预计的跳转到 trap_from_kernel 然后 panic 终止。通过调试发现,虽然确实跳到 trap_from_kernel 了,但接下来会修改 sp 分配栈帧,而此时 sp 已经爆栈了,访存又会触发 Store/AMO page fault,于是继续陷入死循环。
此时我已经大概猜到爆栈原因了,于是这次我先让 GDB 停留在最后两次 check_allocator 输出的位置,然后给 $sp 设置 watchpoint 。呜呜呜,这次终于找到 BUG 现场了,也即发生 stackoverflow 的指令位置,
此时我们可以发现其 stack 深度非常大,
至此,困扰了我一天的 rCore 框架的两个 BUG 终于解决了。解决办法是增大 os/src/config.rs 的 KERNEL_STACK_SIZE ,
/// kernel stack size
pub const KERNEL_STACK_SIZE: usize = 4096 * 16;
注,boot_stack 的大小可以在 os/src/entry.asm 修改 .space 4096 * 16:
    .section .text.entry
    .globl _start
_start:
    la sp, boot_stack_top
    call rust_main

    .section .bss.stack
    .globl boot_stack_lower_bound
boot_stack_lower_bound:
    .space 4096 * 16
    .globl boot_stack_top
boot_stack_top:
Lab5 通过
第六章:文件系统与I/O重定向
这一章是经典的 fs,看久了有点枯燥乏味。
对于 linkat 这个 syscall,本质是将不同的 dirent 指向同一个 inode(硬链接)。首先花了些时间思考如何设计。由于 rCore 没有多级目录只有根目录,实际就是在 ROOT_INODE 下新建一个 dirent 指向被链接的 inode。
pub struct DiskInode {
    pub size: u32,
    pub direct: [u32; INODE_DIRECT_COUNT],
    pub indirect1: u32,
    pub indirect2: u32,
    pub nlink: u32,
    type_: DiskInodeType,
}
首先修改 DiskInode 结构,增加 nlink 字段,为了保持 DiskInode 大小不变,减小 INODE_DIRECT_COUNT。
pub fn sys_linkat(old_name: *const u8, new_name: *const u8) -> isize {
    trace!("kernel:pid[{}] sys_linkat", current_task().unwrap().pid.0);
    let token = current_user_token();
    let old_name = translated_str(token, old_name);
    let new_name = translated_str(token, new_name);
    if old_name == new_name {
        trace!("kernel: sys_linkat failed, old and new names are the same: {}", old_name);
        return -1;
    }
    let ip = open_file(&old_name, OpenFlags::RDONLY);
    if ip.is_none() {
        trace!("kernel: sys_linkat failed, old file not found: {}", old_name);
        return -1;
    }
    linkat(ip.unwrap(), new_name)
}
在 sys_linkat 中只做基本的处理和参数判断,并拿到被链接的 OSInode,接下来将请求转发到 os/src/fs/inode.rs 的 linkat 函数继续处理。这样做是因为 ROOT_INODE 是 fs 子模块私有的,为了保持封闭性和可维护性这里就不做 pub 导出了,因此需要 ROOT_INODE 的函数通通在 fs 内部完成。
/// Create a new file as a link to the same inode as old
pub fn linkat(ip: Arc<OSInode>, new_name: String) -> isize {
    let inner = ip.inner.exclusive_access();
    ROOT_INODE.linkat(&new_name, inner.inode.clone())
}
接下来是 linkat 的实现,可以模仿 create 方法的实现来完成,这里不再赘述,见注释。
/// Create a link to the target inode
    pub fn linkat(&self, name: &str, target: Arc<Inode>) -> isize {
        let mut fs = self.fs.lock();
        let op = |root_inode: &DiskInode| {
            // assert it is a directory
            assert!(root_inode.is_dir());
            // has the file been created?
            self.find_inode_id(name, root_inode)
        };
        if self.read_disk_inode(op).is_some() {
            return -1;
        }

        // increase link count of target inode
        target.modify_disk_inode(|disk_inode| {
            disk_inode.nlink += 1;
        });

        // create a new directory entry pointing to target inode
        let target_inode_id = fs.get_inode_id(target.block_id, target.block_offset);
        self.modify_disk_inode(|root_inode| {
            // append file in the dirent
            let file_count = (root_inode.size as usize) / DIRENT_SZ;
            let new_size = (file_count + 1) * DIRENT_SZ;
            // increase size
            self.increase_size(new_size as u32, root_inode, &mut fs);
            // write dirent
            let dirent = DirEntry::new(name, target_inode_id);
            root_inode.write_at(
                file_count * DIRENT_SZ,
                dirent.as_bytes(),
                &self.block_device,
            );
        });
        block_cache_sync_all();
        0
    }
这里有一点可以提一下,里面的 EasyFileSystem::get_inode_id 方法是自己实现的。因为我发现 Inode 结构没法直接获取到 inode_id,于是写了一个 get_disk_inode_pos 对应的“逆向”方法,根据 block_id 和 block_offset 还原出 inode_id。
    /// Get inode id by position
    pub fn get_inode_id(&self, block_id: usize, offset: usize) -> u32 {
        let inode_size = core::mem::size_of::<DiskInode>() as u32;
        let inodes_per_block = BLOCK_SZ as u32 / inode_size;
        assert!(offset as u32 % inode_size == 0, "Invalid inode offset");
        let inode_id = (block_id as u32 - self.inode_area_start_block) * inodes_per_block
            + (offset as u32 / inode_size);
        assert!(inode_id < self.inode_bitmap.maximum() as u32, "Invalid inode id");
        inode_id
    }
对于 unlinkat 的实现,原以为模仿 linkat 会很简单,发现还是有新的挑战。
pub fn sys_unlinkat(name: *const u8) -> isize {
    trace!("kernel:pid[{}] sys_unlinkat", current_task().unwrap().pid.0);
    let token = current_user_token();
    let name = translated_str(token, name);
    let inode = open_file(&name, OpenFlags::RDONLY);
    if inode.is_none() {
        trace!("kernel: sys_unlinkat failed, file not found: {}", name);
        return -1;
    }
    drop(inode);
    unlinkat(name)
}
这两段代码都没什么好说的。
/// Remove a link by name
pub fn unlinkat(name: String) -> isize {
    ROOT_INODE.unlinkat(&name)
}
核心在于接下来的 unlinkat 部分。在删除 dirent 的时候,我发现这相当于从一段连续数组的中间直接删掉一个元素,这需要后面的元素都往前面移动,并且每次都是 $\mathcal O(n)$ 的复杂度,这里的 $ n = \textrm{BlockSize}/\textrm{DirentSize} = 512 / 32 = 16$,这是在目录仅占用 1 个 Block 的情况下。为此我翻了下之前 xv6 的实现,xv6 在删除 dirent 时直接清 0,表示这是一个未使用的空闲 dirent,当需要新建一个 dirent 时,会 Block offset=0 的位置从头开始查找直到找到第一个空闲 dirent 使用。rCore 在寻找空闲 dirent 时没有像 xv6 这样做,而是直接增大 inode 里的 size 字段分配新的 dirent。综合权衡后,我不想去改动 rCore 现有的分配逻辑代码,也不想去挪动位置,而是采用了简单直接的办法,直接清 0 但不移动,当然这会造成有无法使用的空闲 dirent 遗留。
另外注意调用 Inode::clear() 清空 inode 的数据前,先释放 fs 锁,Inode::clear() 会重新获取 fs 锁,避免产生死锁。
/// Remove a link by name
    pub fn unlinkat(&self, name: &str) -> isize {
        let fs: MutexGuard<'_, EasyFileSystem> = self.fs.lock();
        let op = |root_inode: &DiskInode| {
            // assert it is a directory
            assert!(root_inode.is_dir());
            // has the file been existed?
            self.find_inode_id(name, root_inode)
        };
        let target_inode_id = self.read_disk_inode(op);
        if target_inode_id.is_none() {
            return -1; // file not found
        }
        let target_inode_id = target_inode_id.unwrap();

        // decrease link count of target inode
        let (block_id, block_offset) = fs.get_disk_inode_pos(target_inode_id);
        let target = Self::new(
            block_id,
            block_offset,
            self.fs.clone(),
            self.block_device.clone(),
        );
        let cnt = target.modify_disk_inode(|disk_inode| {
            if disk_inode.nlink == 0 {
                panic!("unlinkat: link count is already 0");
            }
            disk_inode.nlink -= 1;
            disk_inode.nlink
        });

        // remove the data blocks if link count is 0
        drop(fs); // release the fs lock, because Inode::clear() will acquire it again
        if cnt == 0 {
            target.clear();
        }
        let _fs = self.fs.lock();

        // remove the directory entry
        self.modify_disk_inode(|root_inode| {
            let file_count = (root_inode.size as usize) / DIRENT_SZ;
            let mut dirent = DirEntry::empty();
            for i in 0..file_count {
                assert_eq!(
                    root_inode.read_at(DIRENT_SZ * i, dirent.as_bytes_mut(), &self.block_device,),
                    DIRENT_SZ,
                );
                if dirent.inode_id() == target_inode_id && dirent.name() == name {
                    // assert!(dirent.name() == name); // not required, because one inode can have multiple links
                    // TODO: This causes empty directory entries left in the directory.
                    root_inode.write_at(DIRENT_SZ * i, DirEntry::empty().as_bytes(), &self.block_device);
                }
            }
        });
        block_cache_sync_all();

        0
    }
最后这个 sys_fstat 的实现没想到还有坑。这里的坑点在于,rCore 的设计使用 File trait 来存储 fd table,也就是说 fd table 存储的实际类型是 Arc<dyn File + Send + Sync>,但实际上除了 0, 1, 2 前三个元素分别存放的 Stdin、Stdout、Stderr 外,剩下的实际都存放的是 Arc<OSInode>。这会导致一个很麻烦的问题,我无法从 fd table 里的 Arc<dyn File + Send + Sync> 调用 OSInode 独有的方法。
接下来就是一通询问 GPT 如何才能安全地将 dyn 指针还原回 Arc<OSInode>,得到的答案思路都是用 Any + downcast。下面是代码实现:
/// trait File for all file types
pub trait File: Send + Sync {
    /// the file readable?
    fn readable(&self) -> bool;
    /// the file writable?
    fn writable(&self) -> bool;
    /// read from the file to buf, return the number of bytes read
    fn read(&self, buf: UserBuffer) -> usize;
    /// write to the file from buf, return the number of bytes written
    fn write(&self, buf: UserBuffer) -> usize;
    /// 提供一个 as_any 方法用于向下转换,便于转换回 OSInode 类型
    fn as_any(&self) -> &dyn Any;
}


impl File for OSInode {
    // 其它方法省略,添加 as_any 方法,对于 Stdin/Stdout 同理
    fn as_any(&self) -> &dyn Any {
        self
    }
}
不过这样做我仍不太满意,因为实际上 downcast 只有 downcast_ref 和 downcast_mut 两类方法,只能还原成引用,没法拿到所有权。并且还原后的结果是 &OSInode,少了 Arc 的包裹,我也是很迷惑。下面的代码里 any_arc.downcast_ref::<OSInode>() 不能改成 any_arc.downcast_ref::<Arc<OSInode>>(),会导致转换失败。
/// YOUR JOB: Implement fstat.
pub fn sys_fstat(fd: usize, st: *mut Stat) -> isize {
    trace!("kernel:pid[{}] sys_fstat",current_task().unwrap().pid.0);
    let token = current_user_token();
    let buffer = translated_byte_buffer(token, st as *const u8, core::mem::size_of::<Stat>());
    let task = current_task().unwrap();
    let inner = task.inner_exclusive_access();
    if fd >= inner.fd_table.len() || inner.fd_table[fd].is_none() {
        trace!("kernel: sys_fstat failed, fd out of range or not opened");
        return -1;
    }
    let file_arc = inner.fd_table[fd].as_ref().unwrap();
    let any_arc = file_arc.as_any();
    let inode = any_arc.downcast_ref::<OSInode>();
    if inode.is_none() {
        trace!("kernel: sys_fstat failed, fd is not an OSInode");
        return -1;
    }
    let result = fstat(inode.unwrap());

    // Copy the Stat to user space
    let src = unsafe {
        core::slice::from_raw_parts(&result as *const Stat as *const u8, core::mem::size_of::<Stat>())
    };
    let mut offset = 0;
    for dst in buffer {
        let len = dst.len();
        dst.copy_from_slice(&src[offset..offset + len]);
        offset += len;
    }
    0
}
os/src/fs/inode.rs 中 stat 的实现,
/// Get the stat of an inode
pub fn fstat(inode: &OSInode) -> Stat {
    let inner = inode.inner.exclusive_access();
    inner.inode.stat()
}
Inode::stat() 核心实现代码,
   /// Get the stat of current inode
    pub fn stat(&self) -> Stat {
        let fs = self.fs.lock();
        let ino = fs.get_inode_id(self.block_id, self.block_offset) as u64;
        let mut nlink = 0;
        let mut mode = StatMode::NULL;
        self.read_disk_inode(|disk_inode| {
            nlink = disk_inode.nlink;
            mode = if disk_inode.is_dir() {
                StatMode::DIR
            } else if disk_inode.is_file() {
                StatMode::FILE
            } else {
                StatMode::NULL
            };
        });
        Stat {
            dev: 0,      // fixed to 0 for lab6
            ino,
            mode,
            nlink,
            pad: [0; 7], // unused pad
        }
    }
rCore 框架 fs 单步调试支持
接下来谈下 debug 需要修改的代码,这一章的官方框架代码同样不支持直接 debug 😅。需要修改 Makefile,fs-img 和 gdbserver 处的代码框架都没有同步更新,
diff --git a/os/Makefile b/os/Makefile
index e649176..f898ced 100644
--- a/os/Makefile
+++ b/os/Makefile
@@ -51,7 +51,7 @@ $(KERNEL_BIN): kernel
 fs-img: $(APPS)
        @make -C ../user build TEST=$(TEST) CHAPTER=$(CHAPTER) BASE=$(BASE)
        @rm -f $(FS_IMG)
-       @cd ../easy-fs-fuse && cargo run --release -- -s ../user/build/app/ -t ../user/target/riscv64gc-unknown-none-elf/release/
+       @cd ../easy-fs-fuse && cargo run --release -- -s ../user/build/app/ -t ../user/target/riscv64gc-unknown-none-elf/$(MODE)/

 kernel:
        @make -C ../user build TEST=$(TEST) CHAPTER=$(CHAPTER) BASE=$(BASE)
@@ -88,7 +88,15 @@ debug: build


 gdbserver: build
-       @qemu-system-riscv64 -machine virt -nographic -bios $(BOOTLOADER) -device loader,file=$(KERNEL_BIN),addr=$(KERNEL_ENTRY_PA) -s -S
+       @qemu-system-riscv64 \
+               -machine virt \
+               -nographic \
+               -bios $(BOOTLOADER) \
+               -device loader,file=$(KERNEL_BIN),addr=$(KERNEL_ENTRY_PA) \
+               -drive file=$(FS_IMG),if=none,format=raw,id=x0 \
+        -device virtio-blk-device,drive=x0,bus=virtio-mmio-bus.0 \
+               -s \
+               -S

 gdbclient:
        @riscv64-unknown-elf-gdb -ex 'file $(KERNEL_ELF)' -ex 'set arch riscv:rv64' -ex 'target remote localhost:1234'
其次当开启 debug 编译后,ELF 文件体积大大增加,fs-img 的大小太小了放不下,由 16 MiB 调整为 128 MiB(你可以在 user/build/elf 里用 du -sh 查看文件夹大小,我记得实际是 124 MiB) 。
diff --git a/easy-fs-fuse/src/main.rs b/easy-fs-fuse/src/main.rs
index 09016c3..52b2fbb 100644
--- a/easy-fs-fuse/src/main.rs
+++ b/easy-fs-fuse/src/main.rs
@@ -55,11 +55,11 @@ fn easy_fs_pack() -> std::io::Result<()> {
             .write(true)
             .create(true)
             .open(format!("{}{}", target_path, "fs.img"))?;
-        f.set_len(16 * 2048 * 512).unwrap();
+        f.set_len(128 * 2048 * 512).unwrap();
         f
     })));
     // 16MiB, at most 4095 files
-    let efs = EasyFileSystem::create(block_file, 16 * 2048, 1);
+    let efs = EasyFileSystem::create(block_file, 128 * 2048, 1);
     let root_inode = Arc::new(EasyFileSystem::root_inode(&efs));
     let apps: Vec<_> = read_dir(src_path)
         .unwrap()
@@ -79,6 +79,7 @@ fn easy_fs_pack() -> std::io::Result<()> {
         let inode = root_inode.create(app.as_str()).unwrap();
         // write data to easy-fs
         inode.write_at(0, all_data.as_slice());
+        println!("Created app: {}", app);
     }
     // list apps
     // for app in root_inode.ls() {
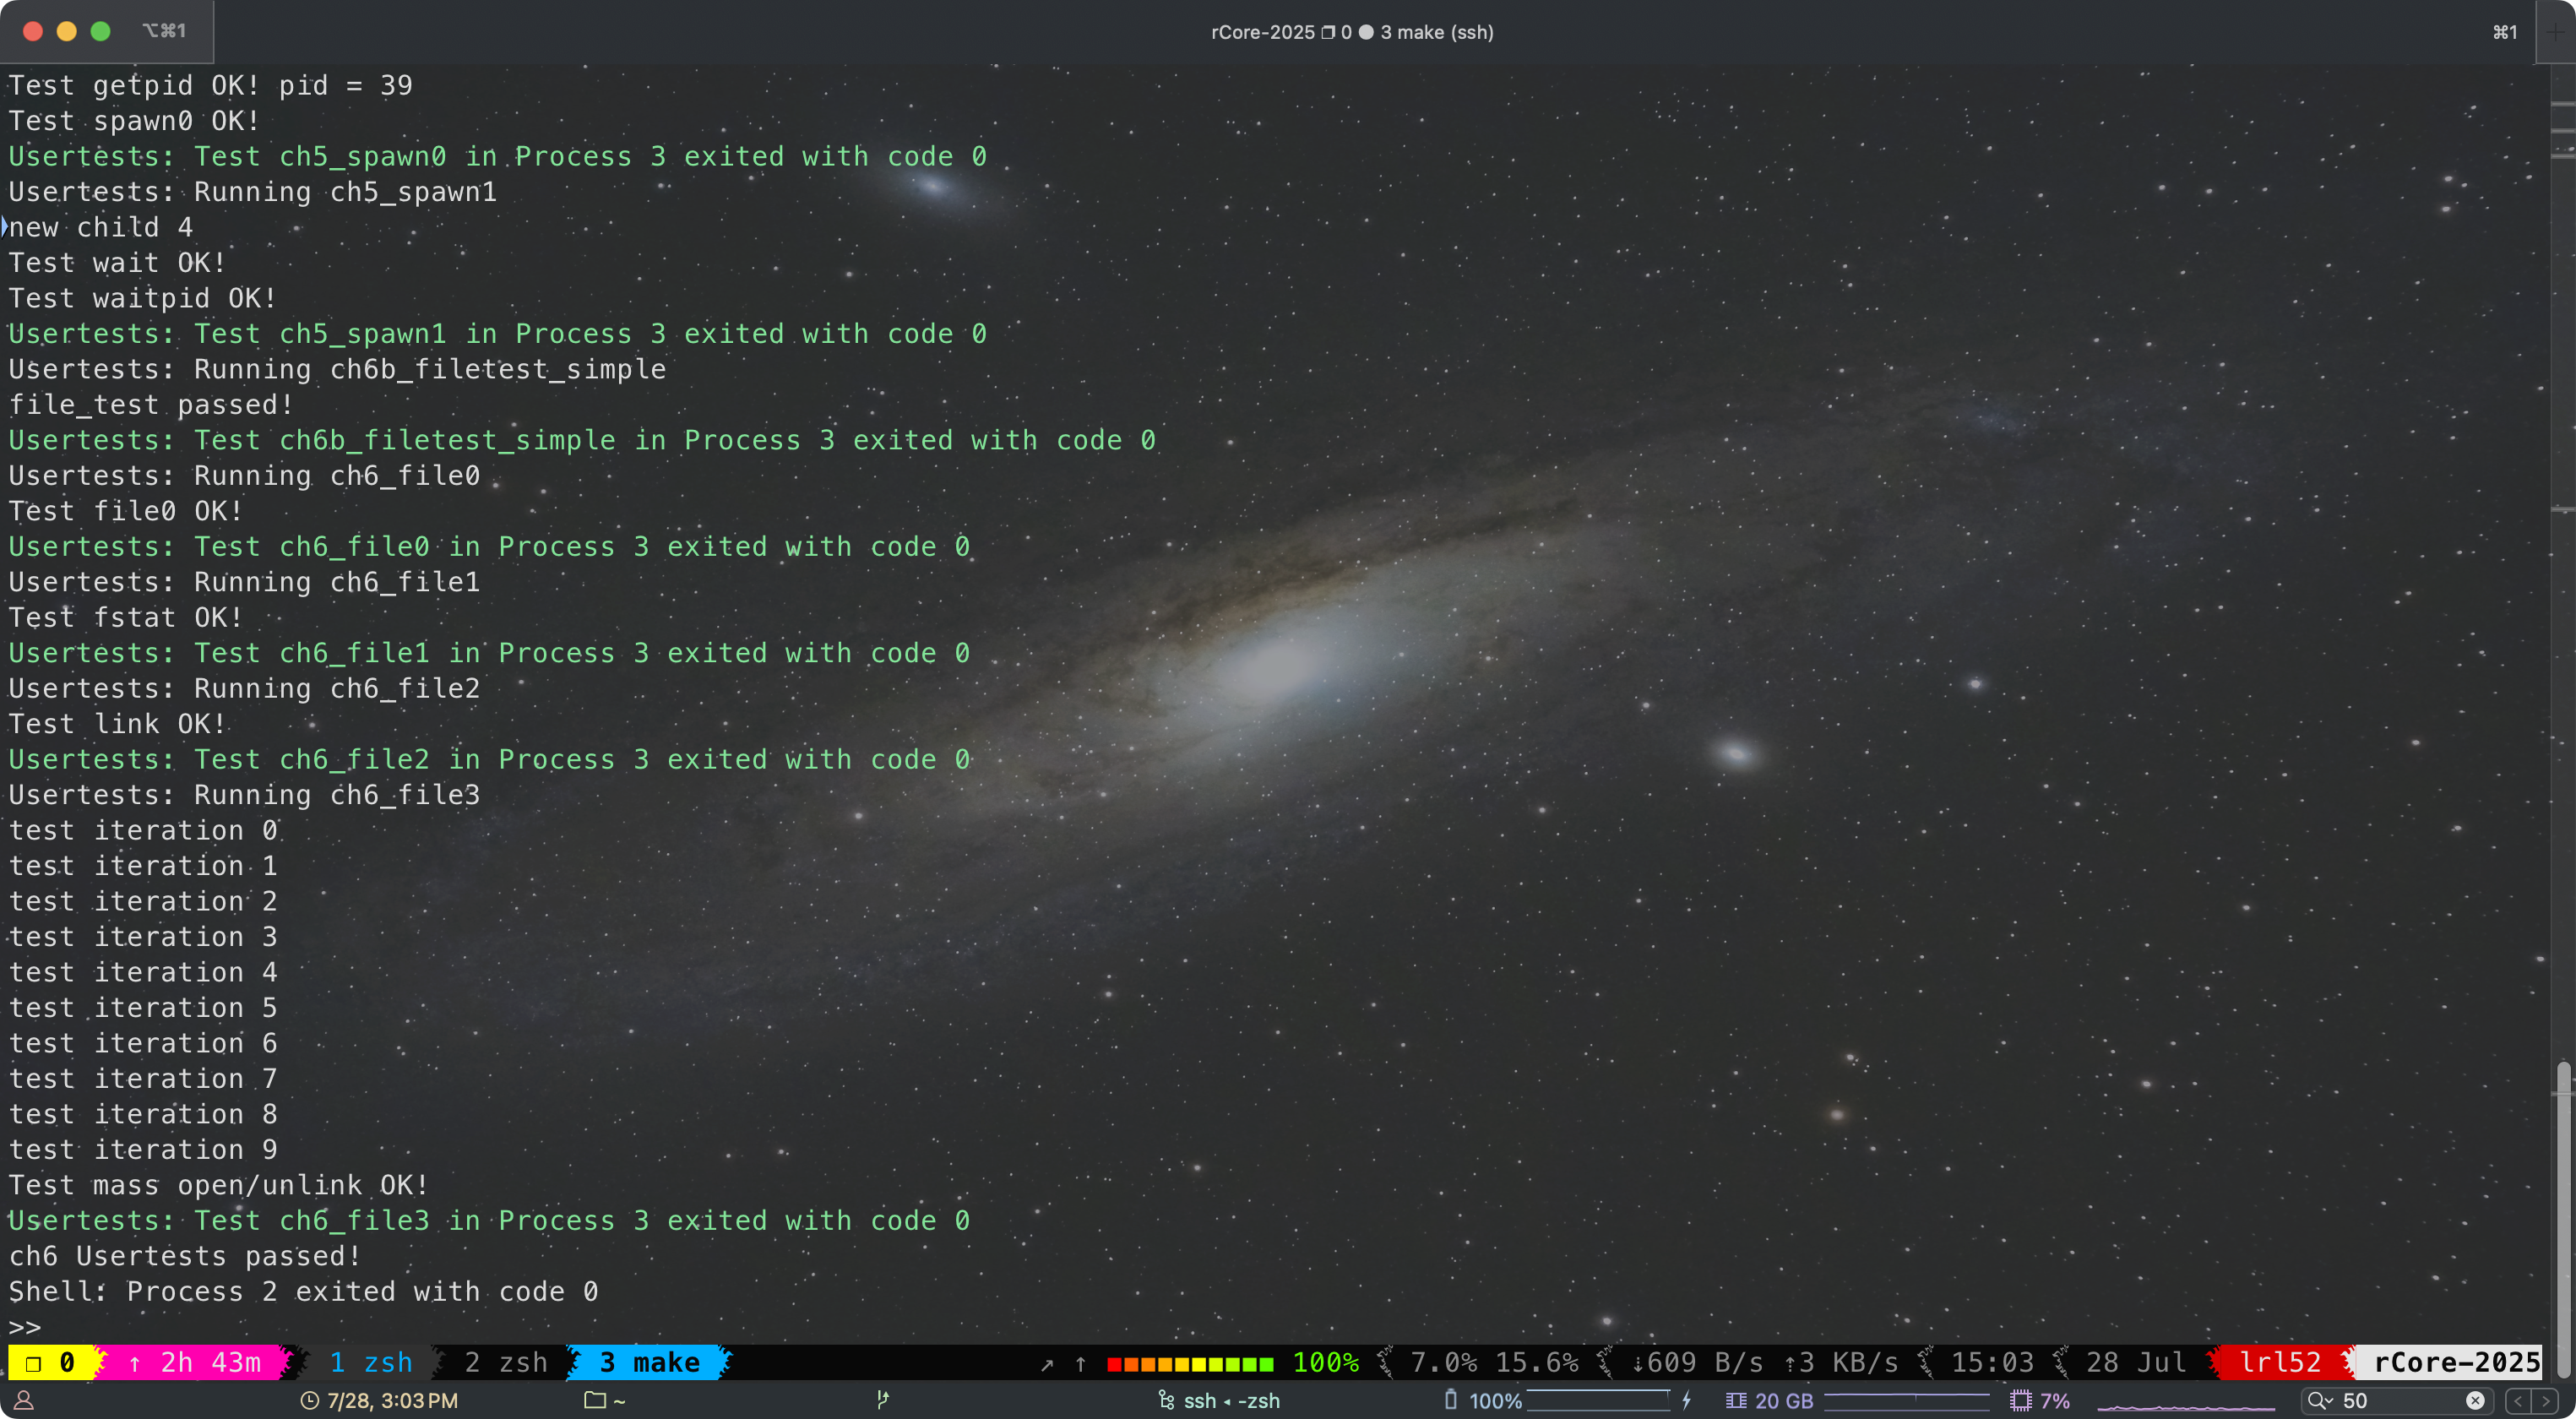
Lab 6 通过。
第七章:进程间通信
这一章遇到了一个编译问题,
error[E0658]: `#[diagnostic]` attribute name space is experimental
  --> /home/lrl52/.cargo/registry/src/index.crates.io-6f17d22bba15001f/zerocopy-0.8.26/src/util/macro_util.rs:54:5
   |
54 |     diagnostic::on_unimplemented(
   |     ^^^^^^^^^^
   |
   = note: see issue #111996 <https://github.com/rust-lang/rust/issues/111996> for more information
   = help: add `#![feature(diagnostic_namespace)]` to the crate attributes to enable
   = note: this compiler was built on 2024-02-24; consider upgrading it if it is out of date
解决办法是更新 rust nightly 工具链版本,这里我经过试验后选择了一个可行版本(nightly-2024-05-20):
rustup show nightly-2024-05-20
同时修改 rCore 根目录的 rust-toolchain.toml,
[toolchain]
profile = "minimal"
# use the nightly version of the last stable toolchain, see <https://forge.rust-lang.org/>
channel = "nightly-2024-05-20"
components = ["rust-src", "llvm-tools-preview", "rustfmt", "clippy"]
第八章:并发
这个 Lab 挺新颖的,实现 OS 教材上著名的银行家算法,经典期末考试题。这个算法实现其实非常简单,不到 30 行代码就搞定了,但是工作量和难度不在于这个算法,而是得思考该怎样才能拿到 Available、Allocation 和 Need 向量。这个问题也是我当初学习 OS 教材时困惑的问题,在实践中 OS 怎么知道所有锁的分配信息。
一开始我想是否可以遍历 PCB 中的 mutex_list 或 semaphore_list 来得到当前锁的状态,这样做似乎只能知道锁是否是 locked,无法知道哪些线程正在请求锁,也不好知道线程持有哪个锁。后来经过思考,我决定自己维护一个死锁检测的数据结构,在每次创建锁、请求锁、分配锁和释放锁的时候更新 Available、Allocation 和 Need 向量,那不就搞定了。
下面给出我的设计和代码。死锁检测代码我放在一个单独的源文件 os/src/sync/deadlock_detect.rs 中。首先是最核心的数据结构和代码,rCore 里 Vec 不能用宏还是挺烦的。
pub struct DeadlockDetectStruct {
    available: Vec<usize>,
    allocation: Vec<Vec<usize>>,
    need: Vec<Vec<usize>>,
}

impl DeadlockDetectStruct {
    pub fn new() -> Self {
        let mut v: Vec<Vec<usize>> = Vec::new();
        v.resize(1, Vec::new()); // Initialize with one thread
        Self {
            available: Vec::new(),
            allocation: v.clone(),
            need: v.clone(),
        }
    }

    pub fn create_resource(&mut self, id: usize, res_count: usize) {
        let m = self.available.len();
        if id >= m {
            self.available.resize(id + 1, 0);
            for v in self.allocation.iter_mut() {
                v.resize(id + 1, 0);
            }
            for v in self.need.iter_mut() {
                v.resize(id + 1, 0);
            }
        }
        self.available[id] = res_count;
    }

    fn add_thread(&mut self, tid: usize) {
        let m = self.available.len();  // current number of resources
        let n = self.allocation.len(); // current number of threads
        if tid >= n {
            let mut v: Vec<usize> = Vec::<usize>::new();
            v.resize(m, 0);
            self.allocation.resize(tid + 1, v.clone());
            self.need.resize(tid + 1, v.clone());
        }
        self.allocation[tid].fill(0);
        self.need[tid].fill(0);
    }

    pub fn request(&mut self, id: usize) {
        let tid = current_task().unwrap().inner_exclusive_access().res.as_ref().unwrap().tid;
        self.need[tid][id] += 1;
    }

    pub fn revoke_request(&mut self, id: usize) {
        let tid = current_task().unwrap().inner_exclusive_access().res.as_ref().unwrap().tid;
        assert!(self.need[tid][id] > 0, "No request to revoke");
        self.need[tid][id] -= 1;
    }

    pub fn alloc(&mut self, id: usize) {
        let tid = current_task().unwrap().inner_exclusive_access().res.as_ref().unwrap().tid;
        self.revoke_request(id);
        self.allocation[tid][id] += 1;
        self.available[id] -= 1;
    }

    pub fn dealloc(&mut self, id: usize) {
        let tid = current_task().unwrap().inner_exclusive_access().res.as_ref().unwrap().tid;
        assert!(self.allocation[tid][id] > 0, "No allocation to deallocate");
        self.allocation[tid][id] -= 1;
        self.available[id] += 1;
    }

    fn detect_deadlock(&self) -> bool {
        let m = self.available.len();  // number of resources
        let n = self.allocation.len(); // number of threads
        let mut work = self.available.clone();
        let mut finish = Vec::new();
        finish.resize(n, false);

        loop {
            let mut found = false;
            for i in 0..n {
                // If thread i is not finished and its needs can be satisfied with current available resources
                if finish[i] == false && self.need[i].iter().zip(&work).all(|(need, work)| need <= work) {
                    for j in 0..m {
                        work[j] += self.allocation[i][j]; // Add allocation of thread i to work
                    }
                    finish[i] = true; // Mark thread i as finished
                    found = true;
                }
            }
            if !found {
                break; // No more threads can be finished
            }
        }

        // If any thread is not finished, we have a deadlock
        return finish.iter().any(|&f| !f);
    }
}
由于 mutex 和 semaphore 的检测方法一致,因此可以在外面加一个统一的封装来管理。mutex_detector 和 semaphore_detector 封装了一层 Option,可以只启用其中一个检测(虽然在这个 Lab 里没有必要)。 add_thread 和 detect_deadlock 这两个函数在 DeadlockDetectStruct 中没有添加 pub 标识,外部只能通过 DeadlockDetector 统一访问,避免产生不一致性。
/// A deadlock detector for mutexes and semaphores
pub struct DeadlockDetector {
    /// Whether the deadlock detector is enabled
    pub enabled: bool,
    /// Detector for mutex deadlocks
    pub mutex_detector: Option<DeadlockDetectStruct>,
    /// Detector for semaphore deadlocks
    pub semaphore_detector: Option<DeadlockDetectStruct>,
}

impl DeadlockDetector {
    /// Create a new deadlock detector
    pub fn new() -> Self {
        Self {
            enabled: false,
            mutex_detector: Some(DeadlockDetectStruct::new()),
            semaphore_detector: Some(DeadlockDetectStruct::new()),
        }
    }

    /// add a thread to the deadlock detector
    pub fn add_thread(&mut self, tid: usize) {
        if let Some(detector) = self.mutex_detector.as_mut() {
            detector.add_thread(tid);
        }
        if let Some(detector) = self.semaphore_detector.as_mut() {
            detector.add_thread(tid);
        }
    }

    /// detect deadlock for mutexes and semaphores
    pub fn detect_deadlock(&self) -> bool {
        if let Some(detector) = self.mutex_detector.as_ref() {
            if detector.detect_deadlock() {
                return true;
            }
        }
        if let Some(detector) = self.semaphore_detector.as_ref() {
            if detector.detect_deadlock() {
                return true;
            }
        }
        false
    }
}
在 ProcessControlBlockInner 中新增一个字段,
/// Inner of Process Control Block
pub struct ProcessControlBlockInner {
    // ...
        /// deadlock detector
    pub deadlock_detector: DeadlockDetector,
}
在 PCB new 和 fork 的时候填入 DeadlockDetector::new() 默认值。⚠️注意,目前不支持 fork 和 exec 调用,因为锁也不支持。
接下来就是 hook 系统调用,创建线程 sys_thread_create 时分配资源,
    // add new thread to deadlock detector
    process_inner.deadlock_detector.add_thread(new_task_tid);
以 semaphore 为例,创建信号量 sys_semaphore_create 时也要分配资源,
@@ -127,6 +172,12 @@ pub fn sys_semaphore_create(res_count: usize) -> isize {
             .push(Some(Arc::new(Semaphore::new(res_count))));
         process_inner.semaphore_list.len() - 1
     };
+    process_inner
+        .deadlock_detector
+        .semaphore_detector
+        .as_mut()
+        .unwrap()
+        .create_resource(id, res_count);
     id as isize
 }
请求 semaphore 时,先 request,如果通过死锁检测,再 allocate,没通过则 revoke request 撤销请求。
@@ -163,10 +222,37 @@ pub fn sys_semaphore_down(sem_id: usize) -> isize {
             .tid
     );
     let process = current_process();
-    let process_inner = process.inner_exclusive_access();
+    let mut process_inner = process.inner_exclusive_access();
     let sem = Arc::clone(process_inner.semaphore_list[sem_id].as_ref().unwrap());
+    if process_inner.deadlock_detector.enabled {
+        process_inner
+            .deadlock_detector
+            .semaphore_detector
+            .as_mut()
+            .unwrap()
+            .request(sem_id);
+        if process_inner.deadlock_detector.detect_deadlock() {
+            trace!("kernel: sys_semaphore_down deadlock detected");
+            process_inner
+                .deadlock_detector
+                .semaphore_detector
+                .as_mut()
+                .unwrap()
+                .revoke_request(sem_id);
+            return -0xDEAD;
+        }
+    }
     drop(process_inner);
     sem.down();
+    let mut process_inner = process.inner_exclusive_access();
+    if process_inner.deadlock_detector.enabled {
+        process_inner
+            .deadlock_detector
+            .semaphore_detector
+            .as_mut()
+            .unwrap()
+            .alloc(sem_id);
+    }
     0
 }
 /// condvar create syscall
释放 semaphore 时 deallocate,
@@ -143,8 +194,16 @@ pub fn sys_semaphore_up(sem_id: usize) -> isize {
             .tid
     );
     let process = current_process();
-    let process_inner = process.inner_exclusive_access();
+    let mut process_inner = process.inner_exclusive_access();
     let sem = Arc::clone(process_inner.semaphore_list[sem_id].as_ref().unwrap());
+    if process_inner.deadlock_detector.enabled {
+        process_inner
+            .deadlock_detector
+            .semaphore_detector
+            .as_mut()
+            .unwrap()
+            .dealloc(sem_id);
+    }
     drop(process_inner);
     sem.up();
     0
至于 sys_enable_deadlock_detect 实现就非常简单了,
pub fn sys_enable_deadlock_detect(enabled: usize) -> isize {
    trace!("kernel: sys_enable_deadlock_detect");
    if enabled != 0 && enabled != 1 {
        trace!("kernel: sys_enable_deadlock_detect invalid argument");
        return -1; // Invalid argument
    }
    let process = current_process();
    let mut process_inner = process.inner_exclusive_access();
    process_inner.deadlock_detector.enabled = enabled != 0;
    0
}
Lab 8 通过,用时刚好两周完成了 rCore 学习和实验,后期有点摆进度拖得比较慢,完结撒花!🌸🌟
总结
rCore 总得来说虽然用了更 modern 的语言和 RAII 的数据结构设计思想,代码也更复杂,但真不如 xv6 简洁而优雅,运行效率就更不用说了,Rust 编译速度也非常慢,对 debug 支持不太好。rCore lab 到最后也是单核模拟多核,没有实现真正的并发。rCore 的 fs 也不支持 crash consistency。相比起有整整 10 个 lab 的 xv6(虽说有两个比较水),rCore 只有 5 个 lab 对学生的工作量要求更小,更适合课堂教学。值得肯定的是 rCore 的创新,rCore 尽管设计思想和 xv6 非常相似,并不是 xv6 的一味照搬和 Rust 复刻,rCore 的 lab 和 xv6 基本是互补的而不是重复的,rCore 实现了 xv6 没有的 stride 调度器,以及死锁检测的银行家算法,这也让我这次学习有新的收获。这次学习 rCore 的主要目的是为了学习和强化 Rust 语法,学习优秀的 Rust 代码结构设计经验,不过似乎 rCore 没有太多用到 Rust 语法特性(?),尤其是异步协程 future。
References
rCore-Camp-Guide-2025S 文档
liamY – 2024春夏OS训练营
2025年春季开源操作系统训练营:第二阶段
https://github.com/plerks/2025s-rcore-plerks
https://github.com/LearningOS/2025s-rcore-eclouder
https://github.com/LearningOS/2024s-rcore-KMSorSMS

友友也是搞操作系统的吗,能否参考一下学习路线,谢谢
可以看下南大 jyy os 课(jyy yyds),然后学习 MIT 6.1810 并完成对应的 lab(参见我之前的文章)。同时科研需要我啃了一点 Linux 内核相关的东西(主要是 mm subsystem),并尝试修改内核。至于这个 rCore 纯粹是为了熟悉 Rust,rCore 本身和 MIT 6.1810 没有本质区别